Developed by Portuguese studio Whalestork Interactive and released on January 5, 2024, The Night is Grey is a point-and-click thriller that sees protagonist Graham stumble upon a young girl all alone while trying to escape a forest full of wolves. Together they must get to safety, but doing so won’t be easy, with the game throwing some fairly difficult puzzles your way. If you’ve found yourself stuck, this guide can help you move forward with a gentle nudge or you can use this walkthrough through to the ending. If you want to know what we thought of the game, you can read our The Night is Grey review.
Chapter 1
When you gain control of Graham, head right to find a shed. Go north to reach the house in the distance, then go inside. Ask all four questions to the girl to learn about fixing the power generator. Examine the nearby Key Cabinet to get a Small Metal Box. Examine the Small Metal Box to get a Key.
Go back outside and inspect the Cigarettes in your inventory. Search the right side of the house’s porch to get the Gas Canister. Head south of the house and then use the Key on the shed on the right. Look inside to grab the silver Duct Tape on the shelf.
Return to your starting location, then head west across the bridge to find the wolves. Go back to the starting location again and head northeast, looking for the curved arrow mouse icon. This leads to the boat dock. There’s a pole with a Cloth on your right as you enter.
Head further to the right of the boat dock to find the Power Generator. It’s out of gas and the Generator Belt snaps when you use the Power Pump Cord, giving you the Broken Generator Belt. Combine Duct Tape with the Broken Generator Belt to get the Generator Belt, then use the Gas Ganister on the Gas Lid.
Flip the Gas Pump Switch, then operate the Power Pump Cord. Time the circular marker with the shaded area three times to power the generator. When power is restored, return to the house to speak with the girl. Take the Butter Knife off the dinner table before you go outside.
Head south of the house to speak to the girl, whose name is Hannah. Speak to Hannah and go inside the shed. Use the light power switch and inspect the Handless Saw at the top of the shed.
You can’t reach it and must speak to Hannah about reaching high places. Take Hannah to the shed to get the Handless Saw. Time your mouse click with the blank space to successfully collect it. After returning, you will also get the Storky doll.
Combine the Butter Knife with the Handless Saw, then use Duct Tape to put them together to get a Saw. Head south of the shed to reach a clearing with poison ivy. Use the Saw on the poison ivy and you will get the Butter Knife back. Head right of the poison ivy to reach a downward ramp with a truck.
Go back to Hannah and tell her you can get going now. Go back to the house and inspect the Notepad on the table, along with the photographs on the wall. Speak to Hannah and ask to borrow a pen to learn about crayons in the trash. Search the Trash Can at the middle of the house’s exterior to get the Red Crayon.
Use the Red Crayon on the Notepad, then return to Hannah and tell her it’s time to go.
Chapter 2
Inspect the back of the pickup truck to get an Electric Connector. Head east of the pickup truck to reach the Old Building. Pick up the Rusty Lever on the ground. Head right of the Old Building to reach an abandoned office and warehouse.
Use the Butter Knife on the Oil Barrel to open it. Search the Tool Box on the table to get the Screwdriver. Check the Lost Diary on the right side of the table to find a photo on the second page. Make sure to read both entries to get the information you need. The first page has a code of 331652. The second entry mentions 14 workers were lost and the correct Power Box amperage is equal to the number of remaining workers.
Look at the Jackets outside the Abandoned Office to get a Red Key. Search the Miners Suit outside the Abandoned Warehouse to find an ID. Look at the back to find the card reader colour code.
Go back to Hannah’s location and head west past the doors to reach a new area: the mine entrance. Check the Broken Oil Lamp to get a Wick and a second Electric Connector. Check the Spare Cables on the ground to find some Wires. Head left and check the Employee Counter to learn 91 workers are on the site.
Head back to the abandoned office and warehouse. Place the Rusty Lever in the Oil Barrel to get the Oiled Lever. Return to Hannah’s location and use the Screwdriver on the truck’s headlight to get a second set of Wires. Head left to find a Power Box. Use the first set of Wires on the Barbed Wire to make it usable. Combine both Wires together.
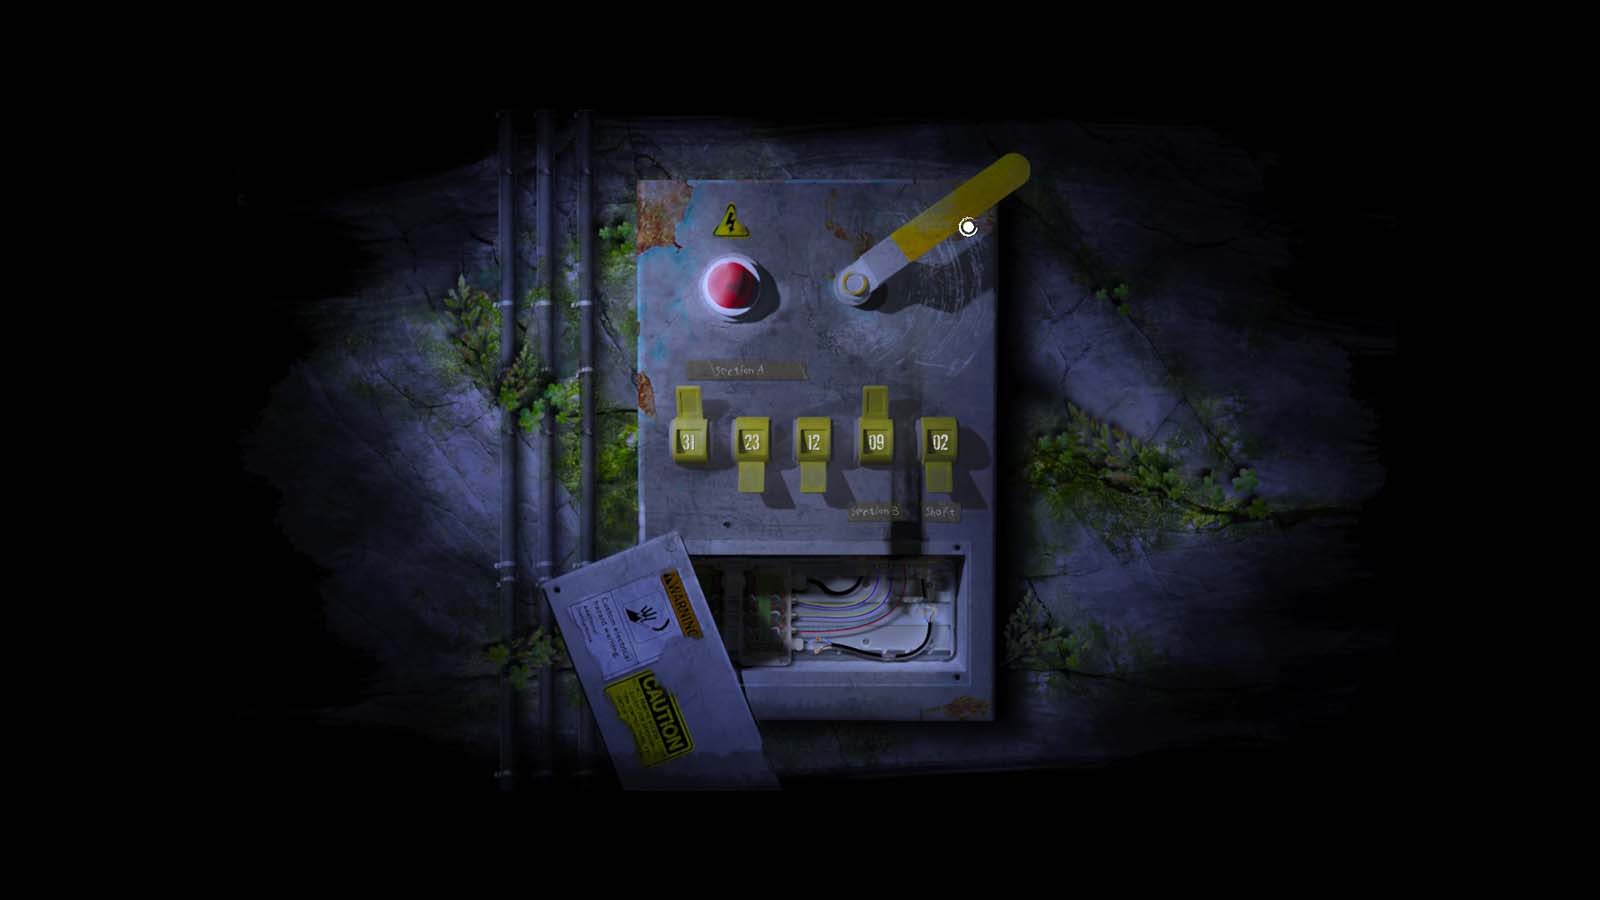
Use the Screwdriver to unscrew the bottom panel, then remove some burned wires. Use your Wires to replace the burned ones, then put the Oiled Lever in place. Look at Section A of the Power Box to control the amperage.
From the notes, the amperage is the number of remaining workers. There were 91 workers on site and 14 left, which means 77 is the amperage you must reach. Here is the correct combination from left to right:
First Switch: Leave it at 31
Second Switch: Flip it down to 23
Third Switch: Flip it down to 12
Fourth Switch: Leave it at 9
Fifth Switch: Flip it down to 2
Pull the Oiled Lever and power is restored in the area. Head back to the abandoned office and warehouse. Check the card reader uncovered by the Jackets after getting the Red Key. This unlocks a panel with numbers that must be selected according to the colour. Use the ID on the card reader before you begin. For reference, the colours are:
#1 – Dark Blue
#2 – Red
#3 – Yellow
#4 – Light Blue
#5 – Pink
#6 – Green
The code you must put in is 331652 from the diary. That means the right buttons are:
#1. Yellow
#2. Yellow
#3. Dark Blue
#4. Green
#5. Pink
#6. Red
You enter a monitoring area in the office. Pick up the Shaft Lifter Key from the ground. Check the Report on the table and look at the Screen. Turn the top (Channel) dial to the yellow dot, then use the bottom (Rotation) dial to turn the camera to the right. Stop when you see what looks like an Electric Connector in a box; click on it.
Leave the Office and head right near the Warehouse. Use the Shaft Lifter Key on the Presser Bender (tool that shapes metal). Wait for the marker to move between the two arrows before clicking. Do this three times to repair the Key.
Head to the Power Box and turn it off. Go to the mine entrance and look for a Door Stopper near the electric fence. Use the Screwdriver on the Door Stopper, then go back to the Power Box and turn the power back on.
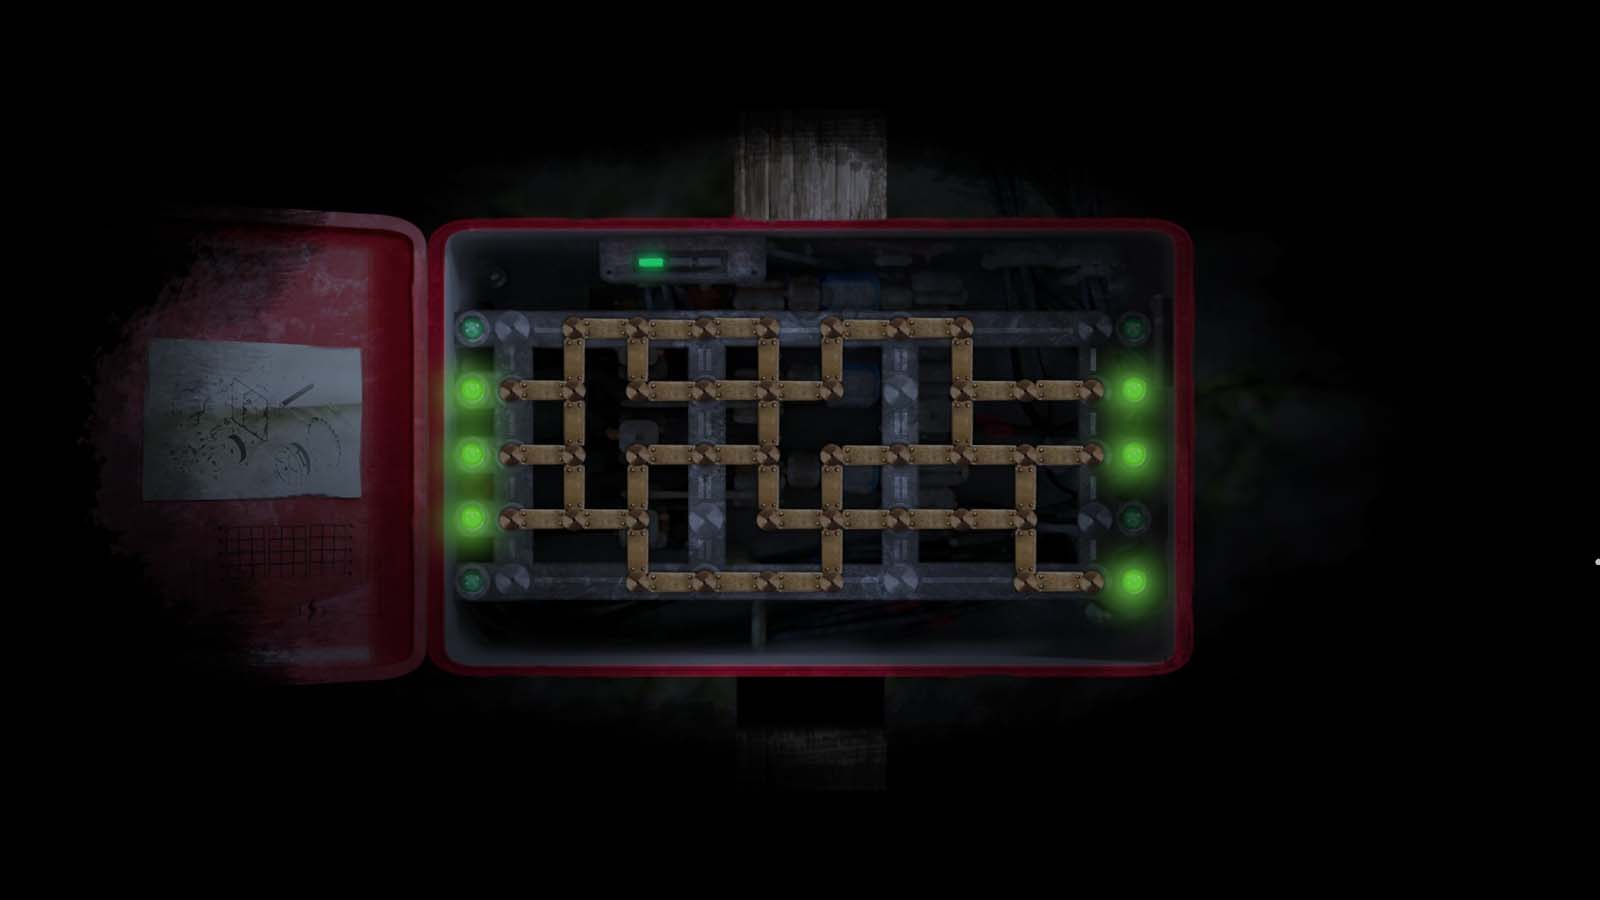
Check near the Connector box to find a Connector Piece which the camera uncovered. Go back to the Connector Box and use the Red Key to open it up. There are two existing Electric Connectors inside but you need three specific connectors. You can’t power it just yet, but place the following from left to right:
First Connector: It has three prongs on the left side towards the middle, none at the top or bottom.
Second Connector: It has four prongs on the left side, except the fourth from the top.
Third Connector: It has three prongs, one on the top, third from the top, and fourth from the top.
Keep the first (left) switch and make sure the connectors work together. Use the Connector Piece you found earlier for the left connector.
Go into the mine which now has light. Head left to the Mine Shaft and use the Shaft Lifter Key on it. Return to Hannah and tell her you are going underground, then return to the Mine Shaft to continue.
Chapter 3
Head left while Hannah is on your back. Drop her off and you return to the starting area. Pick up the Pump Wheel on the bottom left. Look to the left of Hannah to find an Old Mine Map. Go into the entrance left of Hannah, then go right past the Warning Lights.
You reach a room with lots of empty cargo boxes. Check the Wood Cabinet and use the ID Card between the cabinet doors to open it. Grab the Broken Oil Lamp, then move the Old Dossier to find a Valve.
Return to Hannah and get Matches after the conversation. Combine the Wick with the Broken Oil Lamp to get a working Oil Lamp. Go through the entrance next to Hannah and use the Matches on the Rusty Surface on the left barrel. This allows you to start exploring the mines.
The mines have several rooms that look alike and navigating them can be tricky. Use the following directions:
- North
- East
- North
- North
- East
- South
- East
This leads to a room with a blue Valve. You can also read the Journal on the bench if you like.
Leave the room and use the following directions:
- North
- West
- West
- West
- West
- North
This leads to a room with a Pump Wheel. Use the blue Valve to turn the light green.
From this room, use the following directions:
- South
- East
- East
- East
- North
- West
- North
- East
- North
- West
- East
- East
Turn the blue Valve in this room to make the light go green. This is a separate blue Valve; you don’t need to bring the previous one from earlier.
Continue going all the way west through the rooms until you reach the wolves. You must answer correctly or the wolves get closer and eventually eat you. The correct answers are:
- I think you’re already full.
- I just want to help Hannah.
- I’ll do what I need to.
- Monsters.
- It just does.
- It always is.
When you regain control head south. Turn the blue Valve in the room to get a green light. From there, use the following directions:
- South
- South
- East
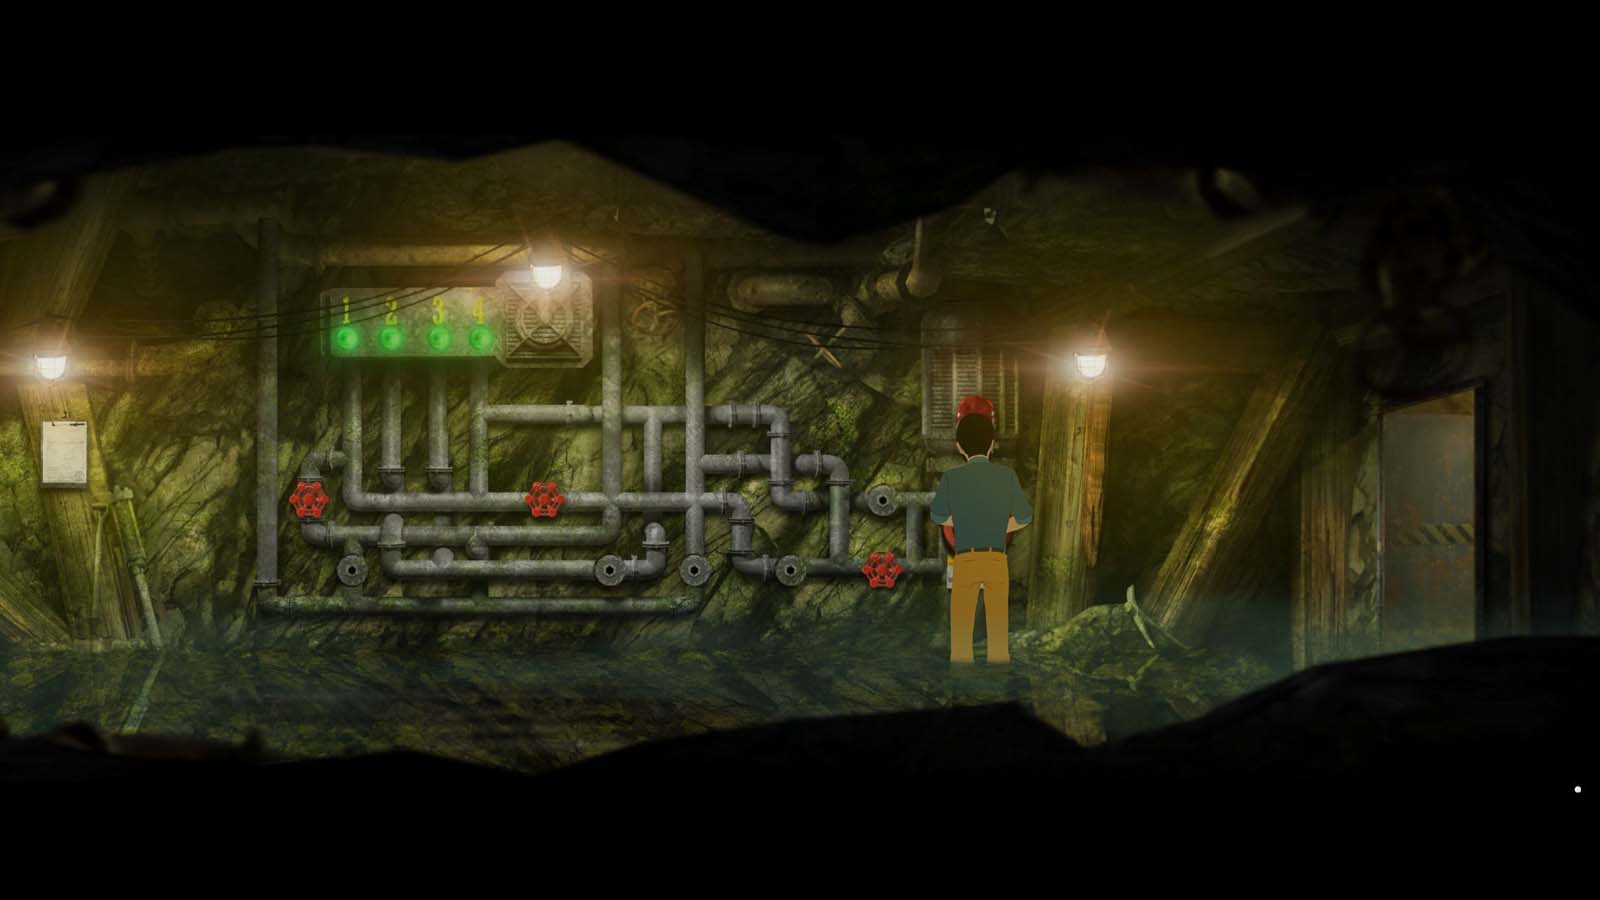
You will reach a room with several pipes. Inspect the Mine Report to get a Key. Use the regular Valve you found earlier, then the red Valve Wheel at the right-most slot. Rearrange the valves to put two valves in the northwest and north respectively. The last valve should be left of the red Valve wheel.
Turn the red Valve wheel, then use the keys you found to open the door. Head through, then go south to reunite with Hannah. Talk to her about being ready to go, then confirm it one more time. Head west to continue.
Chapter 4
Go into the tower room to speak with Hannah. Pick up the Metal Funnel from the counter and the Piggy Bank from the ground. Check the Guitar and inspect it on the bed to get a Plastic Disc.
Check the Ranger’s Journal on the desk to your left. Turn the page, then use the Red Crayon on the blank page. The revealed drawing shows a disc under a bench.
Talk to Hannah, then go outside the room. Check the Power Box outside the room and turn on all the lights. After checking, go down the stairs to Hannah’s right.
Head to the right to move to a map of the national park. Return to the tower when Hannah blows her whistle. Return to the map of the national park, then look at the Paper Drawing to its right. Use the Piggy Bank on the Big Mossy Rock to the northwest, then inspect the Broken Piggy Bank for a Coin.
Head left to reach the park main gate. Use the Power Plug to the right of the main gate, then use the Coin on the soda machine to get a Soda.
Return to the map of the national park and go south to reach a bee farm. Grab the Smoke Pump in the bottom right corner. Go back to Hannah and give her the Soda to get the Empty Can. Go back to the map of the national park and go right for a dead end. Use the Empty Can with the Nails On Pole to get Can With Holes.
Return to the bee farm and combine the Can With Holes with the Smoke Pump. Combine those items with the Metal Funnel. Use Duct Tape to bind all three together to get a Bee Smoker. Use the Old Mine Map with the Bee Smoker to add some fuel. Use Matches with the nearby Rusty Surface, which drives off the bees. Head left of the beehives to reach another area where a voice calls out to you near the park toilets.
Agree to help by getting some toilet paper. Before you leave, check under the park bench for a Plastic Disc.
Return to the bottom of the tower and interact with the Wood Cabinet. You must unlock a wooden combination lock. The correct answer for both rows (from left to right) is:
Top Row: Press the Crab and the Anchor
Bottom Row: Press the Flag
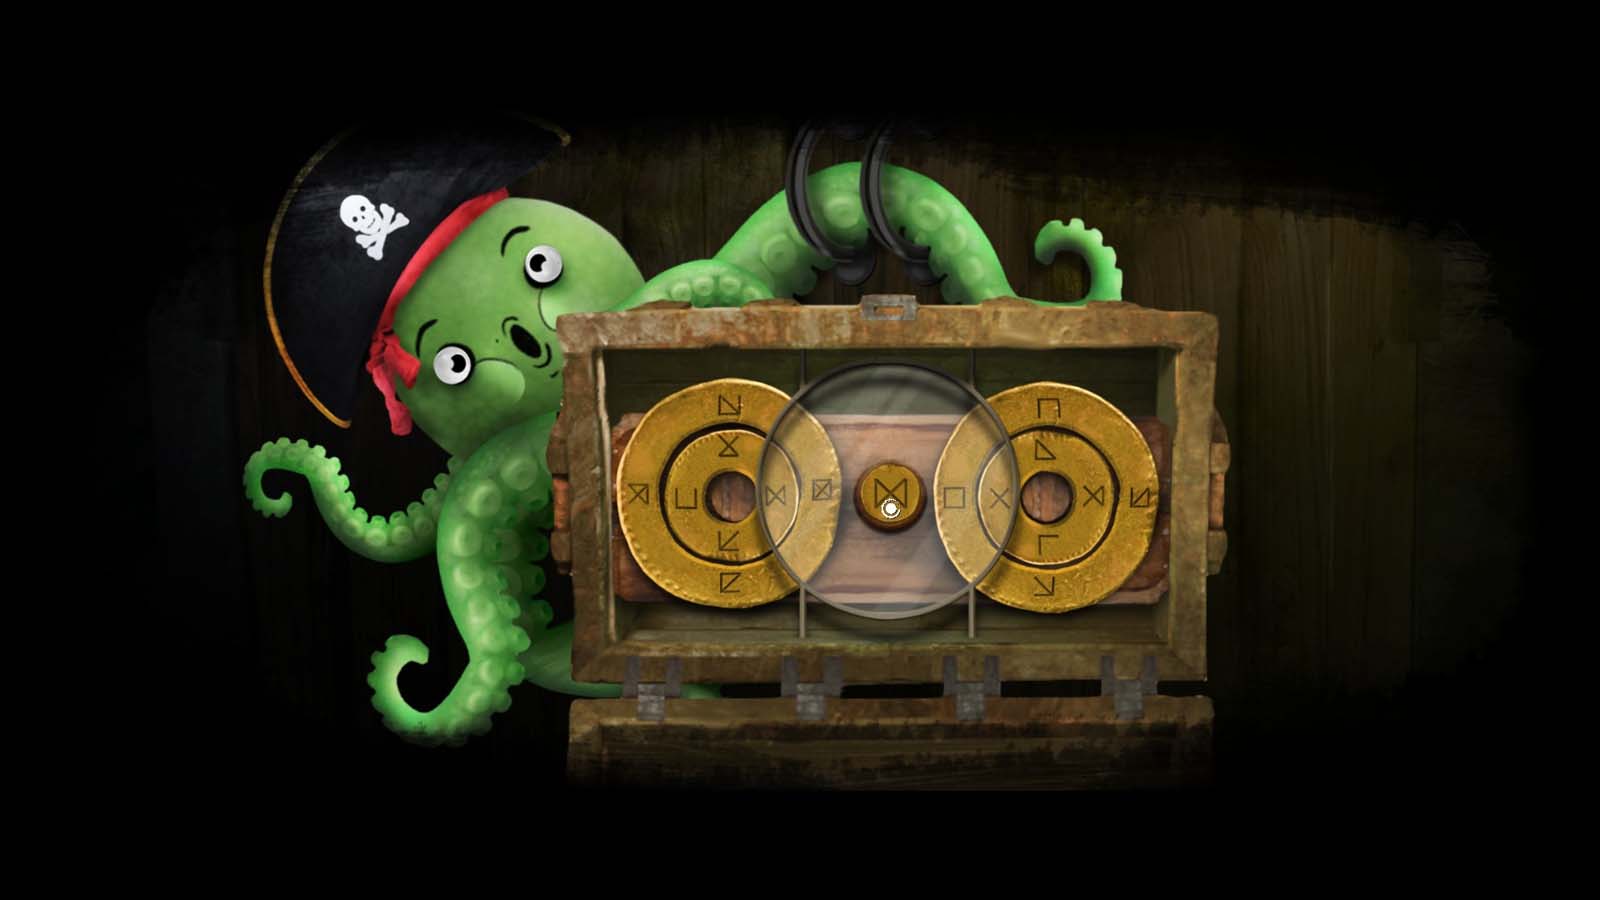
Once all the correct answers are pressed, press the Heart twice to open a compartment. Insert your two Plastic Discs, with the smaller one going in the left circle and the larger one going in the right.
Rotate the left discs until the inner circle has an hourglass and the larger circle has a box with an X, both facing left. The right discs should have the inner circle with an X and the outer circle with a square, both facing right. Press the central hourglass when you are done but you get nothing.
Return to the park toilets west of the beehives to get the Keys. Go back to the tower to speak to Hannah. Go back down the stairs and head east three times. Head north to re-enter the mines then head east to enter the vent control room.
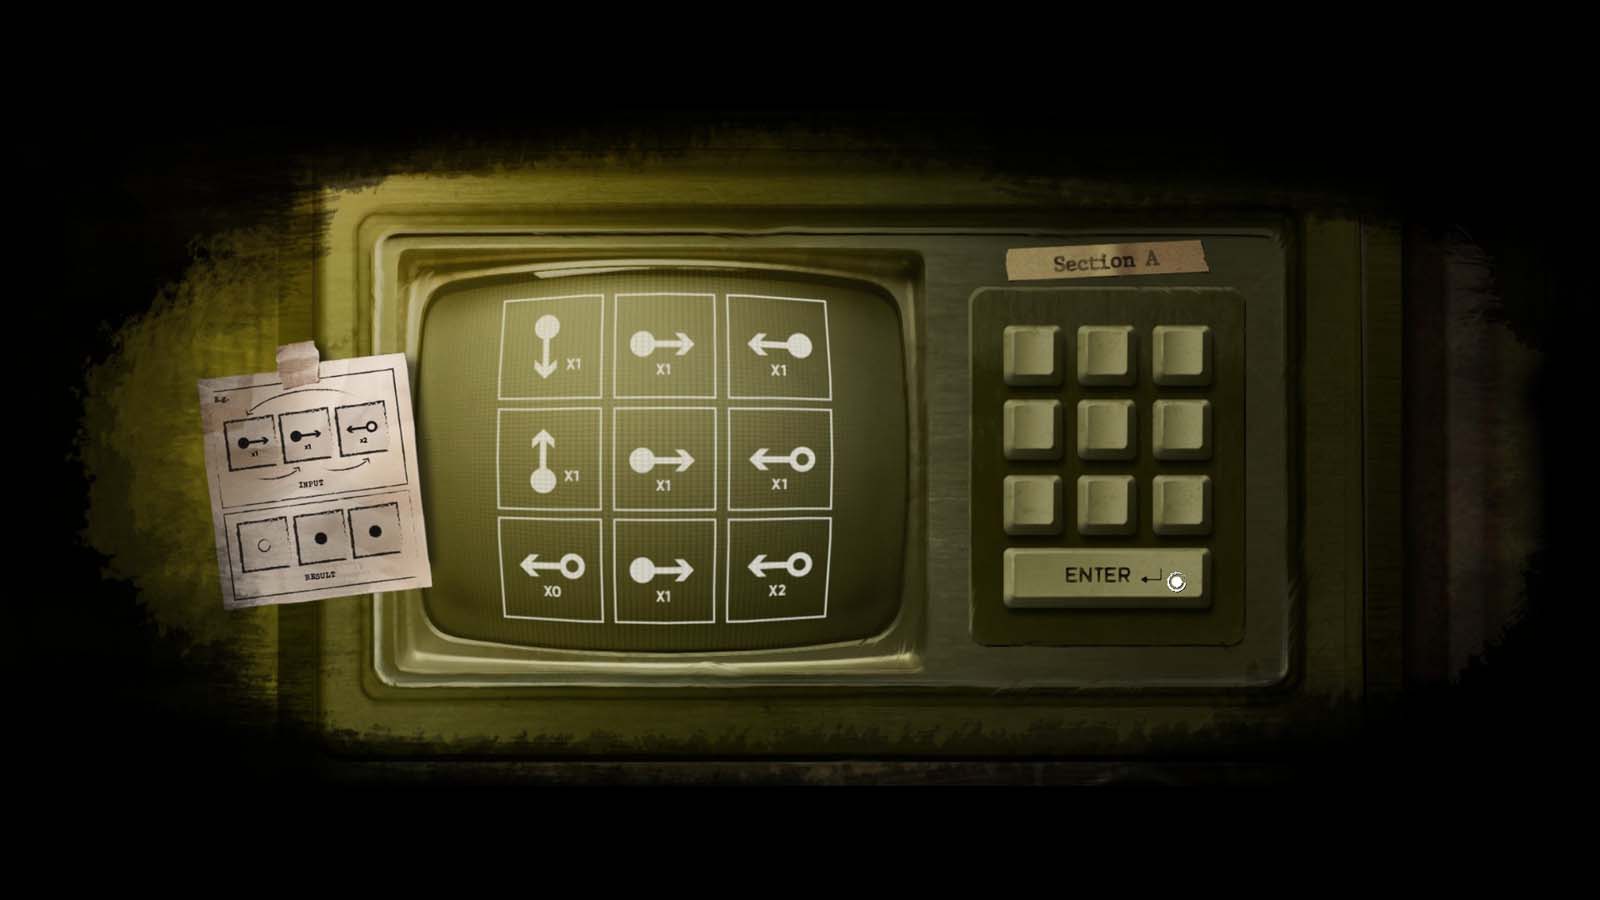
Check the Vent Schematics on the wall, then start with the left vent control. You need a 3×3 grid with the correct layout. From left to right, the answers are:
First Row: Solid arrow pointing south x1, solid arrow pointing east x1, solid arrow pointing west x1.
Second row: Solid arrow pointing north x1, solid arrow pointing east x1, hollow arrow pointing west x1.
Third Row: Hollow arrow pointing west x0, solid arrow pointing east x1, hollow arrow pointing west x2.
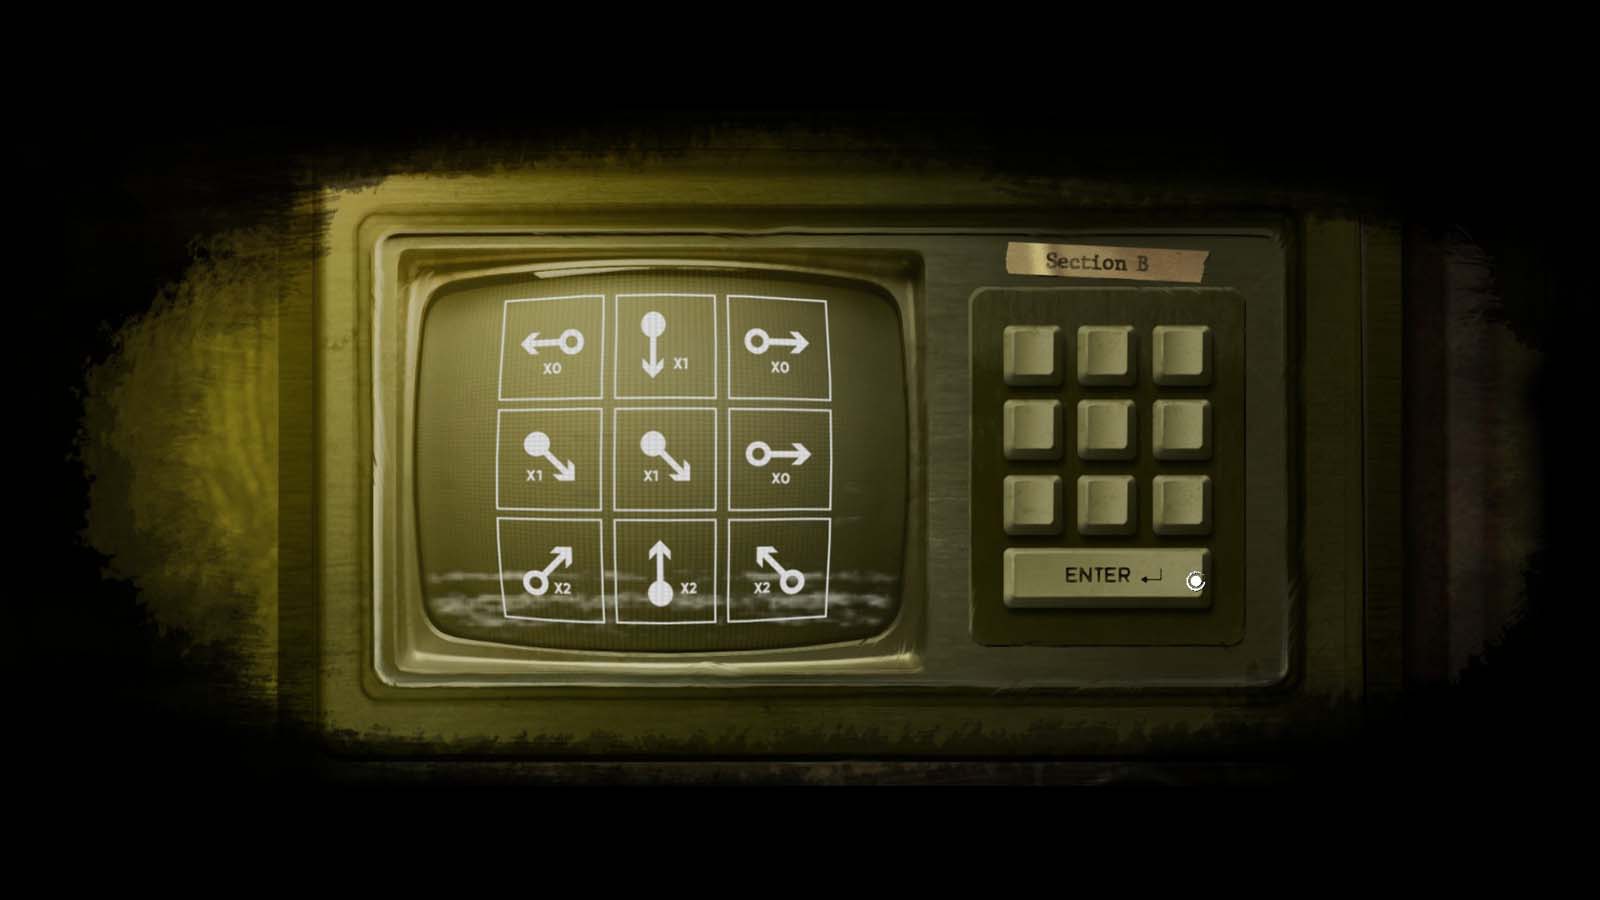
Move to the central vent control and use the following arrows from left to right:
First Row: Hollow arrow pointing west x0, solid arrow pointing south x1, hollow arrow pointing east x0.
Second Row: Solid arrow pointing southeast x1, solid arrow pointing southeast x1, hollow arrow pointing east x0.
Third Row: Hollow arrow pointing northeast x2, solid arrow pointing north x2, hollow arrow pointing northwest x2.
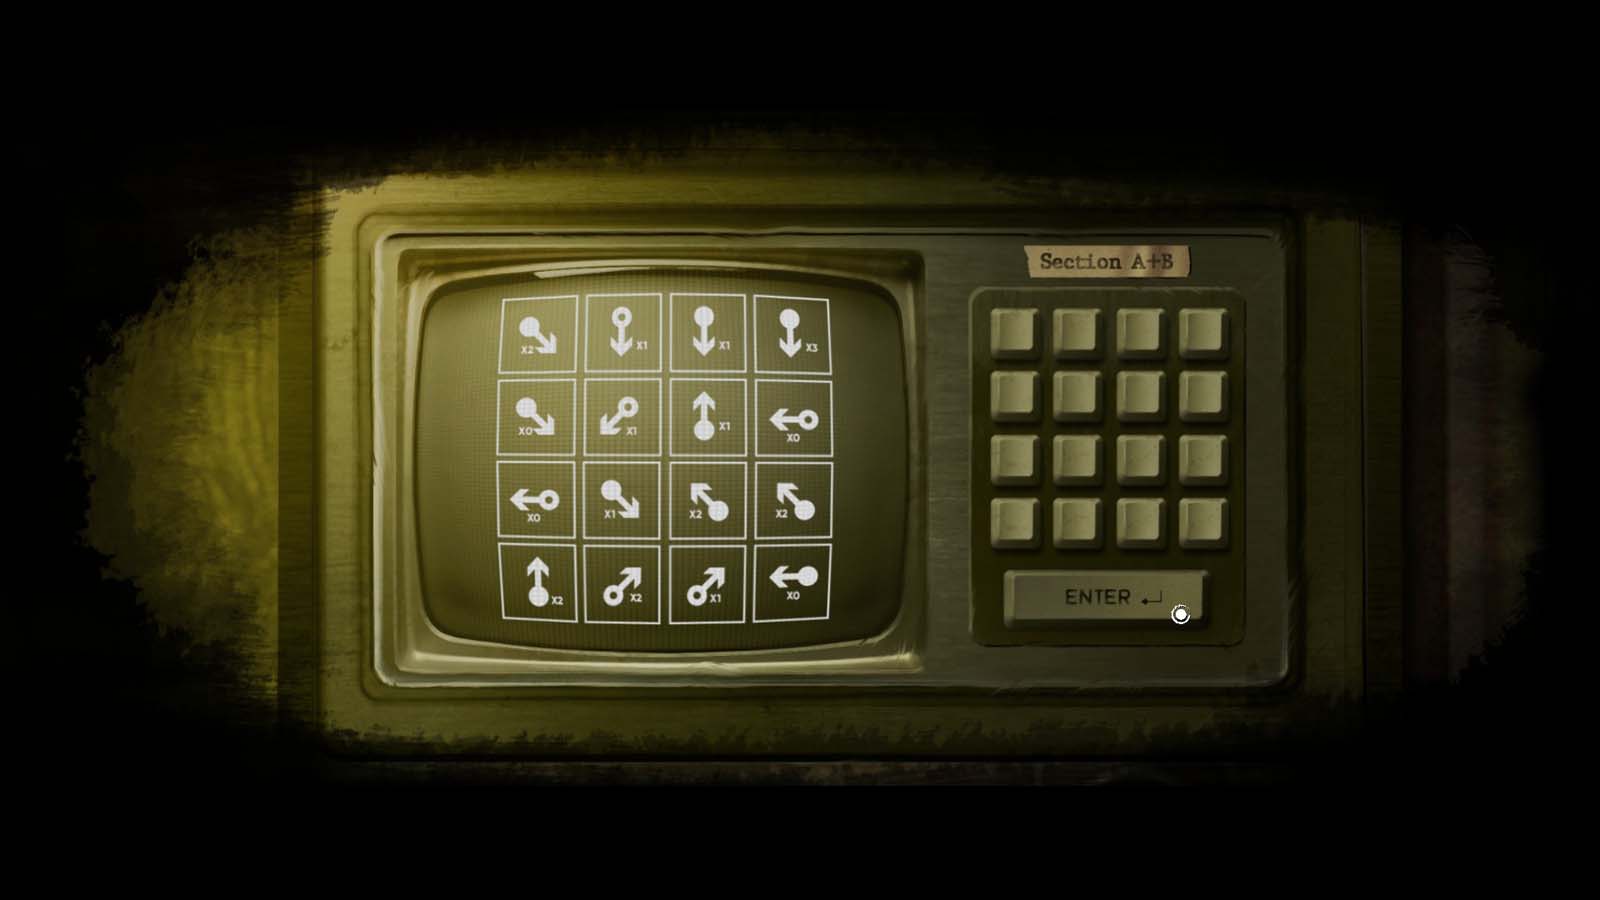
Head to the right vent control. This puzzle has a 4×4 grid and combines both Section A and B together. Here are the following answers from left to right:
First Row: Solid arrow pointing southeast x2, hollow arrow pointing south x1, solid arrow pointing south x1, solid arrow pointing south x3.
Second row: Solid arrow pointing southeast x0, hollow arrow pointing southwest x1, solid arrow pointing north x1, hollow arrow pointing west x0.
Third Row: Hollow arrow pointing west x0, solid arrow pointing southeast x1, solid arrow pointing northwest x2, solid arrow pointing northwest x2.
Fourth Row: Solid arrow pointing north x2, hollow arrow pointing northeast x2, hollow arrow pointing northeast x1, solid arrow pointing west x0.
Use the Elevator Brake Control on the right, then leave the room. Go into the now-open door also on the right and go to the end.
You automatically teleport to the park main gate. Use the Keys on the Info Booth Door, then pick up the Guards Key on the ground. Use the Guards Key on the main gate to go through. Use the Cloth on Hannah.
Chapter 5
Head to the right and pick some Red Peppers from the bush. Continue going right and after the conversation at Syren’s tents, ask why you were called over. Head north and speak to Otto, then head to Otto’s right to find a Vent Hatch. You must fill the Vent Hatch with three Leaf Piles.
The first Leaf Pile is close to Otto’s feet. Go back to Syren’s tents and search the bottom of the area for the second. The final Leaf Pile is back towards the beginning where you found the Red Peppers.
After filling the Vent Hatch, return to the Syren tents. Take the Key off the info board and head southeast to reach the main tent. Move the wooden crate and use the Key to unlock the tent.
Inside the tent, take a Test Flask nearby and read the PH Report on the left desk. Go back to Otto and head left to enter Graham’s house through the Lodge Door. Get your Lodge Keys back from Otto, then go inside.
Take the Corkscrew from the counter and put the Red Peppers into the Metal Pot on the stove. There is a Journal you can read and some Hanging Photos you can look at. Return to the main tent and use the Test Flask with the Water PH Reader on the left desk.
Go back inside the tent and grab another Test Flask. Return to Otto and grab the Rusty Nails near his workbench. Return to Graham’s lodge and put the Rusty Nails into the Metal Pot. Return to the tent and use the Test Flask with the Water PH Reader.
Chapter 6
Go back into the tent and grab another Test Flask. Leave the tent through the front and head to the right to reach the lighthouse. Inside the light house, check the Desk Drawer on the left and read the journal. You can also inspect the photos on the desk and walls.
Head north and go through the door. Use the Metal Door and inspect the Door Dents at the bottom to start kicking it open. Use the Metal Door again to climb to the top.
Use the Rope on the left to get a Wine Bottle. Open the Wine Bottle with the Corkscrew and then combine the Bottle with the Test Flask to get Wine Flask.
Return to Otto and select the Hammer near him. Give him the Wine Flask to get the Hammer. Go to Graham’s lodge and use the Hammer on the Boarded Door to the west. Return the Hammer to Otto.
Go through the Boarded Door to find a ship. Get the Boat Paddles by going inside the ship. There’s also a Photo on the wall. Leave the ship and head back to the lighthouse. Look to the right to find a boat at the dock. Use the Boat Paddles on the dock to finish the game.
Great stuff, credits should be now rolling for The Night is Grey. Please let us know in the comments what you think about the game and if this guide proved useful.
Victor is a big fan of RPGs and enjoys helping people through areas that they struggle in. He also spends far more time on them than is probably healthy for a single individual. If he's not playing some RPG, you can often find him playing D&D or training MMA at the gym


