Releasing on January 12, 2023, in Australia, Children of Sileentown is a dark point-and-click adventure inspired by Tim Burton from Elf Games, Luna2 Studio and Daedalic Entertainment. If you’ve found your way here, you’re likely playing the game and have hit a snag – but don’t stress, our walkthrough will help you on your journey. If you wish to know what we thought of the game, you can read our Children of Silentown review.
Chapter One
When you gain control of Lucy, move over to the Ball and take it. Go into your inventory, select the Ball, and move to the boy asking for it. The Ball icon should be above your head to confirm you have it.
You move to a scene where Blue (the boy from earlier) wants to show off. You can choose between two options:
- Cut it out and play by the rules. (Sunny likes this)
- Show me what you got! (Blue likes this)
Lucy will follow her mother home and help her for dinner. Go south to the kitchen and talk with your mother to learn you need a saucepan. Go near the entrance and look to the right to find the kitchen pots. Highlight the Saucepan to select it and put it in your inventory.
Select the Saucepan in your inventory and hand it to your mother, who asks you to put more wood in the fireplace. Go to the chest northwest of the kitchen, but your pet Squinty is on top and refuses to move.
Go upstairs (northwest) and your destination is the room on the right with a cat picture. Before you go in, inspect the nearby mirror to get a Sticker and the Egghead Lucy achievement.
The door with a cat picture is Lucy’s room, and you immediately pick up Lucy’s Diary upon entering. This allows you to view Lucy’s thoughts as you proceed through the adventure. Grab the Toy Mouse in the middle of the room. Head back downstairs to the chest, select the Toy Mouse, and use it on Squinty.
Lucy will gain a Note after the event, which can be used to create Melodies. A Melody can be used on your adventure, and it’s worth finding the different Notes to do so.
With Squinty gone, take the Firewood from the chest, select it, and throw it into the fireplace. Talk to your mother again and she wants you to grab some sausage in the cellar. Since it is dark, grab a Candle from the table near Lucy’s father, then go to the fireplace to light it. Head down to the cellar (opposite the stairs going up).
In the cellar, put the lit candle on the nearby candle holder. Step below the sausages, using the brown step to position yourself underneath. This allows you to grab the Sausages. Leave the room and a scene will play.
Hand the Sausages to Lucy’s mother and she will ask you to get salt from the shelf. It is too high up, and you need the Stool. The Stool is close to the rack where you got the Saucepan. Select the Stool and use it on the shelf with the Salt (opposite the Stool) to play a scene.
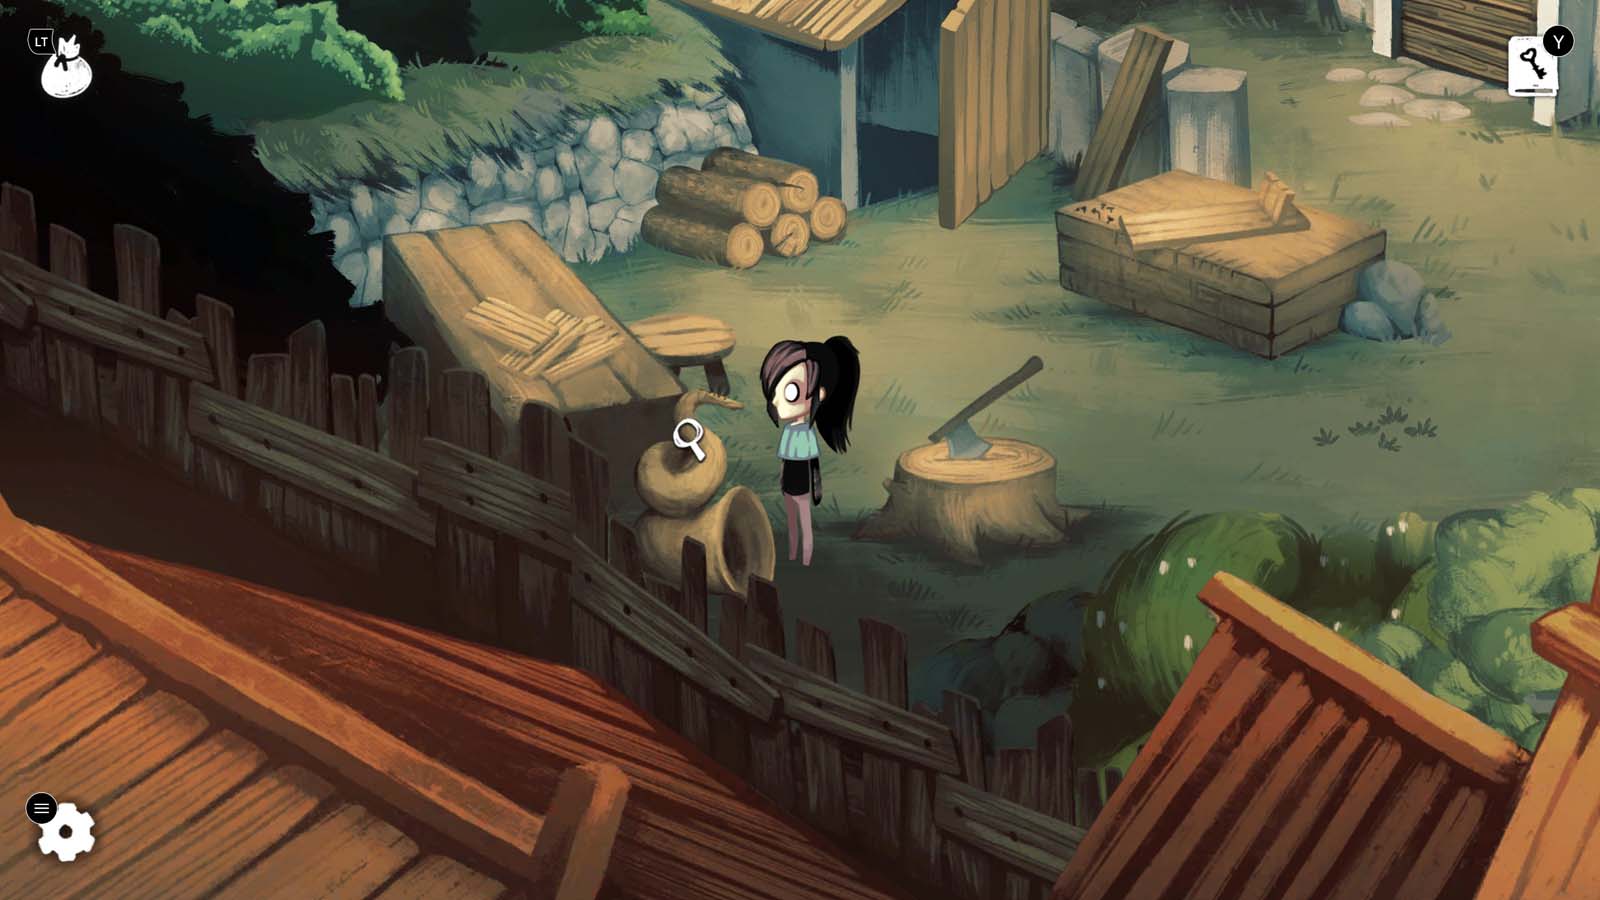
Lucy will be allowed to go outside. Head southwest to the woodworking area and inspect the trumpet-looking object to get a Sticker and the Trumpet achievement.
Head to the middle of the area and speak to the old lady. She will give you a Sticker and the Lucky charm achievement. Head northeast and inspect the door to get a Weird Handle. Use the Weird Handle on the Bell next to it to get a Note.
Getting the Note will trigger a scene. Once Lucy returns home, you will get another Note. You will also begin Chapter 2.
Chapter Two
When the option to ‘Draw’ appears, select it repeatedly. Choose to Stand Up, then Get Closer. Despite the warning, you must choose ‘Turn’.
Back in Lucy’s Room, inspect the cabinet to find a Broken Slingshot on top. Check the Mirror when you leave the room if you didn’t get the sticker earlier.
Head downstairs and you are forced to get dressed again (you couldn’t do it earlier). Your clothes are on the right side of the cabinet. Go back downstairs, but don’t speak to Lucy’s mother just yet. Check the chest in the middle of the room to get a Sticker and the Hairball achievement.
Talk to Lucy’s mother and grab the Grocery List from the table. Leave the house and you will meet Sunny, one of Lucy’s friends. Talk to her and promise to help, then check the clothing line outside Lucy’s house. You will get Tights and learn how to combine items. Combine Tights with the Broken Slingshot to get a Sling. Head southeast to go to town.
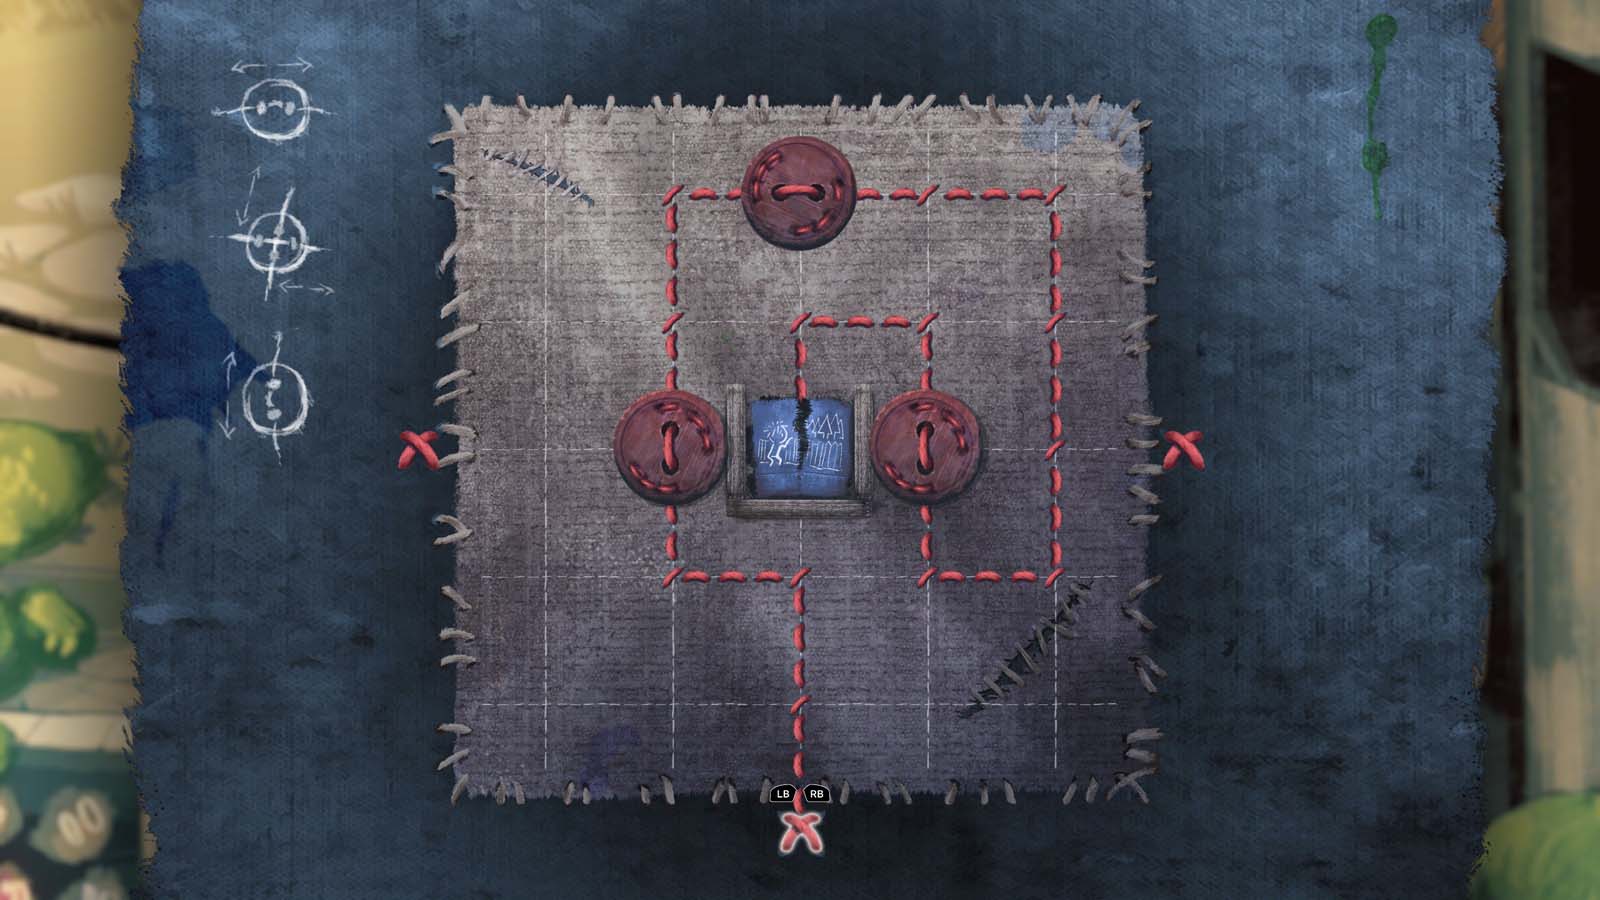
When you arrive, head southeast to find Blue. His ball is stuck and he can’t get to it. Use the Sling with the ball to knock it down. You get a Note for your troubles. If you grabbed other Notes previously, you will get the Children’s Song. This starts a tutorial about using songs on people, and you can test it on Blue. You also learn about sewing thoughts together, pushing the thread through all the buttons and finally the ripped thought. Move the strings in the following directions while starting from the bottom:
- North x2
- West
- North x2 (through the first button)
- East x4 (through the second button)
- South x3
- West
- North x3 (through the third button)
- West
- South
This is the path that works for Blue’s thoughts:
Head northeast of the well in the centre to find Silver, who will not let you pass because you are a girl. Getting past Silver is required, but take a look at the ingredient list now.
You need to get:
- Bread
- Mushrooms
- Veggies
- Water
The order you obtain them isn’t important, but you can’t obtain the Veggies without getting Bread first.
Water
Head to the well in the centre. Grab the nearby Bucket, then use the Bucket on the well to get Water.
Mushrooms
From the well, head north on the path leading to the red forest. Head all the way to the right and check the plants by the gate to get Mushrooms.
Bread
Head southwest to the bakery (with the bread sign pointing the way). Search the nearby box when you arrive to get a Sticker and the Broken toy achievement. Check the Box again to add it to your inventory.
Return to Lucy’s room and check the drawers to find Squinty inside. Use the Box on Squinty, then leave the room. Return and check the box to get a Note.
Head all the way left and check the Spyglass to get a Sticker and the Spyglass achievement. Try to knock on the bakery door (with the bread picture above it) and it won’t open. Check the grate to the left of the door to find the Baker looking at a picture.
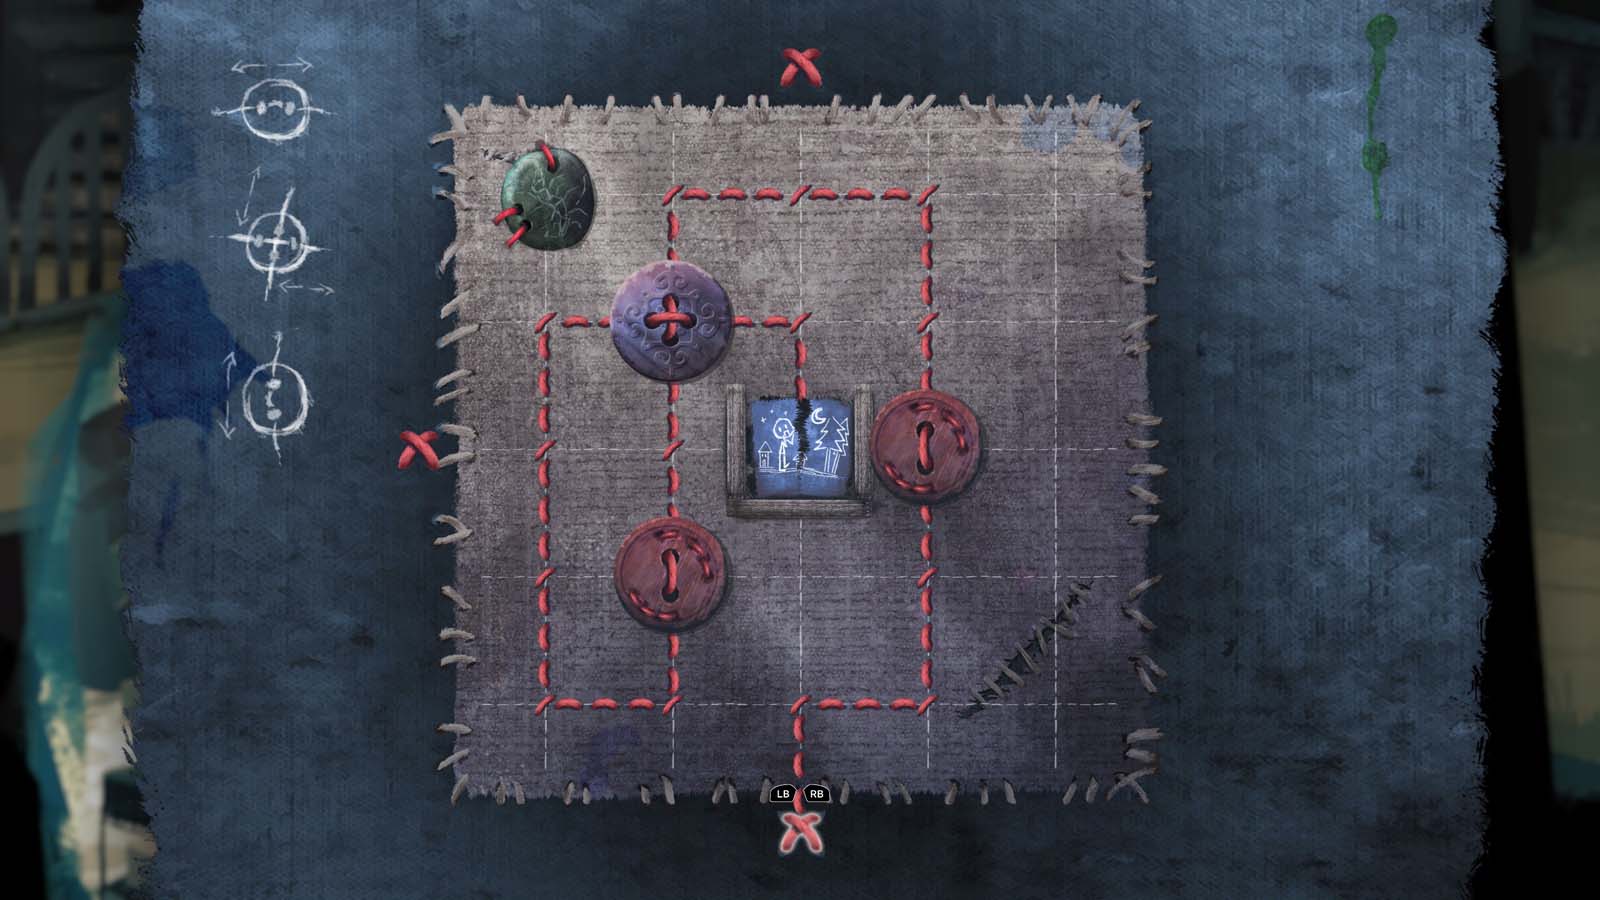
Use Lucy’s first song and repair the baker’s thoughts. Start from the south, and take the following path:
- North
- East
- North x4 (through the first button)
- West x2
- South x4 (through the second and third button)
- West
- North x3
- East x2 (complete the second button
- South
You get some Bread afterwards, along with some Candy.
The path looks like this:
Veggies
From the well, head south past the fisherman and follow the stone stairs going upwards. Speak with the lady outside the house, but she can’t get in to get your vegetables because the door is missing a knob.
Head to Silver and give him the Candy you got from the baker. Silver asks if you believe Blue’s stories, and you can choose:
- No, just asking. (Silver likes this)
- I do.
Check the barn window near Silver to climb in. Look out the window on the right. You have two options to get the doorknob:
- Tell Olivia.
- Let it go. (Silver likes this)
Telling Olivia solves the problem immediately without needing a puzzle. If you choose not to report to Olivia, use your Sling to shoot at the wooden ramp. You get the Knob which you can give to Olivia, but your Sling breaks.
Leave and return to get a Sticker and the Mysterious Footprints achievement. Report back to Sunny, then go back to Olivia. Speak to Olivia or use the Knob on her if you didn’t report the kids. You get the Vegetables.
All the ingredients will be wrapped in a Shopping Bag once they are present. Return to Lucy’s mother and use the Shopping Bag on her to proceed.
You will get five Sandwiches. Hand them out to everyone (not the group of kids just yet). When you hand a Sandwich to the central couple, they will insult Lucy’s mother. You have two options:
- React
- Let it go
When talking to the Woodworker and his dog, don’t forget to give the dog a Sandwich (one of the adults won’t take it). This gets you a Sticker and the Puppy achievement.
Report back to Lucy’s mother and you will hang out with your friends. It’s your turn to tell a scary story. You have a variety of options when telling the story.
First set:
- Stealing corncobs
- Hiding shoes
- Playing hide and seek
Second set:
- The cemetery
- The shoemaker’s shop
- The farmer’s field
Third set:
- A bear trap
- A scarecrow
- A banana peel at the entrance
You can ‘fail’ the story if Raven (one of the girls) doesn’t think it makes sense. A combination that does make sense is:
- Hiding shoes
- The shoemaker’s sop
- A banana peel at the entrance
Back at home, you will get a Note, followed by another Note after the scene.
Chapter Three
Select the options as they appear (Search, Ask For Help, Take A Look, Ask, Take A Look, Take A Closer Look, Reach Out).
When you wake up, you will get a Message and a Doll. Your next goal is to make some tea. Grab some Cookies from the table before you start searching.
Check the cabinet where Squinty is sleeping to find the spice rack. The labels are torn, and you must put them back together. If you put the label piece in the right spot, it will lock into place and can’t be moved again. If it’s wrong, you can move the piece until it’s in the right spot.
[[Children of Silentown Chapter Three 1]]
You get Tea Leaves after finishing the puzzle.
Grab the Saucepan from the rack (same as you did in Chapter 1). Head southeast and use the Saucepan on the bucket of water. Use the filled Saucepan on the fireplace to get Hot Water, then combine the Tea Leaves with it to get Tea. Give the Tea to Olivia to continue.
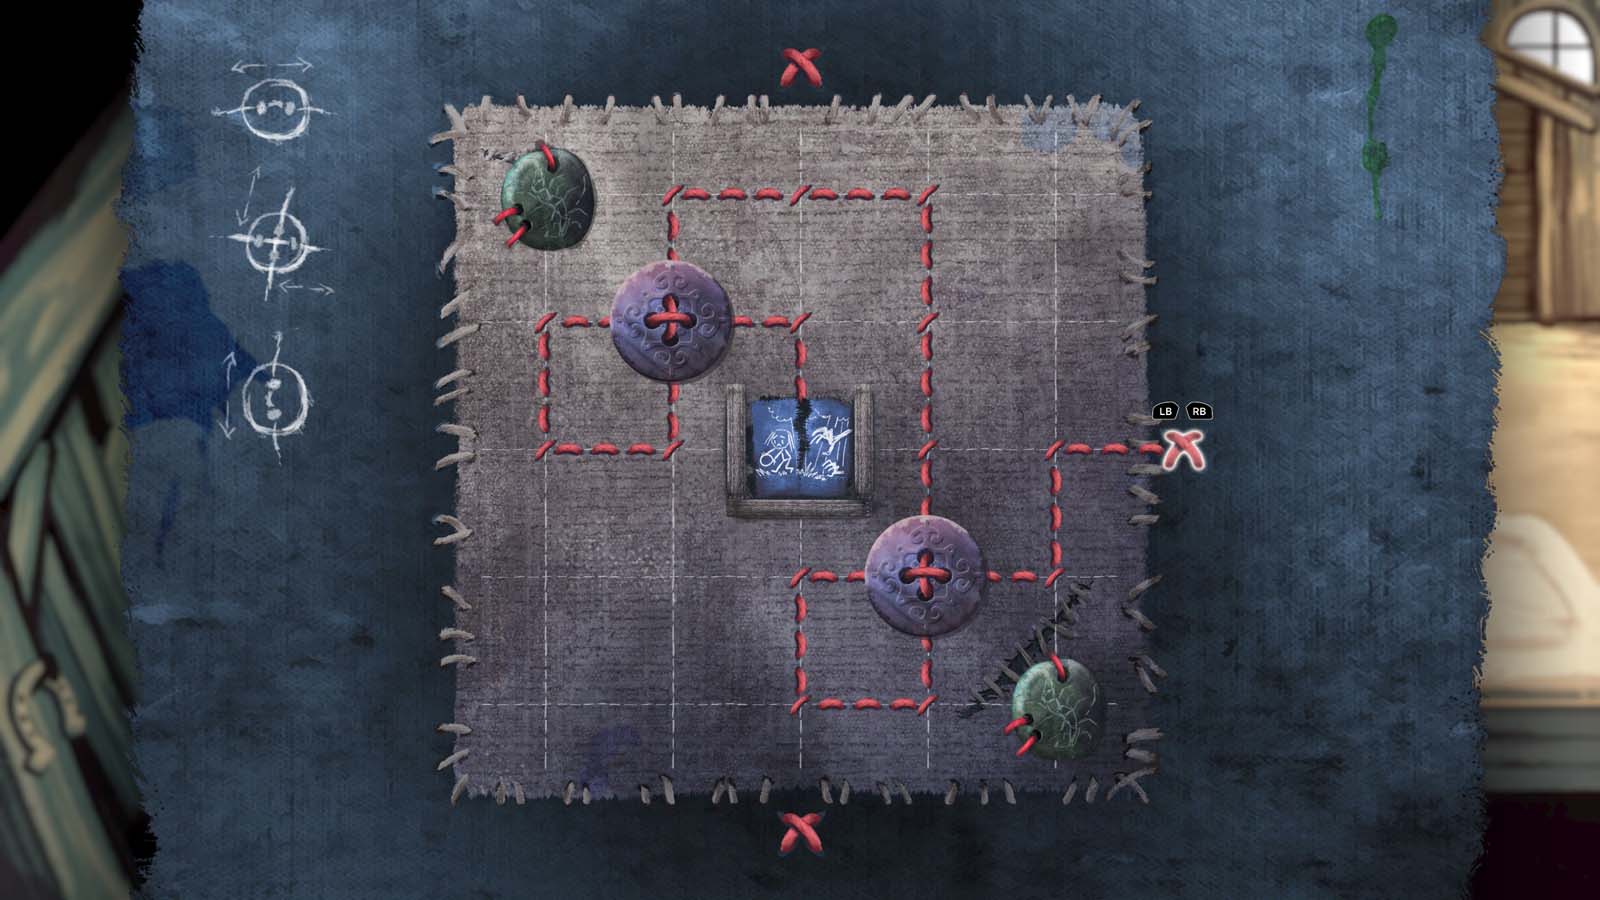
Use the Children’s Song on Olivia to repair another thought. Start from the east side and use the following movements:
- West
- South
- West x2 (through the first button)
- South
- East
- North x4 (completing the first button)
- West x2
- South x2 (through the second button)
- West
- North
- East x2 (completing the second button)
- South
The path looks like this:
After talking to Olivia, Lucy begins her investigation with Lucy’s Notes. Head east and talk to the man repairing the pipes. Ask about the pipes.
Head to the centre of town and speak to Sunny who is pruning vines. Ask about Lucy’s mom, the monsters, and the forest. Head east of the well and you will find a Stone covered by a roof. Throw the Stone into the well to get a Sticker and the Depths of the Well achievement.
Talk to the man south of the town centre, though he will be resistant. Speak to Sunny again and you can ask about the old man, as well as her shears. Asking about the old man allows you to talk to him, and you can ask about the forest and the monsters. You can then use the Children’s Song on him to get more information. Start at the top and use the following path:
- South
- East x2 (completing the first button)
- South x3
- West x4 (completing the second and third buttons)
- North x3 (completing the fourth button)
- East
- South
- East
- South
The old man will remember blue hibiscus flowers. The flower is at Olivia’s house but you will get it later.
Go northeast to the barn and go around the back. You will find a Rake against the wall. There is an old lady sitting on the bench. Ask her about the song, the monsters, the forest, and what it was like before. Asking about the song gets you a Note, which unlocks Mom’s Song. Test out Mom’s Song on the nearby hopscotch court. Your goal is to rotate blocks to create a path to the labyrinth.
Place a gear on the southeast and northeast parts connecting the blocks, then rotate to clear this puzzle. Here’s what it looks like:
Go inside the barn and you will find a moving sack. Use Mom’s Song on the sack to start another labyrinth puzzle.
- Put two gears connecting the lower left piece to the centre-left and bottom centre pieces
- Put two gears connecting the centre piece to the bottom centre and centre-right pieces
- Put one gear connecting the centre right piece to the upper right piece
- Rotate until it connects (it shouldn’t take more than two rotations)
This reveals Blue’s location, and you can ask him about his uncle. Follow up with “Did you ever go looking for him?” to get more clues.
Go back behind the barn again to note the lady has left. Grab her “bench” to add the Crate to your inventory.
Head back to the town center and go southwest to find a lady sitting on a bench. Talk to her, asking about the forest and monsters. Use the Children’s Song on her to get more information.
Head west of the town center to the bakery, where Silver blocks you from proceeding.
It is possible to speak to Red and Black without talking with Silver if you try to use the Children’s Song on them. This can result in sequence breaking and isn’t recommended if you are concerned with doing things properly.
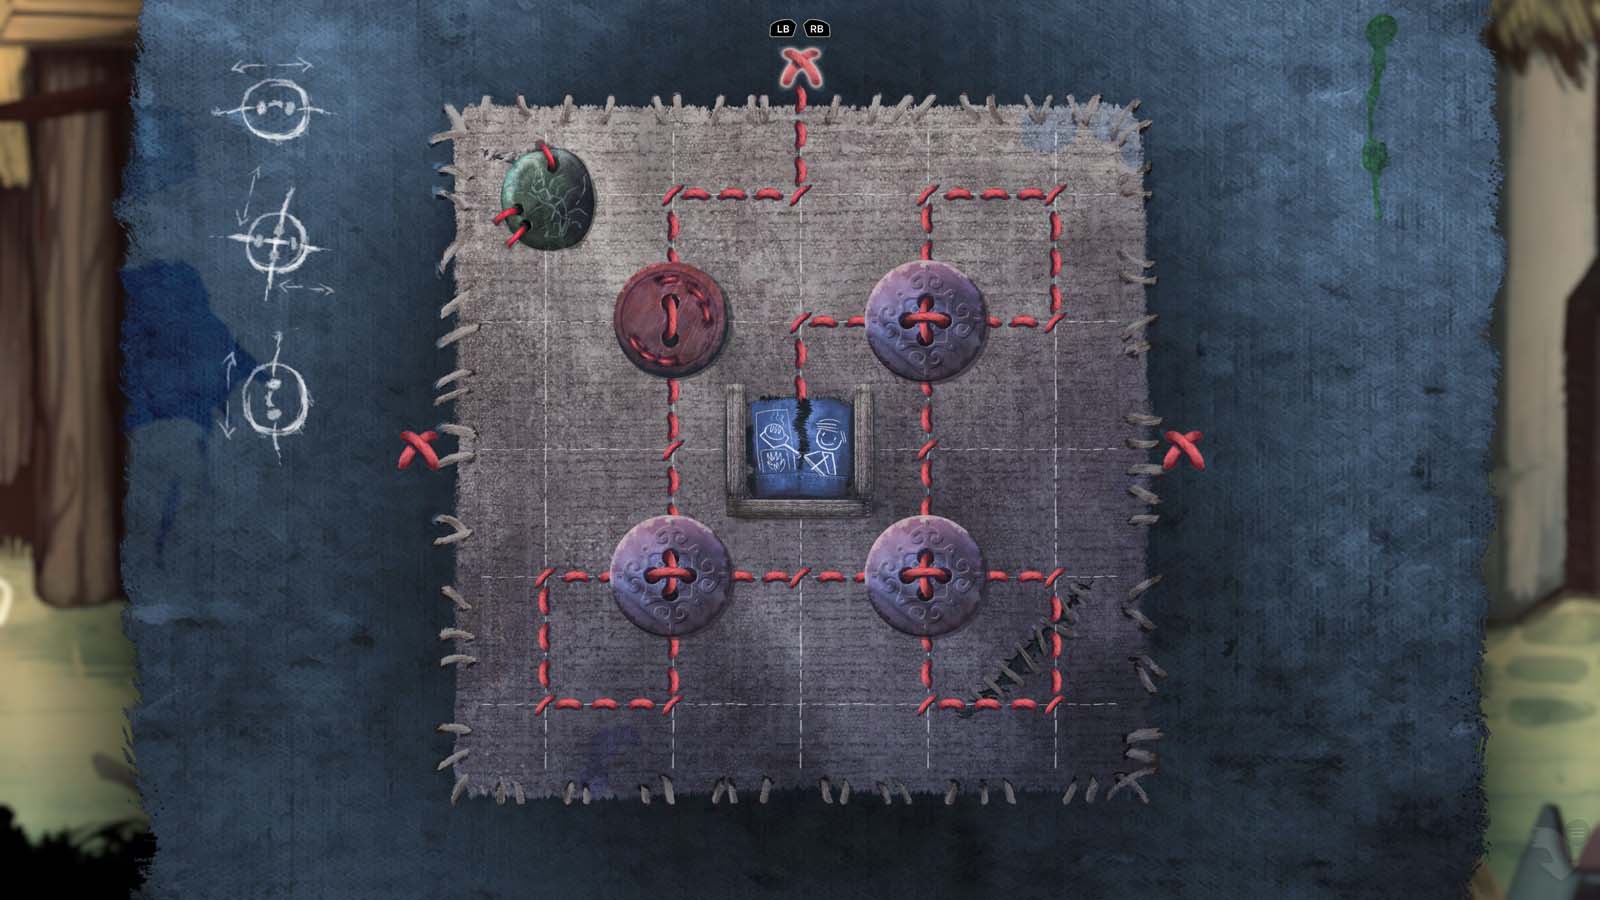
Use the Children’s Song on him to get more information. Start from the top, and repair the thought with this path:
- South
- West
- South x4 (completing the first button and going through the second)
- West
- North
- East x4 (completing the second button and going through the third)
- South
- West
- North x4 (completing the third button and going through the fourth)
- East
- South
- West x2 (completing the fourth button)
- South
This tells you about Silver’s gift, and he agrees to let you pass if you can find it. Talk to Silver about the gift and the monsters.
Head back to the town centre and go east through a door that is now open. This leads to a new area with a farmer (Tom) working the field. Turn left and inspect the beehives to get a Rusty Key. Talk to Tom about the forest, the people who disappeared, and the monsters.
Head back to the barn where Blue is and go west to find a locked toolbox. Use the Rusty Key to open it and look inside. You can get a Hammer and a Hook. Go back to the field and use the Hammer on the nearby rabbit cages. Inspect the scarecrow on the field (go around the left side to reach it) to get the Peel.
Go to the east end of the area to find a cherry tree. Use the Crate to get a Branch of Cherries but you will lose the crate. Give the Branch of Cherries to Sunny, then the Rake. Sunny will give you A Pair of Shears.
Return to Silver and give him the Peel. Talk to Red about the forest, the monsters, and the game. Talk to Black about the same topics. Talk to Raven (sitting on a bench nearby) about the disappearances and the monsters. After the monsters, ask if she hears them singing.
Red and Black want you to race animals with them. Go on the other side of their race track to challenge them. You will use either Red’s frog or Black’s hedgehog. Follow their instructions to win the race. For Red’s frog, wait until the bar turns green to jump or the movement will not allow you to win the race.
If you beat them, Red gives you more information about the monsters’ motive, while Black mentions Blue knows about Luca. Return to Blue and ask about Luca for more clues.
Go back to the area outside your house and use Mom’s song on the hat near Coal (the woodworker’s dog). This starts another labyrinth puzzle.
- Rotate the lower left piece until it faces the southwest.
- Put a gear between the lower left and the lower central piece.
- Put a second gear connecting the lower left and central left piece
- Rotate to the right and the path should extend towards the upper left piece
- Rotate to the left once
- Put a third gear connecting the central left and upper left piece
- Rotate to the right once
This gives you the option of untying the rope. Use the Shears on Coal to set him free. Check the Rope to add it to your inventory. Combine the Rope and the Hook to get a Grappling Hook. You can give the Shears back to Sunny.
Follow Coal to the forest. After the scene, check the gate to get a Sticker and the Coal’s fur achievement.
Go to Olivia’s house and use the Grappling Hook near the left wall. Grab the Thibescus flower from the flower pots. Check Olivia’s door to get a Sticker and the Complicated padlock achievement. Return to the old man and give him the Thisbescus. Talk to him again about the woman he mentioned, then use Mom’s Song on the newly potted flower for a puzzle.
- Put one gear in the lower left corner so it turns all four pieces
- Put another gear in the upper left corner so it turns all four pieces
- Rotate them until the yellow track has a path that reaches all but the lower right piece
- Rotate the blocks to the left or right, then put a gear between the bottom centre and lower right piece
- Rotate once or twice and the path will form. If it doesn’t work, go back one step and switch the rotation before trying again.
Ask the old man about the woman again, which gives you the last clue you need. Return home and watch the scenes.
Chapter Four
Follow the prompts again (Run Away, Ask For Help, Look).
When you wake up, grab the Hammer from the shelf and go downstairs. After speaking to Lucy’s father, check the cellar. Check the bottles in the crate for a Cork (there are two crates with Corks). Go back upstairs and check the kitchen counter for a third Cork.
Go outside to look for Squinty. Interact with the flowing tap to cause the pipes to burst. Check the red valve to learn you can’t turn it. Head east of the pipes and examine the mess to find Squinty trapped behind junk.
Return home and grab the Bottle of Oil from the kitchen counter. Go outside and use the Bottle of Oil on the red valve. Turn the red valve to shut off the water, then plug the holes with Corks. Use the Hammer to secure the Corks. One hole can’t be filled with the Cork, and you can leave it for later. Turn the red valve and the water should dislodge the junk on the right.
Grab a Cloth that has come loose from the junk because of the water. Combine the Cork and the Cloth to get a Wrapped Cork. Put the Wrapped Cork in the final hole, then turn the red valve again.
After going through the hole, you will find Squinty. Check the ladder to the right to learn it is tied to the house. Look above the ladder to find a Sticker and the Big metal ruler achievement. Use your Hammer on the right window to get a Shard of Glass. Use the Shard of Glass on the Ladder to rescue Squinty.
You get a Note during the scene. Back at home, use Mom’s Song on the piece of paper.
Lucy will move to the town centre to play hide and seek with her friends. You are the seeker and you must find everyone. Their locations are:
- Silver: Near the well
- Red: Head to the field, go east, and pull a rope by the tree
- Sunny: Head to the forest, she is near a wooden fence
- Blue: Head to the bakery and search the pile of straw. Take a closer look and proceed down the hole
- Black: Go back to your house and towards the woodworking area. Black is in the shed
- Raven: Head to the bakery and go all the way west to find her in front of a poster
You can check inside the barn to find a note, giving you a Sticker and the Blue’s drawing achievement. Clean up after Red’s prank to get Fake Spiders. Check behind Blue and look through the gap to get a Note.
While looking for Black, use Mom’s Song on the wooden trumpet for a labyrinth puzzle.
- Rotate the lower right piece to make the inner part (the ‘v’ shape) face the southeast
- Put a gear between the lower right and bottom centre pieces
- Put a gear between the four lower left pieces so that they all move when rotated
- Rotate to the right once
- Remove the gear in Step 3, then rotate to the right once. Replace the Step 3 gear in the same position
- Rotate to the left twice
- Put a gear between the four upper right pieces so that they all move when rotated
- Rotate to the right twice
- Put a gear between the four upper left pieces so that they all move when rotated
- Rotate to the left once
This allows you to reach Black without interference. He will hide behind the nearby pipes, but he will push you away if you approach now. Use the Fake Spiders above Black’s former hiding spot, then approach him behind the pipes.
When you return to the town centre, you must choose between Red’s cunning or Black’s strength. You can also check in with Raven and tell her you found Black, which lets her go to the centre.
While it doesn’t do anything, use Mom’s Song on the fireplace near Blue for another labyrinth puzzle.
- Turn the bottom centre piece to make the short part point north
- Put a gear between the four lower right pieces so that they all move when rotated
- Put a gear between the centre and centre-left pieces
- Put a gear between the bottom centre and the lower left pieces
- Rotate to the left once, then remove the gear in Step 4. Put it back after the piece shifts
- Put a gear between the centre-left and upper left pieces
- Rotate to the left again
[[Children of Silentown Chapter Four 3]]
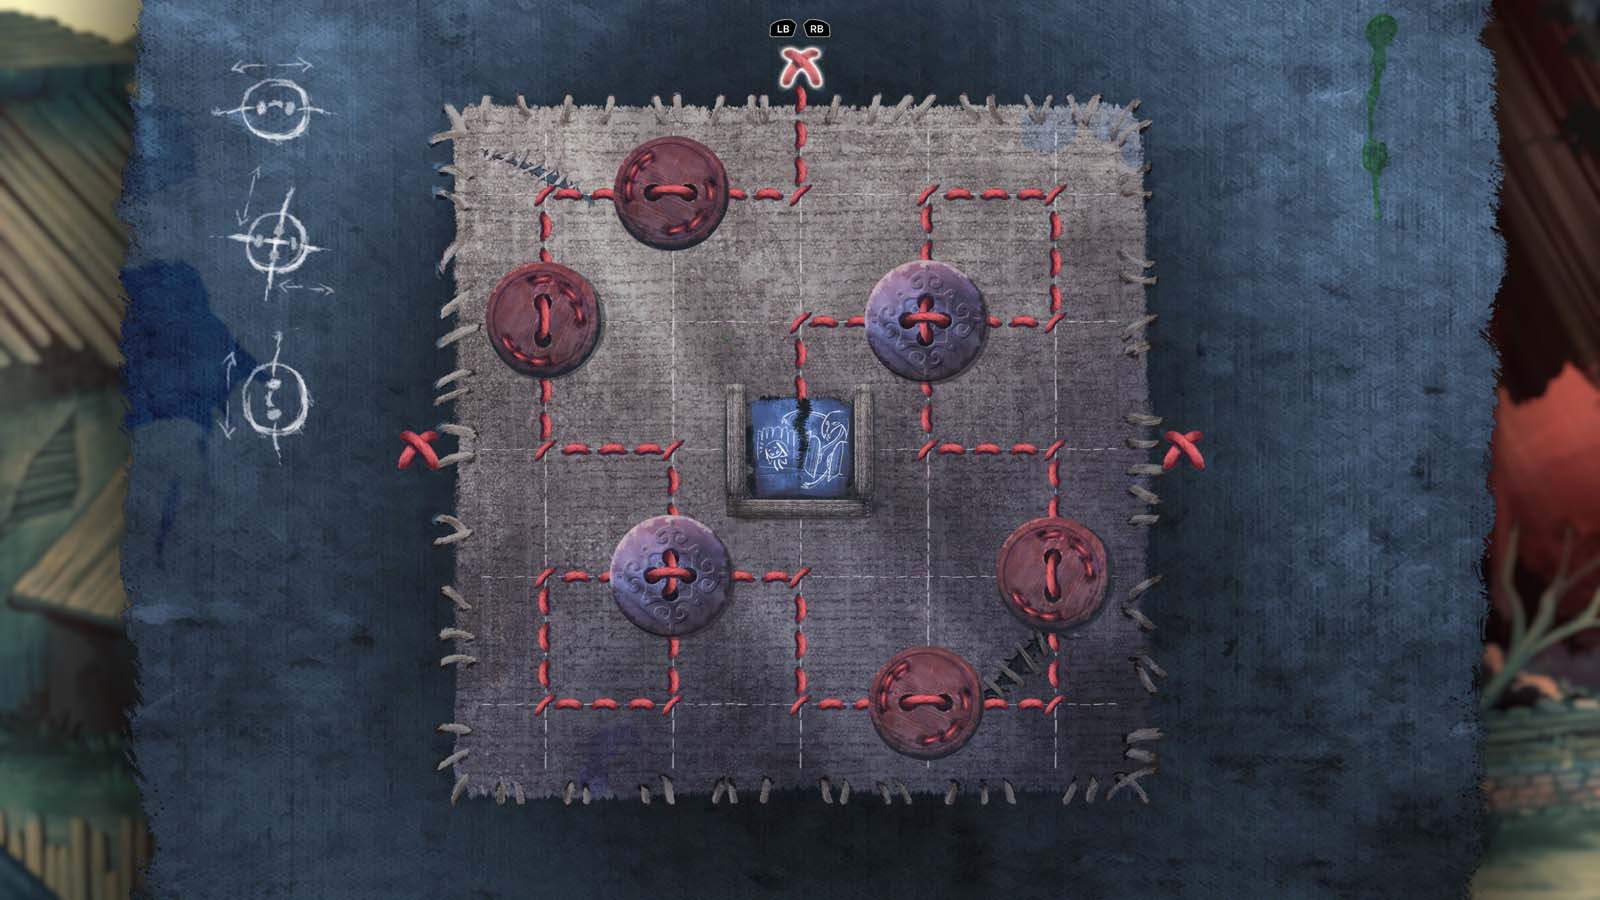
For Sunny, use the Children’s Song on her to repair her thoughts. Start from the top:
- South
- West x2 (completing the first button)
- South x2 (completing the second button)
- East
- South x2 (through the third button)
- West
- North
- East x2 (completing the third button)
- South
- East x2 (completing the fourth button)
- North x2 (completing the fifth button)
- West
- North x2 (through the sixth button)
- East
- South
- West x2 (completing the sixth button
- South
After speaking with Sunny, head east towards the gate, then speak with her again. You can tell Sunny:
- I’ll protect you! (Sunny likes this response)
- You’ll be fine! You’re strong!
Return to the square and if you have found everyone, Red will ask to change games. You can ask to wait a moment if you forgot to do something, or proceed to the next game.
When the scene end, you will be inside the forest. Try to get your Doll back from the white creatures to get a Branch. Your Children’s Song will change, allowing you to sing to the blue growth coming from the tree. This starts another puzzle, where you start from the bottom:
- North
- East
- North x4 (through the first button and completing the second)
- East x2 (completing the third button)
- South x4 (completing the fourth button and going through the fifth)
- West
- North
- East x4 (completing the fifth, sixth, and first button)
- South x2 (through the portal and reaching the end)
This grows a Vine on the tree. Climb the Vine, which snaps and goes into your inventory. The white creature goes south after you climb. Pick up the Gross Fruit that also fell down.
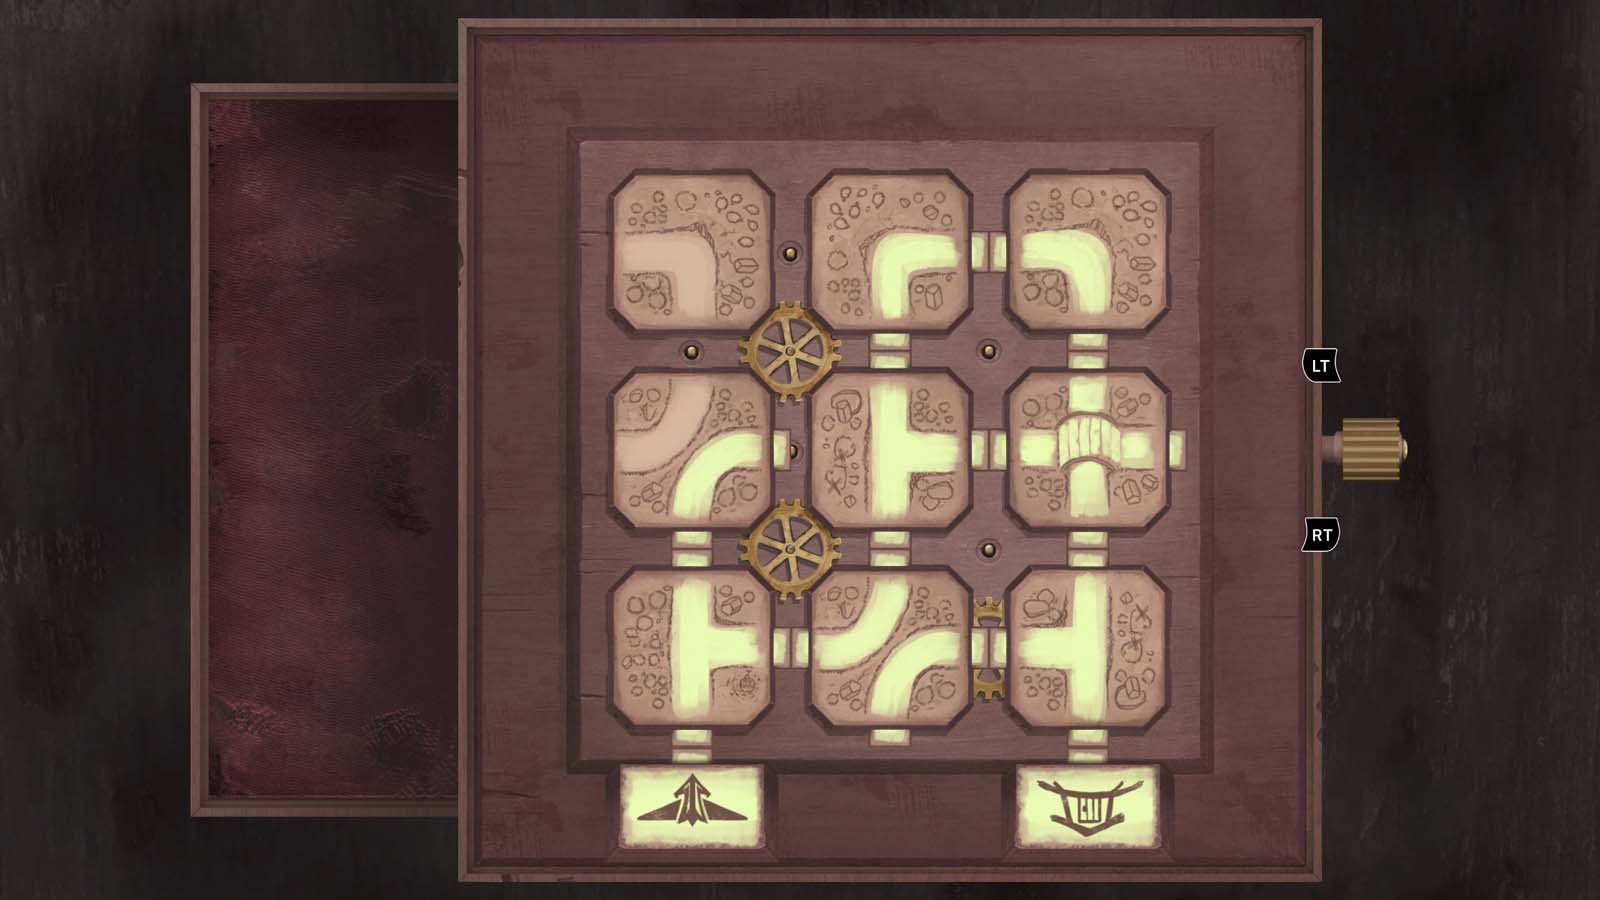
Head south and turn right to find a plant wrapped in red vines. Examine it to allow Mom’s Song to work on plants as well. Use Mom’s Song to start a labyrinth puzzle. Unlike other puzzles, your goal is to avoid touching the face block while charting a path to the exit.
- Put all four gears around the corners of the centre piece, which makes all blocks move when you rotate
- Rotate to the left once
This makes the light reflect down on a nearby statue, closing its mouth. Use the Shard of Glass on the closed statue to reflect the light and close the east statue as well.
Head south and follow the path to reach a Giant Snail. Grab it and put it in your inventory. Combine the Giant Snail with the Gross Fruit to get Sticky Snail. Return to the statue and put the Sticky Snail on the west rock. This allows you to corner the white creature until it flies off.
Before you follow the white creature, return to the Sticky Snail and pick it up. You will free it, giving you a Sticker and the Huge Snail achievement.
Head south and go back to where you found the Giant Snail to find the creature. Follow it through the plant, continuing east no matter what happens. Eventually, Lucy gets cornered by a monster and you must escape.
Head left and pick up a Skull that fell when the monster spotted Lucy. Combine the Skull with the Vine to get a Skull Hook. Go to the ‘second’ floor (go up the northwest arrow the first time) and head left. Watch the monster’s line of sight; when it moves away and the ground isn’t red, run. Keep going left until you reach a spring. Use the Skull Hook on the spring until it begins flowing again.
Make your way back to the ‘first’ floor (where you originally started) and pull the vine. This puts pollen in the monster’s face and you can run to the east. Move quickly, as the monster can spot you and force you to restart. When you get to the other side, use the Children’s Song on the blue roots. Starting from the left, here is the path you should take:
- South x2 (complete the first button and go through the portal)
- South x4 (complete the second button and go through the next portal)
- East
- South x3 (complete the third and fourth buttons)
- East x2 (complete the fifth button)
- North x3 (complete the sixth and seventh button)
- West
- South x2

This activates the vine on the ‘second’ floor. Head back to the centre of the area (pull the nearby yellow vine for more pollen), then go back to the ‘second’ floor. Pull the blue vine and go all the way east until you see a plant covered by red vines. Use Mom’s Song to start a labyrinth puzzle.
- Put a gear between the lower left pieces so all four rotate at the same time
- Rotate to the right once
- Put a gear between the centre and top centre pieces
- Rotate to the left once
- Put a gear between the centre-left and upper-left pieces
- Rotate to the right twice
This activates the vines on the ‘third’ floor. Make your way to the ‘third’ floor (same way you made it to the ‘second’). Pull the vine and quickly run east as fast as you can. There will be a set of red vines, but you can use Mom’s Song without another labyrinth puzzle. This leads to a wooden socket, which you can’t use just yet.
Use the branch on the vine on the east side (which you note is longer than the others). This takes you to a higher up area. Pull the vine and quickly run northeast (this may need to be done twice). Use Mom’s Song on the red vines, then run back the way you came. Go back to the first wooden socket and use Mom’s Song on the red vines that have appeared above you. The red vines reappear on your left, but you can get the Weird Artifact from them.
Before you put the Weird Artifact on the right-most wooden socket, pull the vine and run back to the start of the ‘third’ floor. Head all the way west and put the Weird Artifact in the socket. This opens an area where you can head left and search the ground for a Sticker and the Old kettle achievement.
Head back to the right-most socket and place the Artifact inside. After the scene, you will wake up in front of a plant with six pink tendrils. You must light up all six tendrils at the same time.
Touch the second tendril twice, the fifth tendril once, the sixth tendril once, the first tendril once, and then the fourth tendril once. This opens the plant, and you can crawl inside.
Keep crawling to the east until a scene plays. When you regain control, head up the north path. Inspect the central pillar, then put your hand inside. You get a Note afterwards, which gives you the Song of the Forest. You get to try it out in a tutorial, where you must light up all tiles on a grid.
The answer to this puzzle is (counting from top to bottom, left to right):
- First row, fifth square
- Second row, second square
- Third row, third square
- Fourth row, fourth square
- Fifth row, first square
Move on to the next area and you will find a series of paths that seem to lead back to the same location. To get through, go through the paths that do not have fog covering them. If you encounter a coloured bird, use the matching coloured song on them. Red requires Mom’s Song, Green requires Song of the Forest, and Blue requires the Children’s Song.
If done correctly, you will get back to the town.
After the scene, leave your room. Head downstairs and check the irons near the fireplace to get the Fire Iron. Go down into the cellar and inspect the broken glass to get a Sticker and the Glass shards achievement.
Head back to the living room and check the left side. The music box is covered in red vines, and you must use Mom’s Song to clear them in a labyrinth puzzle.
- Put a gear between the lower left and bottom centre pieces
- Put a gear between the lower right pieces to move all four of them
- Put a gear between the top right pieces to move all four of them
- Rotate to the left once
The music box is locked and you can’t open it yet, but it’s good to free it and avoid wasting time.
You will see red vines outside Lucy’s parents’ room. Use Mom’s Song for a labyrinth puzzle:
- Rotate the lower right piece until it connects a path along the right side
- Put a gear between the lower right pieces to move all four of them
- Put a gear between the centre and top centre pieces
- Rotate to the right once
- Put a gear between the upper-right and centre-right pieces
- Put a gear between the upper left and centre-left pieces
- Put a gear between the lower left and bottom centre pieces
- Put a gear between the centre left and centre pieces
- Rotate the to the right once
Once inside the room, use the Song of the Forest on the closet for a puzzle. The eyes to activate are (counting from top to bottom, left to right):
- First row, first square
- Second row, fourth square
- Fourth row, second square
- Fifth row, third square
This uncovers a locked cabinet but you can’t do anything with it right now.
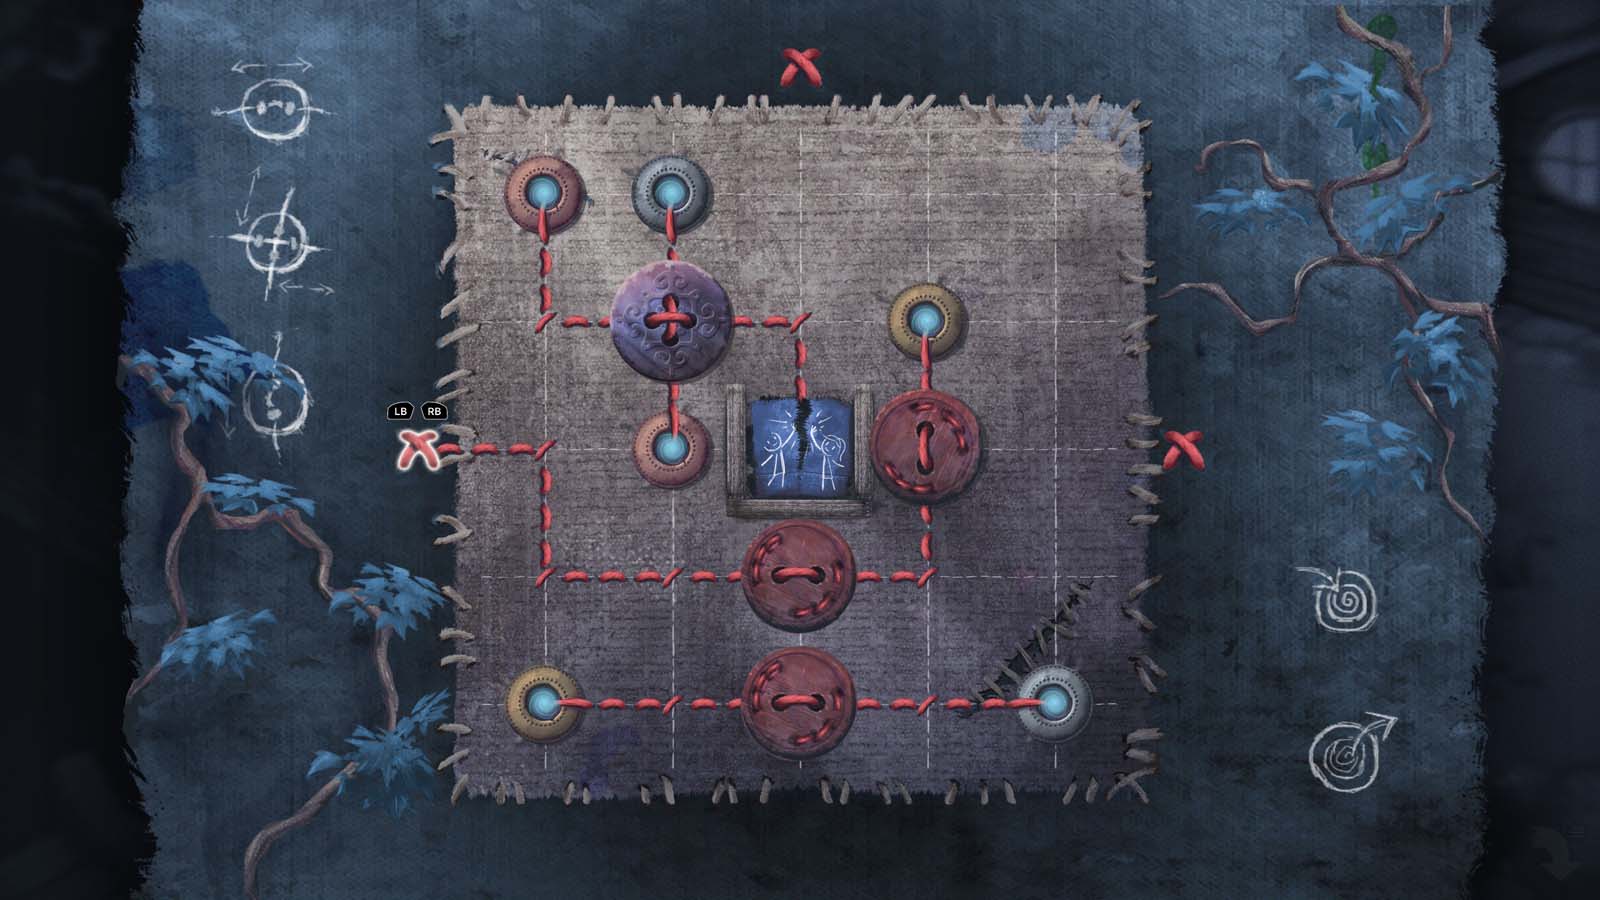
Head to the front door of the house and use the Fire Iron on the gap in the wooden planks. This allows you to leave the house. Head left to the woodworking area to find Sunny. Use the Children’s Song on her for a puzzle. Start from the east side.
- East
- South
- East x3 (completing the first button)
- North x2 (completing the second button and through the portal)
- East x3 (completing the third button and going through the portal)
- South x2 (going through the fourth button and going through the portal)
- South
- East x2 (completing the fourth button)
- South
You get the Friend achievement for solving the puzzle, as well as:
- Told Blue to cut it out at the beginning
- If you returned the Shears to Sunny.
- Told her that you would protect her.
Otherwise, you miss the achievement. Squinty can also appear if you played with it and gave it the box earlier, which gives you the Cat achievement.
Head east to the wall, which has been hastily repaired. Use the Song of the Forest to start another puzzle. The eyes to activate are (counting from top to bottom, left to right):
- Fourth row, first square
- Fifth row, fifth square
- First row, fourth square
- Third row, second square
This reveals a school sign and a nearby letterbox. Check the letterbox for a Letter. Check the Letter for a Mysterious Note and a Small Key.
Return to your house and use the Small Key on the music box that you freed. You get a Bronze Key and two notes. Head back to your parents’ room and use the Bronze Key on the locked cabinet. Choose to read the notebook and watch the scene.
Inside your room, take the Jar on the cabinet. Check the drawer of the cabinet for Emergency Cookies. Check the bed for a Bed Sheet, and investigate the sheet hanging on the wall for a Blanket. Check the trunk at the bedside for a Sock.
Combine the Sheets and Blanket for a Makeshift Rope. Use the Makeshift Rope on the Window to get a way out.
Chapter Five
Head west and inspect the nearby tree for some Bark. You will encounter a large flower with fireflies. Combine the Jar with the Emergency Cookies for a Jar of Cookies. Head to the right and use the Jar of Cookies on the nearby stream to turn it into a Sweet Jar. Use the Sweet Jar on the flower and you have a source of light.
Continue going west and you encounter a waterfall. Search the nearby tree trunk for a Sticker and the Doll achievement. Use the Bark on the waterfall to slide down.
You will land in front of a windmill. Check the windmill itself for a Sticker and the Windmill achievement.
The lever on the right controls the canals at the bottom. It goes from 1-5, with the marks on the stone to indicate the number. Make sure the canal control is set to 3 (if it isn’t already) and head southwest into the next area.
You will see the water flowing due to the canal, but it isn’t moving to the statue’s basin. There are two nearby vines that control the wooden mechanisms that deliver water. Pull the left vine, then the right one. Wait a few moments for the water to fill and a small stone pillar will rise nearby. Check the pillar to find a Shard.
Go back to the windmill and turn it to 4. Go southwest twice, then east to reach another statue near a beehive and three vines. Pull the first, third, second, and first vine again to get the water flowing into the basin. Near the statue is a blue plant, which you can use the Children’s Song on. The path, starting from the left, is as follows:
- East x2
- North x2 (through the first button)
- West
- South
- East x3 (completing the first button, going through the second, and into the portal)
- South
- East x2 (completing the third button)
- North
- East x2 (going through the fourth button)
- South
- West
- North x2 (completing the fourth button and going through the portal)
- South x2 (completing the second button)
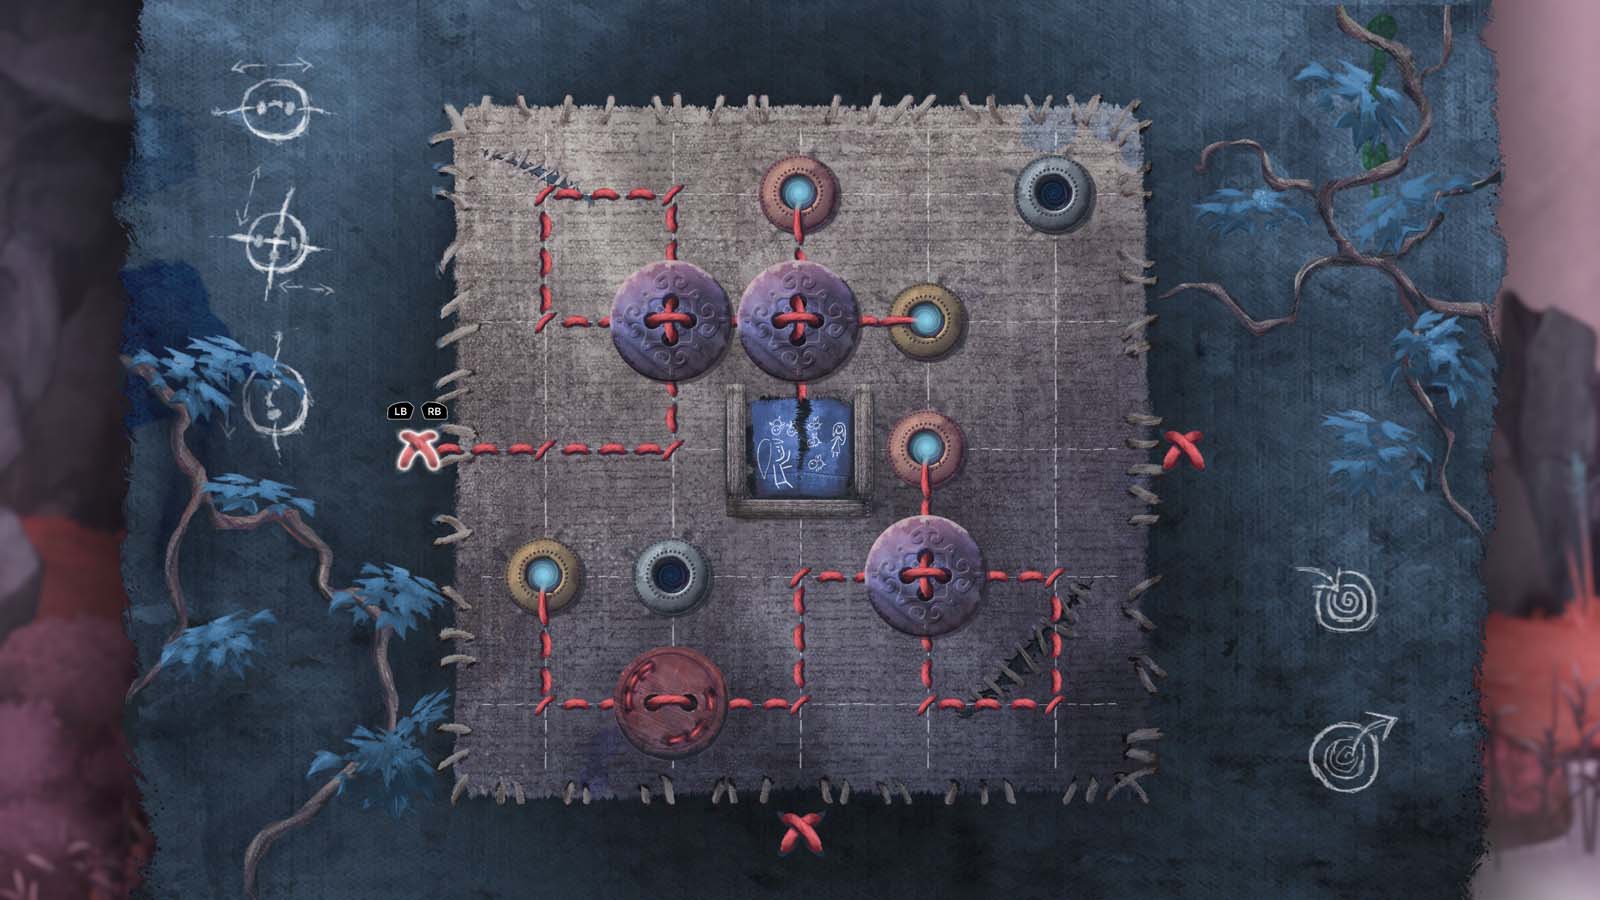
Pull the second vine to shift the flow of water towards the beehive. It will drop, allowing you to get some Wax when you pick it up with the Fire Iron. Combine the Wax with the Sock to get a Waxed Sock. Use the Waxed Sock on the nearby basin, then flow the water back into it. This allows you to pick up another Shard.
Return to the windmill and set it to 2. Head southwest from the windmill twice and you will see water dropping into apparently nothing. Use the Song of the Forest to uncover a puzzle.
The eyes to activate are (counting from top to bottom, left to right):
- First row, fifth square
- Second row, first square
- Third row, third square
- Fourth row, second square
This reveals a statue without a basin. Head left to another area and check the ground to find a Basin Covered in Sand. Give the Basin Covered in Sand to the revealed statue and you get another Shard.
Head back to the windmill and go up the stairs on the left. Put in three Shards in the indents, then go through the half-open stone door. Keep going east behind the windmill.
In the new area, head left and you will see a stone column with an artifact hanging on a branch. Head east and use the Song of the Forest to uncover a puzzle.
The eyes to activate are (counting from top to bottom, left to right):
- First row, second square
- Second row, fourth square
- Third row, fifth square
- Fourth row, first square
- Fifth row, third square
This reveals a door you can’t unlock at the moment .Keep going left and you will see red vines blocking your path. Use Mom’s Song to start a labyrinth puzzle.
- Put a gear connecting the centre and bottom centre pieces
- Put a gear connecting the bottom centre and lower right pieces
- Put a gear connecting the lower and centre-right pieces
- Put a gear connecting the centre and centre-left pieces
- Put a gear connecting the centre-left and lower left pieces
- Rotate left once
- Put a gear connecting the centre and top centre pieces
- Rotate left once
Continue going left and your light source will disappear. Check the lower left to fall into another area.
When the monster appears, press the button to grab the nearby Rock. Use the Rock against the monster, then watch the scene.
As you approach an unstable log with the monster, use the Children’s Song on the monster. Use Mom’s Song on the monster after you finish crossing the log. When you reach a dead end, use the Song of the Forest on the monster to climb.
You will return to the artifact hanging on a branch. Look at the fruit opposite the branch and investigate it. Use the Song of the Forest on the monster to climb up, then use your Fire Iron to hit the fruit. This pushes the artifact, allowing you to climb up the stone column and get the Weird Rune.
Put the Weird Rune in the door you unlocked earlier. Call the monster to you if necessary, then head inside. Stand on one and use the Children’s Song on the monster to make it stay. Step on the other to open a door going east. Call the monster back and head east. Inspect the cave drawings on the wall for a Sticker and the Mysterious Paintings achievement.
Inspect the steel with writing at the end, then use Song of the Forest on the monster. Climb up and head into the next area to help the monster up. Use your Fire Iron on the tree to the right, then fall into the next area.
You will be near one of the statues, but it has no basin. A Small Basin lands nearby, and you can put it into the statue. Head east, then northeast twice to return to the windmill. Turn the canals to 1, then return to the statue. Pull the second, third, and first vine to make the water flow into the statue (or experiment if the vines move differently). This gives you a Shard once the basin is full.
Return to the windmill and insert the Shard into the last remaining indent. Press the button and the monster joins up with you again.
Go back to the windmill and turn it to 5. Go back southwest and then go east to find the next area with water flowing. There are two statues and three basins, with four vines to adjust the flow. Pull the second, third, fourth, and first vines (in that order) to split the flow between the two basins.
Have the monster step on one symbol and use the Children’s Song to make them stay there. Step on the other and wait for the basins to fill. Take the Shard when both of them fill, and return to the windmill. Head to the wheel that changes the canals and put the Shard in the indent next to the wheel. This opens a nearby path that you can climb.
Head right and you will fall down a hole. When you regain control, use Mom’s Song to get the monster to follow you. Head right and when you reach the rock, use the Song of the Forest to make the monster stand up and grab a vine. Head left and return to the hole, using the Song of the Forest to get the monster to drop the vine.
Grab the vine and use the Children’s Song to make the monster stand still. Use the vine on the rock, then use Mom’s Song to pull the rock. Head left to make sure the monster is standing near the hole, then use Song of the Forest to make it put the vine over a branch. Head to the right and watch the scene as you fall further below.
Keep trying to go down three times and the monster appears to help. You will return to town after the scene.
When you regain control, the ending you get depends on the songs you have unlocked.
Select the Children’s Song to get the Children achievement for beating the game.
Select Mom’s Song to get the Back Home achievement for beating the game.
Select Song of the Forest to get the Forest Howl achievement for beating the game.
Select Song of the World to get the Hope achievement for beating the game.
Congratulations! You’ve reached the end of Children of Silentown. Please let us know what you think about the game and if this guide proved useful.
Victor is a big fan of RPGs and enjoys helping people through areas that they struggle in. He also spends far more time on them than is probably healthy for a single individual. If he's not playing some RPG, you can often find him playing D&D or training MMA at the gym


