Releasing on August 27, BROK the InvestiGator is a point-and-click, beat ’em up title from French developer Cowcat. If you’ve been playing BROK and find yourself stuck and need some guidance, our walkthrough can help you get back on track. If you want to know what we thought of the game you can check out our BROK the Investigator review.
Act 1
Apartment
When you gain control, inspect the Decoration in the northwest corner. This puts the Blanket in your inventory, which you can use on the Fire to your right to safely cross.
Activate Action Mode as the tutorial instructs to bust down the door. In the next room, inspect the Robot in the northeast to “activate” it. It won’t turn on right away, but continue exploring the room and it will activate.
You will have to battle the Robot after a conversation, and you will learn how to defend yourself in combat. Two more Robots will appear after the first Robot has been taken down. When all enemies are defeated, the Bedroom door on the right will unlock.
Inside the Bedroom, switch to Action Mode and jump over the cabinet in front of you. Continue to the right to find Lia trapped under some furniture. Examine the Display Cabinet north of Lia, then break it open in Action Mode. Examine the Pill Reward to get a Metal Bar, which you can use on the Collapsed Shelf to free Lia.
You will get the Introduction completed achievement after the events play out. You can inspect the table, looking at the Fruit Cup to get a Pampalos fruit which goes into your inventory under the Food tab. You can also grab the Magnifying glass off the table.
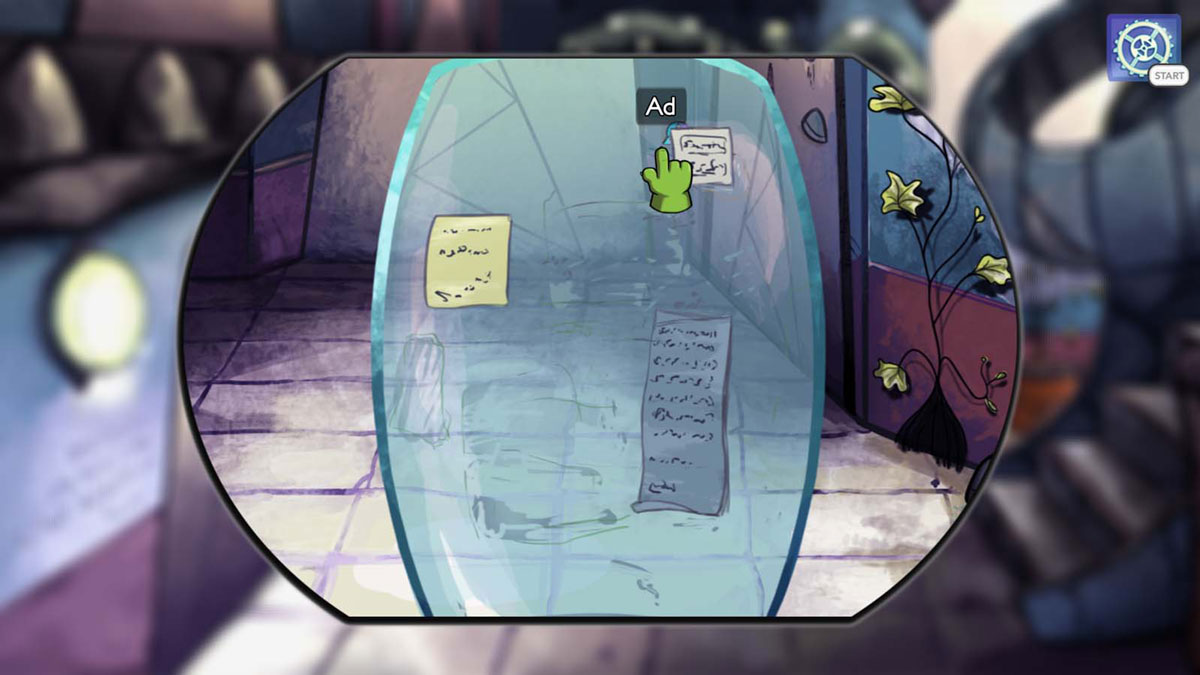
You can work on the Punching Bag on your left for some EXP. Check the Stick to the right of the Check the fridge in the northwest to put it in your inventory. Open the fridge and you can grab the Energy Drink in the middle row. Check the bottom for an Ad, which provides hints. There are three Ads in every room, and they provide hints if you get stuck.
The second Ad is found southeast of the Dishes, just under the Clothing bag. The final Ad can be found under Brok’s bed around the southeast corner.
Try to leave the room but the Auto-Clean Tribot will stop you from leaving. Use the Stick, then go into Action Mode to attack the Tribot. You will get a Cleaning bot and Cat fur in your inventory, and will be able to leave.
In the main hall, check your Mailbox in the top left corner. Use the Mail system left of the Mailbox, then check the Mailbox again. You will get a Bill that you need to pay off. Check your Mailbox again to find another Ad. If it doesn’t appear, use the Mail system to open it again and check.
Check the Job Board in the middle of the room. You can find an Ad stuck behind the top right ad. In front of the Mail system, you will notice a cracked tile that makes noise when you pass over it. Go into Action Mode and jump on the cracked tile until it breaks to find another Ad.
Leave the Apartment on your right and you will see two gangsters ganging up on a Tramp. Fight off the enemies and you will get a Medical Prescription from the Tramp. You need to get him medicine to help him survive. Check the ruined car left of the Tramp to find an Ad in the tire.
Head left of the ruined car to find an elevator that will bring you to the top floor. You can grab a Pred Toy from the fence, and there will be an Ad stuck in the floorboards south of the door. You can head through the door to play an optional Trash Hunter game that costs Unis, but it doesn’t affect the story at all. Treasures include finding healing items, training videos that give EXP, and 50 or 200 Unis coupons (there is no middle amount).
You can enter the room to look for Ads. You will find an Ad as one of the treasures while playing. You can find another Ad by punching the Statue on your right. Use the Controls to play but before doing anything, move your cursor to the top left corner of the console (not the playing area, the console itself) to find the last Ad.
Go back down and check the Advertisement left of the elevator. Use your cursor and check the bottom right corner to find an Ad.
Head east of the Tramp to access the World Map. There are three Ads in this area. One is north of Home, the second is in the southeast part of the blue sphere, and the final one is northeast of Sector 56X. You will need to take a bridge to its northwest and make your way over, taking care not to touch the nuclear waste or you take damage. You can’t get the Ad in the blue sphere just yet, but keep its position in mind.
Make your way to Sector 56X when you are ready.
Sector 56X
When you arrive, you can check the Pipe-Pill on your left to find an Ad in the southwest part of the machine. Look to the right of the Merchant’s stall and you will see another Ad stuck in a triangular-shaped gap. Punch the Pipe-Pill to get a clue that you can use for later. Talk to the Merchant to get a clue about a policeman.
Head east and you will reach an arch you have to pass through. Enter Action Mode and jump up the objects left of the arch to reach the top where you can find an Ad.
Continue east and you will reach the apartment building where your client is waiting. You can use the Entry Code 4098 to get in (Sin sent that to you in a message) or you can enter Action Mode and destroy the Entry Code machine. Use the middle arrow to change numerical positions, the left buttons for even numbers, and the right buttons for odd numbers.
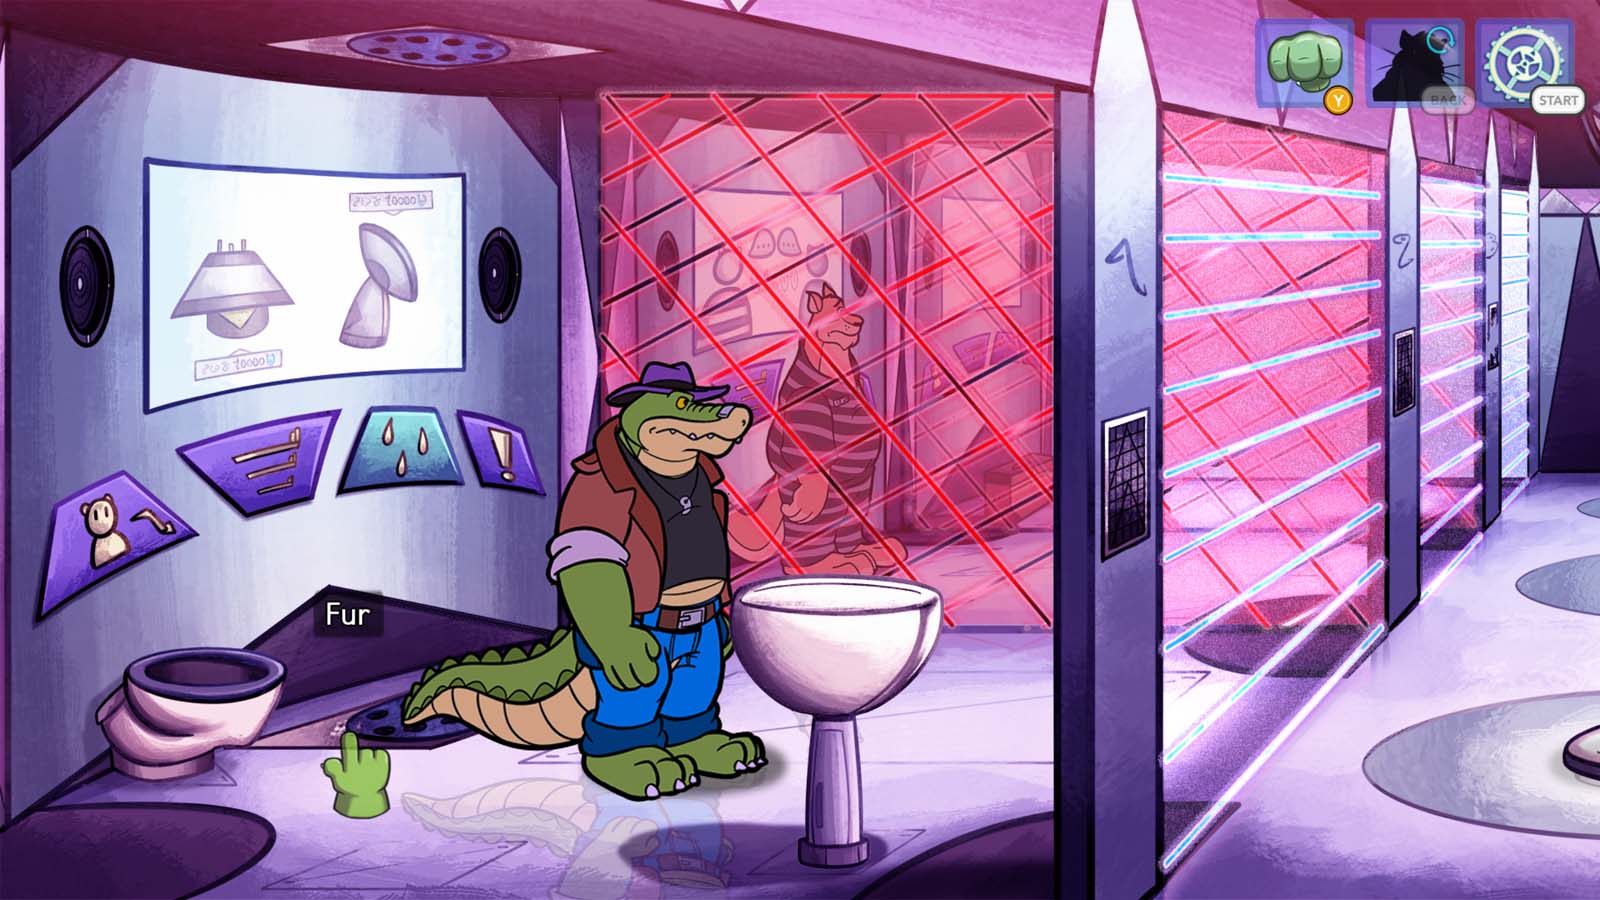
Once inside, you will see Sin’s apartment which is illuminated by the only light. To the right of Sin’s apartment door is an Ad sitting near some debris. You can also check the Mailboxes on the left, using Action Mode to destroy them to unlock another Ad. Head to the second door on the left, going into Action Mode and hitting the door twice. This should trigger the resident pushing out a magazine, giving you the third Ad.
Visit Sin’s Apartment and Sin will tell you he lost his crippling gun. Ask about the gun, then Drumer Street. This will unlock Shay’s Garage as a location you can visit.
Check the Jacket to the left of the door to find an Ad. Check the Wardfridge and inspect the Food up top to get an Antburger. Select the Button left of the door to lower the bed, revealing an Ad in the wall. You can also check the Glasses to the right of the door, finding an Ad on the counter if you can position your cursor properly.
Inspect the right side of the area where the bed was. You will find a remote which you will break, which adds the Broken Remote to your inventory. Head to the right to enter the bathroom area. Look right of the Mirror to find a Cup with two Pills. Inspect the Cup to take one of the Pills for yourself.
As you leave Sin’s Apartment, you will get a message from Graff you can check in the menu. It will talk about being at the Science Fair at 5. Head to Shay’s Garage which is south of Sector 56X.
Shay’s Garage
When you arrive, check near the green vest in the southwest area to find an Ad sitting on a fence. Enter the water and go northeast to find an Ad in the only hole on a wooden boat. Head all the way north through the water to find an Ad to the left of the brown rock when you reach land. You should get the It’s In My Nature achievement for swimming for at least 10 seconds. If not, just stay in the water until it appears.
The garage is in the west. Activate the two buttons to the right of the garage and the door will open. Go inside to meet Shay and you will automatically start talking. Discuss the Border Post twice to get instructions on getting your own body print to access the Dome.
Choose Show Items and show the Broken Remote from Sin’s Apartment to get it fixed. You can do the same with the Cleaning bot, though Shay will offer to buy it from you for 200 Unis instead. You can agree or refuse the offer.
As you are about to leave, Shay will mention the Virtual Arena, where you can fight for money. For Ads, look to the right of Shay’s position to find an Ad next to her. Check the southeast corner of the area to find an Ad that is hidden in a broken floorboard, sometimes covered by the floating cushion. You can check the Tubes to the right of the Incubator and carefully move your cursor to find the last Ad.
Head east into the next room at Shay’s Garage to reach the Virtual Arena. You can find an Ad under the Metal Thing as well as the Bed. You can also find the last Ad to the right of the Cabin (though it is in a dark area).
As you are about to leave Shay’s Garage, use the Lever to the right of the entrance to put it in your inventory. Head to Border Post 001 as your next destination.
Border Post 001
When you arrive, talk to Bolt who is sitting on the right bench. Learn about his job and situation, then ask about the building behind him to gain access. You can also talk to Bolt about helping him find a new job, which gives you a side objective. None of your current options will help. You can return to Shay’s Garage and speak with Shay. She will agree to help with Bolt if you pay her 200 Unis from your night fight victory (this happens in Chapter 2).
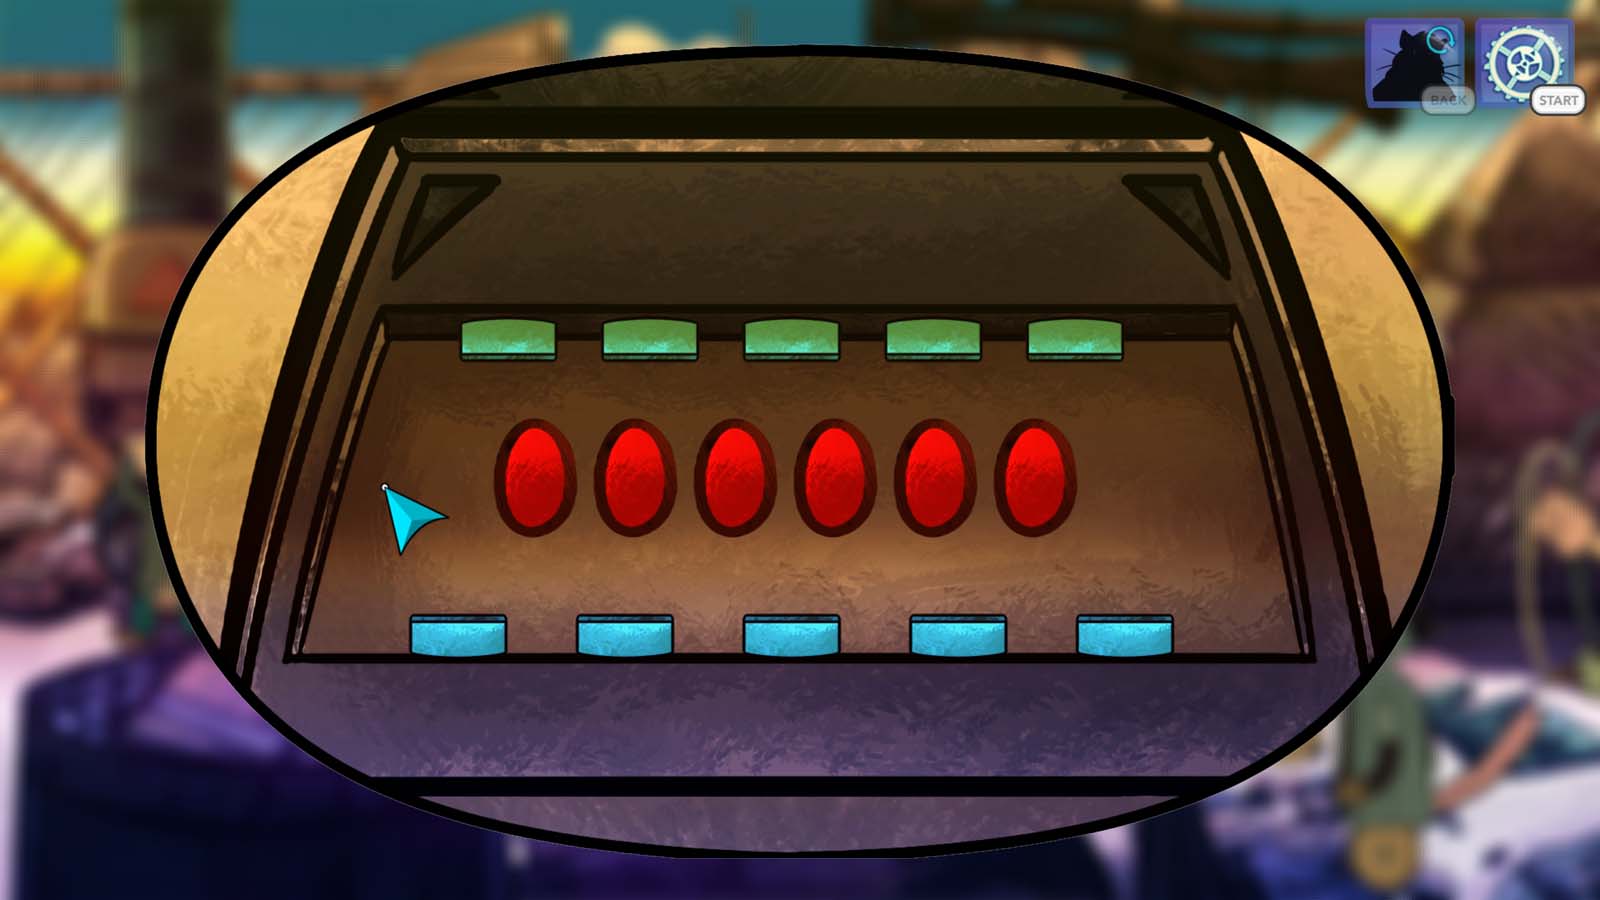
Head inside the newly opened door and check the ground near the door to find an Ad. Use the nearby Control Panel and press the circular button to begin. You want to get one red square block and one blue rectangle block together. If multiple versions of the same block drop down, press the square or rectangle button to send them away. Stack the square and rectangle blocks together (order doesn’t matter), switch to Action Mode and jump up to the wooden platform. You can use the Ladder to climb up.
At the top, you can grab an Ad stuck on a pipe right in front of you. Go into your inventory and use your Apartment key on the Shelf Braces (both left and right). You can now attack the Planks until they fall.
The left Plank will not lead anywhere, but you can jump off to break the vending machine below, giving you the final Ad in the area (you will take 90 damage, plan before you fall). The right plank leads to the building roof; interact with the Door to go inside.
The next part has lasers that you need to avoid. You will learn how to run to dodge the faster lasers as you get to the bottom.
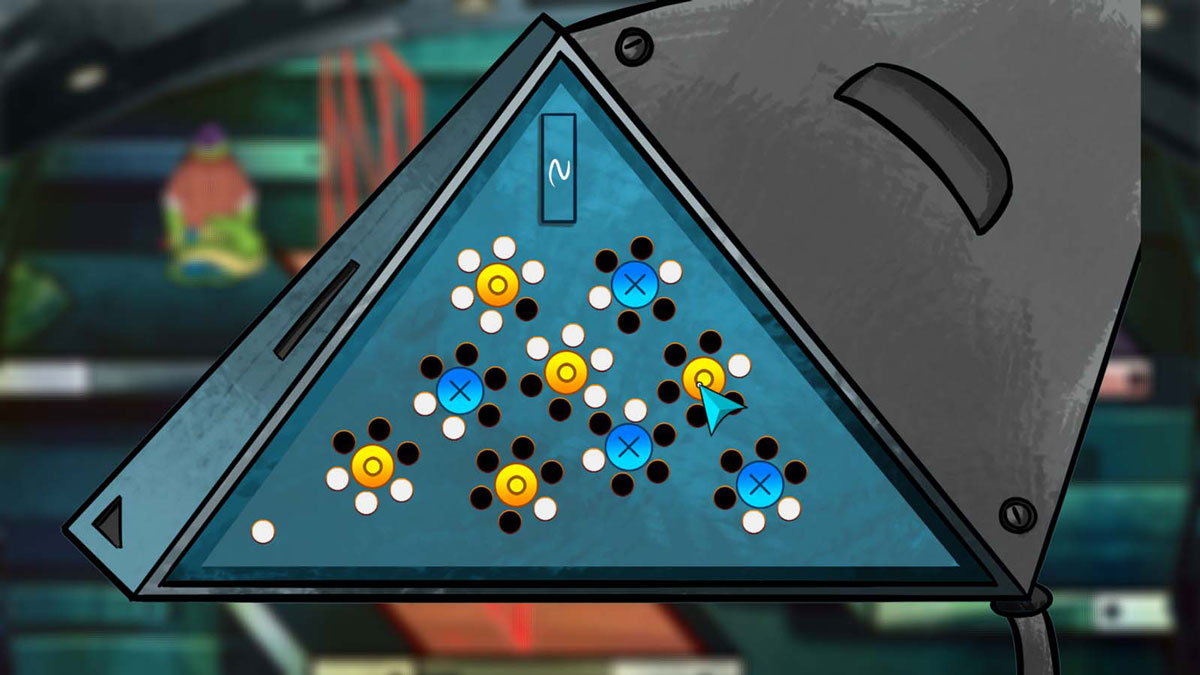
Alternatively, you can use your Apartment key on the Panel close to the first set of lasers to try and drain the battery from the lasers. You need to get all the X buttons blue while keeping the O buttons orange. The white dots control the flow of the laser. Here is one solution to switch off the lasers.
At the lower level, interact with the Mainframe on the right. Touch the large blue button, and you will then need to select four other buttons to create a trapezoid figure that displays on the screen. If you choose incorrectly, you will have to fight a robot before trying again. These are the four buttons you need to press.
When you leave the building, interact with the Scanner on the right side of the area to head through. This allows you to access Drumer Street on the World Map, as well as take the Ad that is in the southeast part of the blue dome.
Drumer Street
When you first arrive, there will be two vending machines. Check the left-most machine to find an Ad you can purchase for 50 Unis. Head to the right to find the alleyway that Sin wants you to investigate. It is currently blocked by a barrier and a Tribot is preventing access.
Keep moving to the right and a Hologram will appear. Inside the Hologram is an Ad you can pick up. Continue to the right and you will see an Ad in the Garbage Collector. Use your Lever to retrieve the Ad.
There is a Pipe-mail left of the fountain. If you have 245 Unis (gained either by fighting in the Virtual Arena’s training/Trasher Hunter above Brok’s apartment), you can pay off his bill and complete that side objective. Examine the Fountain to get some clues for later.
To get through the barrier, enter Action Mode and punch the Tri-bot. You will have to fight off three Tribots that come as reinforcements, but you can pick up a Tribot cop key to lower the barrier.
Alternatively, you can go to the Fountain and use the Pred toy to inflate it. Put it inside the Pipe-mail before it fully inflates. When the Tribot Cop goes to inspect it, use your Apartment key on the power socket it was using. The Tribot will drop the key allowing you to lower the barrier.
Pharmacy
Head into the pharmacy now that it isn’t blocked off. Inside the Pharmacy, you can use the Panel on the right for 50 Unis to get an Ad and the Your Days Are Numbered achievement.
There is another Ad on the upper left Ad bubble, but you can’t reach it normally. If you have the repaired Remote control from Shay, you can use it on the Ad bubble to lower it, allowing you to access the Ad.
Use the Machine in the upper right area, taking the Medical prescription from your inventory and putting it in the Scanner. It won’t work, and you will have to think up of another way to get medicine. You can also put Sin’s pill inside the scanner to check it out. You can also get your Daily Pill from the machine, giving you a Toxout Pill.
Head to the left side of the Pharmacy and select all the available products to get an Ad. Don’t forget to check the left Pharmacy Drawer at the back before you leave, as this gives you a clue for later.
If you would like to help Tramp again, return to him outside Brok’s apartment. Talk to him and you can give him Glucosite, but it costs 300 Unis at the Pharmacy. You can get the money through training or by playing Trasher Hunter upstairs. Return to Tramp with the Glucosite to finish the objective (but you still must look for a doctor).
Alleyway
Go back outside and into the alleyway. It will be filled with crates that you can destroy in Action Mode. When all crates are gone, you can fully explore the area.
To the left of the Wanted Poster is an Ad stuck on a pipe. Head to the red container in the back and use Action Mode to jump on top. This allows you to reach an Ad stuck to the grated fence. Head to the Target on the left and go into Action Mode. Throw a weapon (ie. the Stick) at the Target and it will drop an Ad.
Check the Gutter on the left and use your Magnifying glass to see the contents. Check the right side to find a blue handkerchief belonging to Sin, which means you must go inside the sewer.
Check the Manhole and you will have to solve a puzzle to open it. If you don’t have the patience, you can use Action Mode and repeatedly do a downward jumping attack to force your way through.
Alternatively, look at the buttons with lines. Press the buttons based on the number of lines they have, going from 1-6. The upper left button should always be first, and the button in the center should always be last. The order is:
- Upper-left
- Bottom-right
- Bottom-left
- Left
- East
- Center
Sewers
Inside the sewers, you can pick up the Handkerchief that you saw earlier. You can also check a Hole to the left of the Handkerchief which gets you an Ad. Check above two rocks near the Handkerchief to find another Ad. On the right side of the entrance, you will see a purple X on the wall. Attack it in Action mode to reveal the final Ad.
Head further into the Sewers and you will encounter self-detonating mines. If you have the repaired Remote Control that Shay helped you fix, you can use them to disable the mines temporarily, allowing you to temporarily walk across. Run along the top level, as the bottom level has chemicals.
Before you run, there is an Ad on the bottom level northeast of the Wires. Make your way to the other side, and you will see a broken Mine on the bottom level. West of the Mine is another Ad, but you must go through chemicals and take damage to get to it.
Keep going to the right to find a group of Squealers that you fought earlier, backed by their boss. You will get four ways to resolve the situation, but only Threaten will work. You can then Attack to defeat them all, or Bluff to calm them and find another way out.
If you Bluff them, grab the broken Mine and return to Shay’s Garage. Speak to Shay and have her look at the Mine to learn that it is just out of powder. Go back to Brok’s apartment and find the fallen robot outside. Use the Broken Mine on the robot to fill it with powder. Return to Drumer Street and discard the now-loaded Mine with the Pipe-Mail. That will allow you to pass by them safely.
If you Attack, you must fight 5 enemies split over two rounds. You will then fight the Squealer Boss, who will be the toughest enemy you have faced thus far. Use food items to heal/buff yourself to gain an advantage.
Regardless of how you resolve the situation, check the Bucket on the right to find the final Ad, then head east on the top level to continue.
You will reach a purifying panel area, where you can interact with the Panel to play a mini-game. You must push objects (in red) to the top where you can get them out of the pipes. The gun you are looking for is in the middle, while the other two objects are a Helios Energy Drink and an Ad.
After pushing the gun out, you can inspect it. Turn it around to find an Ad stuck on the other side. Use the Handkerchief on the dirt on the gun handle, and you can now return to Sin. Before you leave, check the middle pipe in the Machine to find the last Ad.
Return to Sin’s Apartment and talk to Sin to begin an interrogation. Combine the following pieces of information:
- Sin’s remote control switches off cameras + Pharmacy camera was deactivated
- Sin is worried someone might find his gun + Initials on the gun do not match Sin’s
- Sin’s remote control switched off the pharmacy camera? + Pharmacy drawer has been forced open
- Policeman deep sleeping in underwear in the street nearby + Sin’s anti-depressant pills can cause blackouts
- Does the gun really belong to Sin? + Did Sin put a policeman to sleep?
- Did Sin steal from a policeman? + Is Sin involved in the pharmacy theft?
You will then get into a fight with Sin. You must defeat him to continue. He throws glasses at you as his main form of attack. If you can dodge the glasses and then move in for a short combo, you should be able to defeat him with hit-and-run tactics.
If you don’t want to fight Sin, head to Drumer Street and buy some Hot Juice from the vending machines. Head back to his apartment and interact with the glasses to pour Hot Juice in there. Put Sin’s Pill inside the glass, then interrogate him. You will win without fighting.
After the battle, you can denounce Sin or forgive him. You will get the Chapter 1 achievement regardless of your choice. Forgiving Sin gives you a better relationship with him that pays off in the long run.
Chapter 2
Consciousness Center
You must take a test as Graff. Examine the Screen in front of you and examine the Rules to get started. Use the numbers at the bottom to take the questions.
The answers are as follows:
- Do nothing
- 11, 24
- Son in law
- NOTHING
- PU
- Any answer except “No one”
- 16
- 3026 A.R.
- Youth gain
- 25/25
Police Department
You will be in the Interrogation Room, and will have ten seconds to answer a question, with ten questions total. You can answer whatever you like, but here are some options that prevent you from taking too much damage.
- Brok
- Private Detective
- For Graff
- Client
- Investigating
- Free/Prison/Kill (it’s your choice)
- Yes/No (it’s your choice)
- Yes/No (it’s your choice)
- No one/Me/I don’t know (it’s your choice)
Choosing to free Sin gives you a better reputation with him in the long run.
Once you are in the cell, you have the option to switch between Brok and Graff. You can switch freely between the two of them, and they both have puzzles to solve.
Consciousness Center
You have the option of telling Klay what your invention is. You can also punch him or let it go. Your final choice is the play fair or wreck their machines.
If you choose to wreck Klay and Stubot’s machines, use the VR Learner near Graff’s project and learn about Ants (you can learn about the other two subjects as well). Inspect Graff’s project and look at the right side to learn what you need to fix it.
Regardless of what you choose, there is an Ad on the right of the sculpture with dark triangle patterns. Head outside the door and check east of Klay’s position to find an Ad on the small stone wall. There is an Ad stuck on the right of Stubot’s desk, but you need to push Stubot and/or Ott out of the way (just move into them to push).
Speak to Ott to confirm your objectives, and get the Force field item if you are playing fair. Leave the Consciousness Center through the north and you will be on the World Map. Head to Shay’s Garage as your next destination.
Shay’s Garage
Head inside and speak with Shay. Talk to her to learn more about what you need to do (whether sabotaging or playing fair). You will get the Earbuds from her after the conversation. You can take the Screwdriver on the yellow floating cushion to the right of Shay. You can check the pink Box left of the entrance to grab a Detector if playing fairly. If you chose to sabotage the machines, head into the water, then go back to the Consciousness Center and inspect Klay’s machine to sabotage it.
Head to Sector 56X as your next stop.
Sector 56X
Head all the way to the right to trigger a Drone attack on the Merchant. You must fight the Drone to protect the Merchant. Graff doesn’t deal as much damage, but he has a good aerial attack combination starting with an uppercut that will work against the drone.
If you don’t want to fight, you can also use Pebbles south of the Drone to destroy it. You can also ignore the situation by walking around the Stall.
Check the Statuette on the left side of the Merchant’s stall to put one in your inventory. If you are sabotaging Klay and Stubot’s machines, head to the arch on the right, then use the objects on the left to jump on top. Grab the Neon Bulb to the right of the sign.
If you are playing fairly, head right past the arch and use the Screwdriver on the Panel and Infophone. For the Panel, turn Thumb wheel 5 and 7 to disable the Infophone (those are the two wires leading to the Infophone icon at the bottom). This lets you use the Screwdriver on it to get the Button of the Death without hurting yourself.
Head to Home on the World Map next.
Home
After the scene with the Tramp, use the Statuette on the Stove in front of the Tramp to get Melted Plastic. If you are sabotaging Klay and Stubot’s machines, you can go back to the Consciousness Center now.
If you are playing fairly, return to Brok’s apartment and go into Graff’s room. Grab the Flour from the Drawer, and you can train with the Computer on the bed if you like.
As you leave, check the Advertisement on the wall to the right of the exit to put the Sticker in your inventory.
Go back to the Consciousness Center now, and your actions will determine what you need to do. Regardless of your choice, you must always use the Melted Plastic to fix the right side of Graff’s project.
Wreck Machines/Sabotage
To break Klay’s machine, go to Shay’s Garage and enter the water. Go back to the Consciousness Center and interact with Klay’s machine to break it.
To break Stubot’s Machine, use the Neon bulb from Sector 56X on the Ants.
Playing Fair
Put the Force field on your desk, then attach the Button of the Death and the Detector. Head outside and give Klay the Earbuds. Use the Flour on Klay, followed by the Sticker. Use the Sticker on the Force field and you are done.
You will switch to Brok in jail if you haven’t already completed his section.
Police Department
Examine the Dry Shower on the ground and you will find Cat fur on its left. Talk to Sin in the next cell and discuss himself, then discuss RJ twice. On the wall, there will be four purple buttons. Press the second button and then select the Screen. Select the Book option on the left, reading the first two pages. When you get to the third page, you will fail due to outdated firmware. Choose to update, then wait for the update to fail.
Select the Book option again, and flip to the third page. You will see arrows pointing towards directions in an order, which is:
- Bottom-left/southwest
- Top-right/northeast
- Bottom-right/southeast
- Top-left/northwest
This diagram matches the panels on the floor corners of your cell. Flip to the fifth page to find an Ad. Activate the panels in the order to activate the debug mode on the first button.
Press the third button on the wall to get some room, then talk to Sin. Choose the “Press A Button” option (this only appears if you talked to him), then ask him to press “Button 3”.
Head to the northwest corner of your cell and examine the laser wall near Sin’s sink. You will find a Defect that allows you to interact with Sin’s sink. Interact with the Sink once to break it. Talk to Sin and then ask him to press “Button 4”. This calls RJ over, and he will fix the sink.
When RJ comes over, he will leave his Hat on the Sink. Use the Cat fur on the Defect, and you will slide the fur into the hat. Since RJ is allergic, he will react badly to it after repairs are finished.
After RJ passes out, activate the first button. You can now control the cylindrical stand. Move the stand into Brok’s cell to clash with the forcefield. Do this until it reacts and breaks the camera. Do this for Sin’s cell as well to reach an Ad later.
Use the Stand and hit the four blue triangular buttons on the right of the exit. This will cause an Ad to appear on the ground, but you can’t pick it up just yet.
Move the stand towards the Touchpad near Brok’s cell to let him out, and do the same for Sin. Head to Sin’s cell and check RJ to get Flowing Honey and 200 Unis. Search him again to find an Ad. Check the Boxes to the left of the exit to get your items back, then leave. Don’t forget to pick up the Ad from the blue triangular buttons before you leave; you can’t come back to this room.
You will reach the Interrogation Room. You should head left if you don’t want a fight, but if you want Ads, you will have to fight 2 Tribots and 1 Catbot. The Catbot flies, but will come down when it tries to slam into you. Aerial attacks can take it down, or you can wait until it flies down.
After the battle, check the plant in the bottom right corner and look at the pot’s right side for an Ad. Look to the left of the room and you will see an Ad on the camera. Leave the room and you will see an Ad on the left wall (partially covered by thick glass). If you want to resolve this peacefully, head left but you will pass up the Ads for now.
When you emerge into the Police Department entrance, you will have to fight 3 Tribots. You can also choose to disable them with the Remote control if you didn’t get in a fight at the interrogation room. Once they are down, watch the scenes that play out. If you quickly got out in under 15 minutes and didn’t fight your way through the Police Department, you will make it to Graff’s science fair on time.
Apartment
Back at Brok’s apartment, choose to tell Graff what you like. In Graff’s Room, use the Computer. Brok will try to make dinner with the ingredients available to him. You can put whatever combination you like, but you can use Pampalos fruit + Goat’s cheese + Antburger if you aren’t feeling confident.
After dinner, watch the scenes and you will head to Shay’s Garage for the fight.
Shay’s Garage
You can choose to listen to Shay’s theory about time if you like. You will then have to go into virtual combat for the tournament. Fight off two waves of enemies (which are randomly generated) and you will reach your final opponent for the night fight. Hit them once to reveal they are a woman, and you can continue to fight or refuse.
If you continue to fight, your opponent will move quickly, using fast combinations to prevent you from getting a hit in. If you are struggling, stay on the defensive and use your Special Attack (when below 50%) as your main form of offence. If you get too weak, Shay will offer to take you out of the fight. You can accept or decline as you wish, though you will have to start over again if you are KO’ed.
You get the Chapter 2 achievement after the fight, and 600 Unis if you win (you get 400 Unis if you chose to send Bolt to Shay).
Chapter 3
Apartment
When you regain control, head right but be careful of the self-regenerating mines. You will find a Button that activates a window on your left. Look through it, then look through the next window on the right. There will be a lower window further to the right that opens up, look through that one too.
Continue to the right to fight 3 Tribots. You will have to fight two rounds with these Tribots; don’t let your guard down after the first wave. Head right and you will find Graff surrounded by mines. Leave or try to help him, you will wake up from the dream regardless of your choice.
After the scene, you must choose between going to the Police Station or Graff’s school. Regardless of what you choose, you must check your mailbox to get a Bill before you can leave.
When you emerge, there will be a fight with more Squealers. Defeat the three of them to move on to your next destination. Fortunately, if you chose the Police Department, the Chief will leave for another mission. You get to go to the Consciousness Center either way.
If you would like to play Trasher Hunter on the top level before you leave, each try now costs 20 Unis. However, the prizes have improved significantly, as you can win up to 500 Unis by playing now. 50 Unis coupons now become 200 Unis coupons. A few games and you can pay off your bill easily.
If you like, you can also switch with Graff to solve a different set of puzzles.
Consciousness Center
Enter the classroom and meet with the Director. Discuss the “Science Fair” and then “The Present” to learn that you need to find a self-modifier chip.
Your next destination is Shay’s Garage to get a lead.
Shay’s Garage
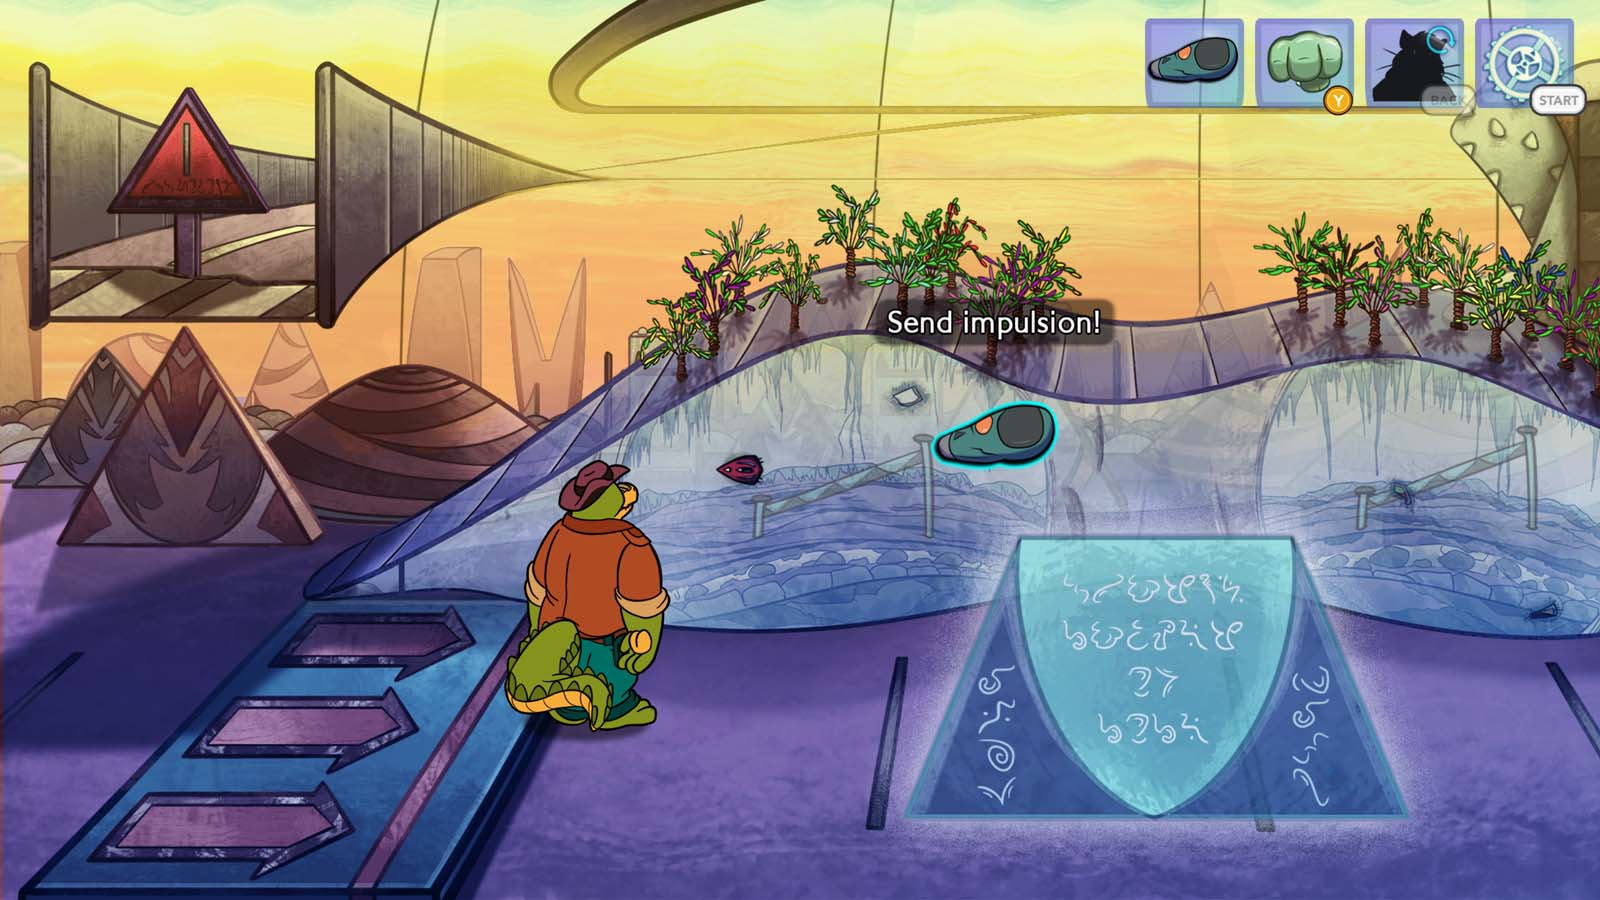
Speak to Shay and offer to help her. You will get a Weird Device that will be used to find special parts for Shay as you travel. It acts as a radar: when used, it will react to materials with 1-5 arcs. When 5 arcs are visible, the material will be marked by “!!!” signs, which you can examine to pick them up.
You will also get a lead on the self-modifier chip if you ask Shay about it, then ask about “The Gloom”. This unlocks the Hacker Back Street on the World Map. If you managed to get to Graff’s science fair on time, Shay will instead ask you to go to Hacker Back Street to repay a debt of 100 Unis, which she gives you.
Shay will ask about her rubber cutter. If you show her the Lever you found when you broke it off earlier, Shay will identify that as the Rubber Cutter. Its name will now be changed, but you still keep the item.
If you sent Bolt to Shay for repairs, you can now talk to Bolt to discover the location of any Ads you haven’t found yet. Bolt will provide clues for 20 Unis, and won’t outright mark them in the area, but you will get a clue that tells you where to look.
Leave the Garage and use the Weird Device, going north of the spinning wheel in the river. You will find a Material there with the radar helping you narrow the position. You can find another Material while playing Trasher Hunter. You can find another Material at Border Post 001, on the rooftop leading to the laser grids (the rooftop accessed with the east plank). Another Material can be found in Drumer Street, going all the way east and checking the Garbage Collector.
Head to Hacker Back Street when you are ready to proceed.
Hacker Back Street
Head to the left and you will get into a battle with some Squealers if you took down the Boss in Chapter 2. After the battle, a scene will play. You will then resume your journey at the entrance as if nothing happened.
Check the nearby garbage bags to find an Ad on the southwest bag. Keep going left and you will see a Plank supported by Brackets. Lower the Brackets to open up the Plank, then enter Action Mode and jump all the way to the highest northeast window. You will find an Ad between the bars of the window. Head left but just before you move to Hacker Street, check the grate to the left of the door. The final Ad is there, though you will need to be careful with your cursor to select it.
Head left to find RJ standing outside a door. If you didn’t need the self-modifier chip from the Director earlier, she will ask if you can help her get one now. You can accept or decline the mission.
RJ won’t let anyone in, but he will make an exception for elephants. You need to disguise yourself as an elephant to get past him.
Before the search, look south of RJ to find a blue “bowl” that has an Ad on the east side. West of RJ will be a ruined building where you can find an Ad among the ruined wall next to the pillar. You will find the final Ad on top of the broken Pipe-Pill on the left side. Use Action Mode to jump onto the Pipe-Pill to reach it.
There will be some rubber Pipe on the floor in front of RJ. Use the Rubber Cutter to cut some off and get a Pipe chunk. Head back to the Back Street Entrance and punch the Statue left of the plank. It will drop its Plastic Wings, which you should pick up (destroying the statue is not necessary). Use Action Mode to jump up east of the Statue onto the window sills to access a clothesline. Interact with it to get some String.
Go to your inventory and start combining the String, Wings, and Pipe chunk to create a Disguise (String needs to be combined first). Use the Disguise on RJ to go inside.
Speak to Hacker/The Gloom and you will get into a fight with some Drones. Destroy the Drones and ask for the self-modifier chip. The asking price is 10,000 Unis. Unless you have played a lot of Trasher Hunter, you likely won’t have that much money. You can Threaten your way and Insist to knock The Gloom out, then search him while unconscious to get the Self-Modifier Chip and a Hack Device.
If you negotiate another payment method, The Gloom will give you the Hack Device and then send you to the Police Department to remove his files from the database. No matter how you resolve the situation, you end up at the Police Department (though getting the Self-Modifier Chip for free gets you a scene about handing it over).
Alternatively, if you are just paying Shay’s debt, The Gloom will ask you to help him. You can accept or Threaten him accordingly.
Head back to The Gloom’s room and check the open pizza box on the right side to find a nearby Ad. Look at the shelf behind The Gloom to find an Ad next to a purple book. Destroy the wooden planks to the right of the shelf in Action Mode to get the final Ad (it might take a while).
Police Department
At the entrance, your goal is to get into the Chief’s Office. You can’t get in as you don’t have permission to go inside. The robot at the counter is blind, and can’t verify you normally. There will be five panels on the floor in front of you, saying the following phrases (from left to right):
- Please!
- Mister Pork!
- Ask us anything!
- Enter
- My office!
Stand on the first, second, fourth, and fifth panels to gain entry (it says “Please Mister Pork enter my office!”).
Before going inside, check the right side of the entrance to find an Ad. To the left of the office is a Window you can operate with a Button. Use the Button and keep opening the Window to fully reveal an Ad in its northeast. Check behind the blind bot and wait for an Ad to appear on one of the screens. You can also grab the Speaker to the right of the Office door.
Inside the Office, you will find Ott. Go through all the conversation options, then end the conversation to note that Ott needs to go to the bathroom.
Go into Action Mode and attack the chair in the middle of the room to knock it over, revealing a Speaker slot underneath. Use the Speaker from your inventory on the slot. Use the Assistant to Ott’s left and change the ambience to Waterfall.
Talk to Ott and offer to get him a drink in a conversation option. Head back outside and step on the fifth panel (that says My office!) to have the blind bot offer you a drink. Choose Flowing Water, then return to Ott and give him the drink. This forces him to leave the room, and you should lock the door behind you to prevent him from returning.
Before you search the room, you can search the Chief’s desk to find an Ad on a piece of paper in the Box. Check the wall behind where Ott was sitting and you will find an Ad on the diagram’s right side. Use the computer and check the top right corner to find the last Ad.
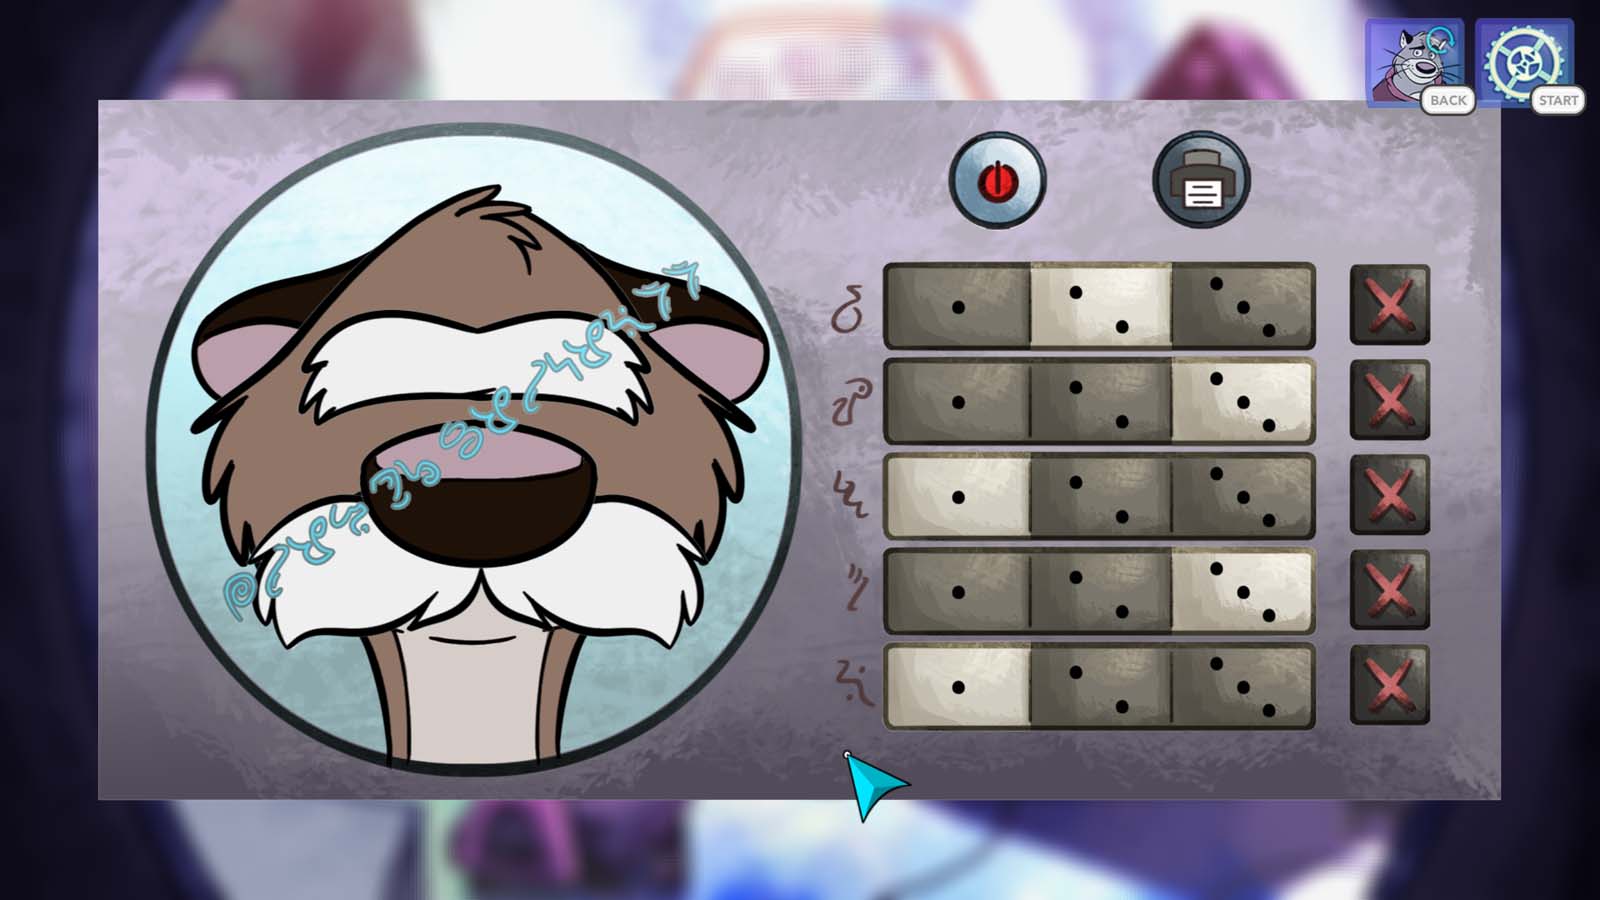
If you try to click on the white circle, it won’t work because it is based on identification. Examine the Box to reveal it is an Identikit, which allows you to draw up portraits. Turn it on with the power button at the top, then select the following numbers (from top to bottom):
2, 3, 1, 3, 1
This gives you an image that looks like Chief Wes. If you press the Printer button at the top, it won’t work because there isn’t a working printer nearby.
Leave the Identikit and search the Mess under the Trophies. You will reveal a Printer. Examine the Printer to find a wire that you can plug into the Power socket on its right. You can then print the Picture of Wes from the Identikit (pick it up from the Printer). Combine your Hacking phone with the Picture in your inventory, then use the Hacking phone on the picture of Wes when using the screen. This gets you the Holographic Wes, which you can use on the white circle.
This is the end of Brok’s situation, and you will switch to Graff.
Bunker
Start by examining the southeast button to find an Ad. Look to the northeast to find a Weight on the ground.
Head west and you will find a green object stuck in a wall. Enter Action Mode and punch it until it falls out. You can then put the Weight into your inventory.
Keep going west to find a ball machine, which you can activate with the right-most button. You will need to press the numbered buttons as the ball moves through the puzzle. The buttons control blue tubes, which turn pink and change shape when the button is pressed. The ball moves slowly, and the tube change isn’t permanent, meaning you will have to wait for the ball to be near the tube before pressing the button. Otherwise, you start over.
Press Buttons 1-3, but leave 4 alone because it actually sends the ball off course. Before you need to press Button 5, the ball will get stuck. Enter Action Mode and hit the area near where the ball stopped to get it going again. Press Button 5 when the ball approaches, and a Triangular Token will emerge from a slot when the puzzle finishes.
Look at the three circles on the ground, with lines in their centre pointing towards a direction. Head to the spot where all lines are pointing and look for a Trap notice to pop up. Examine the Trap and it reveals a Key lock. Use your Apartment key on the Key lock to get another Weight.
Head east and you will see an Ad to the east of a slot, hidden in the darkness. In the middle of the room is a giant 4×4 grid, which is a game of Tic Tac Toe. You need to get 4 blue squares in a row, while the computer tries to get 4 green squares in a row. Beating the game legitimately is difficult, but you can get around this by dropping items from your inventory onto squares. Do this for 3 squares and step on the fourth to make another Triangular Token emerge from the slot.
South of the grid is a crack on the ground. Enter Action Mode and repeatedly jump on it until a Weight is uncovered. Search northeast of the grid to find another Weight.
Go back to the beginning and then go into the north room. Put some Weights from your inventory on one side of the scale, then jump on the elevated side. The height should be enough to reach the upper level if you jump into Action Mode. Head to the left and investigate the third pink triangle to find the final Ad. Head to the right to get another Weight.
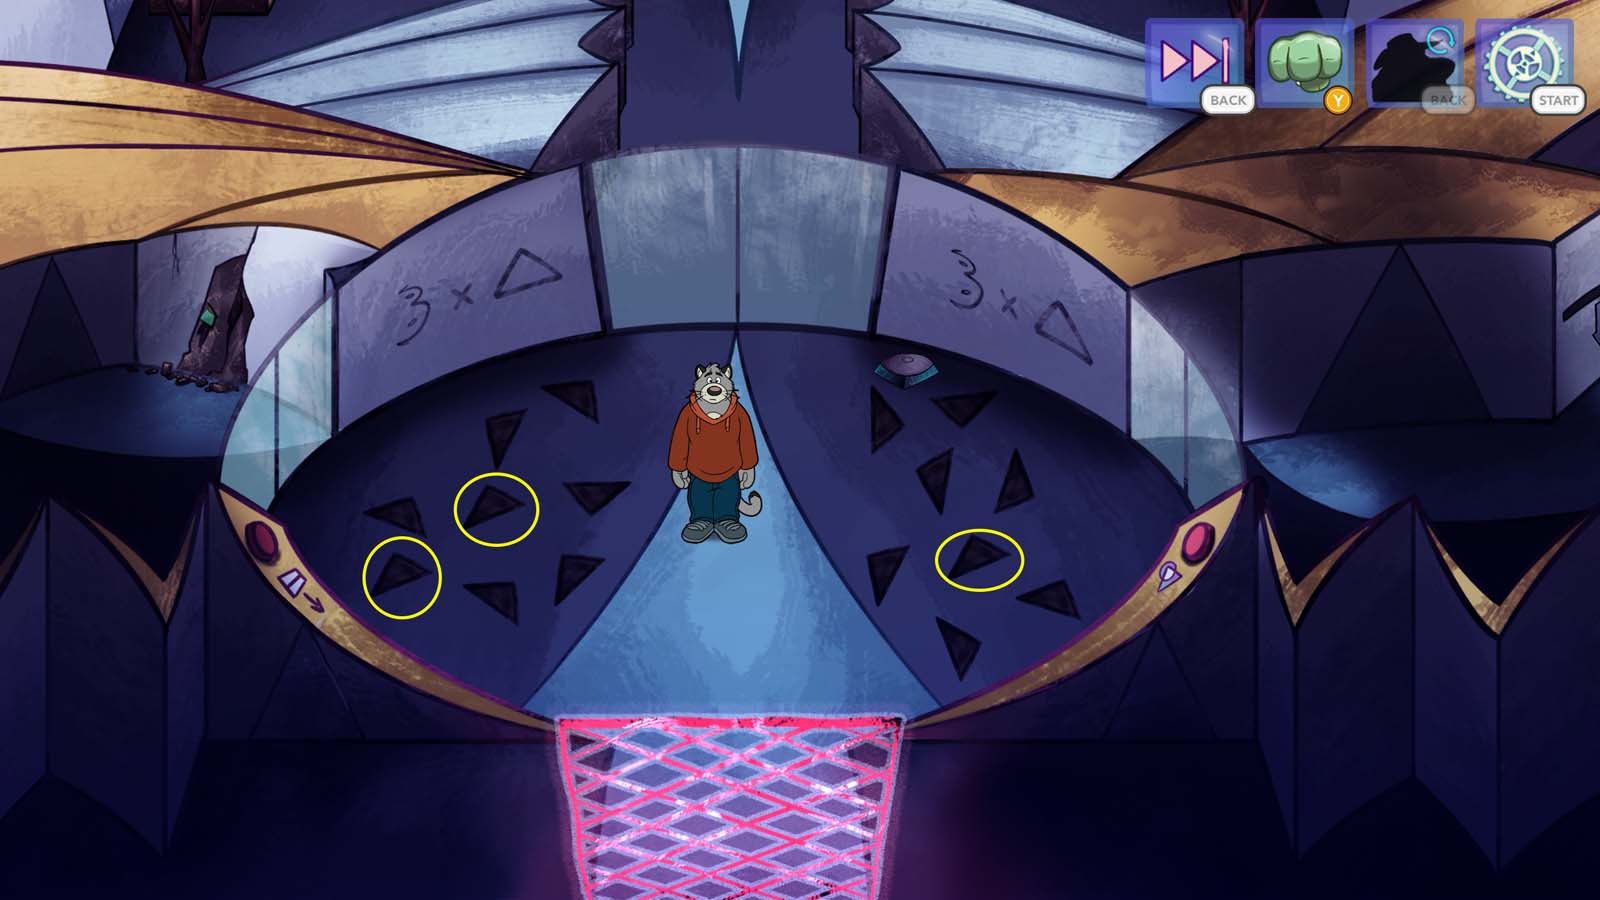
Head back down and break the crate on your left to get the last Weight. You now have enough Weights to solve the balance puzzle. You need to ensure that the weight on both sides equals 17. You can tell how heavy a weight is by the number of “petals” around the center. The easiest way to do this is to take the Weights with 1, 6, and 10 “petals” on one side, and everything else on the other. That balances both sides and gets you the last Triangular Token.
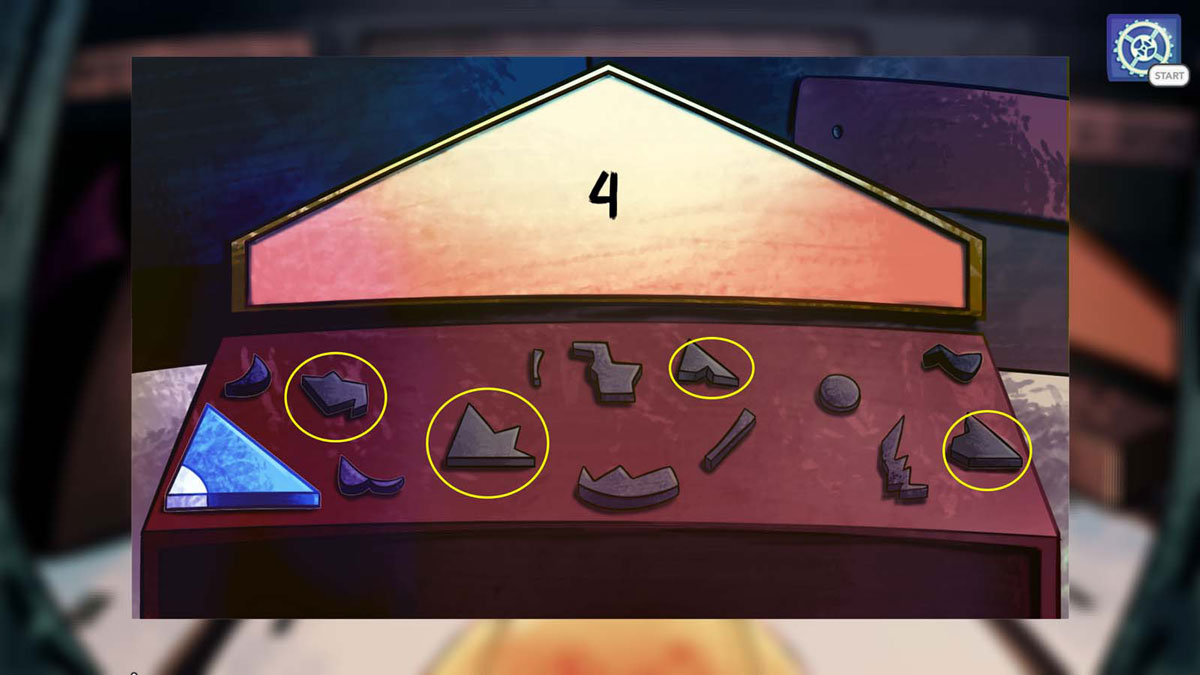
Head back to the beginning with the three Triangular Tokens. You need to put the tokens in three triangle slots to open the path to the exit. If you aren’t sure what the three triangles are, head west and look at the floating triangle Hologram for hints. If you are still stuck, the correct slots are circled in yellow.
Completing this concludes Graff’s part of the chapter. You get the Chapter 3 achievement after both sides have finished.
Chapter 4
Front Lab
When you arrive, you can grab three Ads. One Ad is on the black capsule road you just emerged from, but you will have to move quickly as other capsules will instantly remove all your health if you are hit. There is another Ad behind the Hoverbike on the right, and the final Ad sticking to the glass doors on the entrance to the left (under the 20 sign). You will need to use Action Mode to jump up, as the stairs automatically push you down.
Hall
Inside the lab, talk to the Guard about The Situation, Dr. Hush, The Lab, and Guard. Grab the Ad in the centre of the floor. Enter Action Mode and jump up to the shelf behind the Guard to reach an Ad stuck on a light in the northwest area. Head to the northwest door to investigate Dr. Hush’s office.
Dr. Hush’s Office
You will find an Ad on the three circles on the right side of the room. Look at the Materials on the left side of the room to find an Ad near the northwest. Watch the animated Painting in the northeast and wait for an Ad to appear to select it. Move quickly, or you will have to wait.
You can inspect the Biscuits on the centre table, the Spot on the ground, and the Screen on the left.
Return to the Main Hall and head to Dr. Mink’s office on the right. Knock first and he won’t come out. Enter Action Mode and punch the door until it breaks down, then watch the scene.
Dr. Mink’s Office
Check the Sink on the right and drink the liquid if you like (it heals you). Drain it and search the Sink to find an Ad. Check the Column on the left, and check slightly above it to find an Ad on the Window. Check the Wires to the left of the central table and you can hover over the final Ad on the blue sockets.
Check the Stain under the Bed, then the Equipment on the table followed by the Glove and headset. Examine the Box of nanites left of the Column, then the Canister underneath the table. Finally, inspect the Power outlet southeast of the Sink. Examine the Tablet as well.
Check the body and examine the Device, Spot and Head. Check the Spots on the clothes and Device as well. Check the Right hand for clues.
Talk with Dr. Mink, asking about Himself and Dr. Hush. Return to Dr. Hush’s office, and you should see that the Robot is now fully charged, allowing you to interact with Tidy. Ask about Dr. Hush and Tidy, then The Situation. Ask about Dr. Hush twice to unlock the option about The Golden Rule. Exhaust all conversation options (they turn transparent) before continuing. You can also go over everything again now that Dr. Mink can provide a better explanation. Talk to Dr. Mink about Tidy twice.
If you are interested in helping Tramp out with his medicine issues, use the Medical prescription on Dr. Mink and he will help you with it.
Return to the Main Hall and enter the middle door to reach the Bathroom.
Bathroom
Examine the Shower?/Showlet on the left to find an Ad. Grab the Map to the right of the Showler. Open the Drawer on the right and you will find an Ad inside.
Examine the Cup near the Drawer, then inspect the Trap in the bottom left corner. Inspect the Grinder and Wrapping. Open the First aid kit to the left of the Showler, then punch it in Action Mode. If you want some supplies, you can open Fridge Left to find Pampalos Fruits, an Energy Drink, and Pizzants.
Head back to the main Hall and check the Box near the Pipe. There should be an Energy Drink that you can get if you punched the First aid kit button. Repeat the process a second time and check the Box. It looks empty, but the Hall’s final Ad is here.
When you have examined enough, Brok will notice Ott wants to say something. If this option doesn’t come up, exhaust all conversation options with Dr. Mink and examine items in the rooms. Explore as much as you want, then speak to Ott to solve the mystery. You can choose to charge Dr. Mink for the murder or refuse.
If you charge Dr. Mink, Brok’s scenario ends there. If you refuse to charge, you continue investigating.
New Investigation
You will be back in Dr. Mink’s office. Re-examine the body and look at the Device again to add it to your inventory. Examine the body’s right hand with your Magnifying glass to get a clue.
Look up at Dr. Mink’s ceiling and examine the Trap. Dr. Mink will tell you to use his tablet to lower the ladder. Access the Tablet and use the upper right button to lower the ladder. Use the ladder and you will end up back in Dr. Hush’s office. You can now take Dr. Hush’s tablet on the table, which you couldn’t do before.
Grab the Lamp near Tidy, then the Magnifying glass on the Spot south of the table. Check the Painting near Tidy again to reveal a weird spot on the wall. Enter Action Mode and punch it to get another clue. Press the Button on the left side of the table to reveal a Ramp, then inspect it to get a clue from Tidy.
Head back to Dr. Mink’s office and use the Lamp found near the body with the bottom right button to get more clues. Do the same with the Lamp from Dr. Hush’s room to get another clue. Examine the Speaker above the Bed as well. Use Dr. Hush’s tablet on the body’s left hand,
Go back to the Bathroom and examine the Cup one more time. Examine the Meety-me in the middle of the room to get your last clue. Open the left side of the fridge again to get another clue. Open the right side and interact with the Wardrobe to pull the clothes out. You can find the Bathroom’s final Ad on the top shelf among some clothes.
Check the Little round things among the clothes to add a Restroom Pill to your inventory. Use your Magnifying glass on the Sink for some clues. Check the Pill with Dr. Mink’s tablet, then look it up with the bottom-left button for a clue.
Head back outside and talk to the Guard about The Situation twice. This allows you to check the Door monitoring device that appears on the desk. Check all four rooms on the device to get clues. Speak to the Guard again about The Lie and you will enter an interrogation. The correct pairings are:
- The guard opened Dr. Hush’s room at 5:10 + The lamp in Dr. Hush’s room had a fatal shock at 5:10
- At 5:10 the guard only checked Dr. Hush’s room + Dr. Hush was neither in his room nor the hall at 5:10
- The Meety-me has a recording of Dr. Hush voice
- Hush’s life tracking stopped around 5:00 + Dr. Hush wasn’t in the hall, his office or the restroom at 5:10
- The guard took his shift at 3:00 + The guard entered the lab at 4:38
- Promise to keep the secret (not relevant to the investigation, it’s your choice)
After the interrogation, examine the Flowers near the Guard to get a Flower in your inventory. Bring the Flower to Dr. Mink’s tablet and use it with the bottom right button to learn it is a Phoenixy flower. Use the bottom left button to look up the Phoenixy.
Talk to Dr. Mink again and go through all the conversation options, but don’t touch “The Investigation”. If you searched everywhere, Brok should mention he has all the clues he needs. Talk to Dr. Mink again and talk about “The Investigation”.
Answer the following when the options come up:
- Tidy
- The lamp next to the body received a shock at 11:02 + Dr. Hush’s life tracking stopped around 5:00
- Hush’s blood stains are fake + Antburger “extra Tomatoze sauce” wrapping in restroom trash
- Mink’s daily Antburger was already unfrozen + Dr. Hush’s death was staged with Antburger sauce
- Nanites on Dr. Hush’s hand + Mixing Phoenixy flowers and nanites can cause death
- Nanites on the coffee stain in Dr. Hush’s room + Dr. Hush was murdered with poisonous nanites
- Nanites and a flower in the restroom sink + The coffee was poisoned
- Fake wall between the scientists rooms
- Tidy was last recorded entering the restroom at 4:24 + Tidy stayed charging from 4:50 to 11:10
- Hush was last recorded leaving his room at 5:04 + Dr. Hush wasn’t in the hall, his office or the restroom at 5:10
- Point to the area between the two dotted horizontal red lines
- Tomatoze sauce in the ventilation system
- Hush never left his office
- Hush always drinks coffee in the restroom
At this point, you can choose to push the point or refuse, but you are forced to push the point no matter what you choose.
- The guard looked away at 4:38 for a minute
- Tidy can stretch arms vertically and horizontally
- Hush designed a ramp for Tidy to access the workbench + Dr. Mink’s room column is 10 feet high
- Crumbs on the ramp in Dr. Hush’s room
- Point to the lever near the Trap/vent on the ceiling
- The lamp in Dr. Hush’s room had a fatal shock at 5:10
- The lamp in Dr. Mink’s room belongs to Dr. Hush + The lamp next to the body received a shock at 11:02
- Point to the hole in the wall on the left, above the cabinet
- Tidy made a mistake
- Point to the lamp on the right
- Hush is obsessive with tidiness and order
- The body “magically” appeared when Brok entered the room
- Mink listened to “TechDream” music at 11:00
- Tidy’s charging makes him go through various consciousness stages
- Hush’s tablet transferred AI data at 4:45 + Dr. Hush died between 4:24 and 4:38
- Hush is alive
- Hush takes Accel 500 which boosts body activity
You must then fight Tidy in a battle. Dodge often to avoid his attacks, which have long reach. When Tidy stops moving and begins “vibrating”, it will unleash a special move that can’t be interrupted (not even with your own special attack). You must dodge and wait for it to end before you can resume fighting.
Eventually this battle will move to the highway. You must charge into Tidy to take him down. Use the boosts to do it; you can’t do it normally. Fortunately, Tidy must align with you to attack you, and that is the perfect opportunity to strike.
After you take down Tidy, you will finish Brok’s adventure and switch to Graff.
If you would like to skip this section quickly and you haven’t started the investigation, just repeatedly jump on the body in Action Mode to jump straight to the chase scene.
Bunker
Check the right side of the Tribot display to find an Ad, then check south to find another Ad near the chair.
Examine the Footscreen, check the Frame and Doors on the right, then try to go to the northwest and southwest paths. Press the Button on the left, examine the Tribots and the nearby Door, then talk to Klay. If you have done everything, the Footscreen will revert to an hourglass and Klay will rest.
Talk to Klay and Insist to learn more about him. When the option to volunteer comes up, choose Graff if you want Klay to get you out while you do nothing. Choose Klay if you believe you can do better, then don’t approach the wall no matter what.
If you choose to go to the wall, Graff will not be able to pass, even if you do everything correctly. This will be the option you want if you want the best ending.
The first challenge gives you the option to tell the truth or lie. If you lie, Klay gets hurt. You can also say the following message or refuse to do so.
The second challenge asks if you would fight for your friend. If you answer “Yes”, you must fight a Tribot to prove it. A Tribot and a Catbot will emerge to fight you for the second round.
The third challenge is a rhythm game. You must match your movements on the Footscreen to the sounds that you hear. A bell sound is the Dash symbol, an unscrewing sound is the Point Symbol, a beep sound is the Colon symbol, and if you hear nothing for 2 seconds, you step on the empty panel.
It will be a test of reflexes that will get harder as time counts down. Do your best and move as quickly as you can.
After the challenge, you can press the button or choose not to. Pressing the button will hurt Klay. Regardless of what you choose, you will both leave.
Bunker (Front)
Graff will be affected by the pollution and gradually lose health, which means you need to be quick.
Check the Pipe-Pill to find an Ad at the bottom. South of the bunker door is a pipe that is close to your screen; it also has an Ad you can pick up. It may be blurry/hard to see because it is close to the screen. Head right to have a Squealer sell you a Toxout Pill for 1000 Unis. Unfortunately, it’s unlikely Graff has that much money. Below the Squealer is the final Ad buried in the garbage bags.
Leave the Bunker by continuing to the right and head Home when you reach the World Map.
When you regain control of Brok, return to your Apartment. Choose the Toxout Pill as the priority.
When you regain control of Graff, check the Drawer and choose whatever message you like.
Shay’s Garage
Brok will run to Shay’s Garage and prepare for the next fight. If you haven’t gathered all the materials for Shay yet, she will ask you to find the remaining ones before the fight. You can also explore and get the new medicine for the Tramp if you updated your prescription with Dr. Mink.
Head to Drumer Street and go to the Pharmacy, using the updated prescription on the scanner. This gives you the Medicine for tramp, which you should give him as soon as possible.
Head back Home and enter Graff’s room (he will let you enter). Check the southeast corner of his room with the Weird device to find the second-last Material.
Head back to Shay’s Garage and use the Weird Device on the Mess to Shay’s left. That’s the final material, and you can hand everything to Shay now. This gives you the All materials achievement and the full payout. You can go straight to the night fight or continue exploring if you think you missed something.
The fight will largely be the same as last time, but with more enemies and more rounds. Your final opponent is RJ, who is significantly tougher than the last enemy.
Stay out of the way of RJ’s charge attack, then hit him while he is stunned. If you can use your Special Attack, stay out of his way and let it charge, then use it. Hit-and-run tactics work well here.
If you win, you can decide how to resolve your situation with RJ (Talk, Punch, Give Up). You also get 600 Unis if you win. If you are going to lose, Shay will offer to bail you out, and it is your choice whether you want to take it.
You will end up in the Hacker Back Street and fight off 4 Squealers. After the battle and scene, you can tell Graff the truth or lie. You then get the option to hand Graff something from your inventory, like a Pred toy.
You get the Chapter 4 achievement when you are finished.
Chapter 5
When the chapter starts, you will be fighting 3 robots in the apartment. Do your best to fight them off; the space is limited but that also means enemies can’t run away.
You will now take control of Graff, though you can switch between him and Brok at any time.
As Graff, check the Mail system and the mailbox to get a Bank statement, a Triweb bill, and a Weird Invoice. Head to the Consciousness Center.
Consciousness Center
You can choose to denounce Klay or keep your silence. Regardless of what you choose, you unlock the Museum as a destination on the World Map.
Time is ticking and you need to move quickly, as you only have an hour that counts down the moment the timer appears. Manually pause your game if you want to halt the timer. Head to the Museum straight away.
Museum
Grab an Ad on the right side of the “-200 000 B.R.” shelf, then head east and grab the Museum Piece from the floor next to the Triangular stone. Head to the right and you will see a Button in the northeast. Punch it to lower the laser beams and grab an Ad in the bottom right exhibit. Use Action Mode to jump on the Round stone in the middle of the area, then jump across the brick Exposition exhibits. Grab some Parchment on top of the left Exposition exhibit. The final Ad is on top of the right exhibit.
Head to the left side of the room and examine the Stand in the “1 000 000 000 BR” exhibit, placing the Museum Piece inside. Use the Parchment you found and put it in the empty Space in the left Exposition exhibit to reveal an “I”. Head to the right past where the laser beams were and punch the X on the wall in Action Mode to reveal an “F”.
Head to the centre of the room and interact with the Triangular stone. Press the blank trapezoid to play a game where you are selecting the right shapes. Pick one shape (ie. the cylinder) and keep selecting it through all the shape displays. If you fail, you restart the game. If you succeed, the bottom will open and you can pick up a shape based on what you pick.
The full collection of four shapes consists of a Printed rectangular slab, Printed sphere, Printed triangular prism, and a Printed half sphere.
Head to the dark exhibit that talks about Rebirth Day. Use the Printed half sphere on the Exhibit to reveal the letter “C”. Look at the Big keyboard below and use the Printed rectangular slab on the open panel (you will get to it later). Head right to the Stele that discusses gender equality. Examine the Hole and you get the hint “CC Under STU seat”.
This tells you to go back to the Consciousness Center and check under Stubot’s seat. You will get the Museum key, which can then be used on the Hole to reveal the letter H.
If you check the “-200 000 B.R.” exhibit (where you found the first Ad), you will notice there are two statues when there are supposed to be three. Head to Sector 56X and grab a Statuette from the Merchant’s stall. Place the Statuette in the missing statue exhibit to get the letter G.
Head back to the Museum entrance and examine the Sign of the old Toxout Pill. Use the Printed triangular prism on the screw (your Screwdriver doesn’t work) to reveal the letter E.
Each letter is paired with a number that indicates when it should be pressed. Head back to the Big keyboard and press the letters in the following order:
D, G, H, A, I, C, B, E, F
If you want the answer in terms of numbers, it is:
4, 7, 8, 1, 9, 3, 2, 5, 6
You will now switch to Brok. As you leave the Apartment, you will get a call from Dr. Gherkin, which unlocks the Factory as a destination on the map. Unfortunately, you can’t walk straight there and must go through the Border Post 001.
Border Post 001
When you arrive, you must fight three large robots. One is a military robot that is particularly large and can deal a lot of damage. Try to watch its attacks and dodge to the best of your ability, taking out the other two robots. When they are down, attack the military robot’s back to avoid taking damage. Hit-and-run tactics are the key to winning.
Head to the Scanner, which allows you to head straight to the Factory.
Factory
As you head right, there is a Hologram in the middle. Check the bottom right corner to find an Ad.
Head to the right to find a giant box where Dr. Gherkin is. Check the Window to talk to the Doctor, but he refuses to come out. Check behind the box to find another Ad, though you will have to go around the left side to reach it (there is space to move).
You can use Action Mode to punch down the door, or you can use your Remote Control on the Fixbot on the left side of the area. This allows you to direct the Fixbot to the broken holes on the membrane, fixing them up. If you bust down the door, return to the Factory and fight off the robots that arrive. If you repair the membrane, speak to Dr. Gherkin and he will come out.
Talk to Dr. Gherkin with all the conversation options, then go inside the Sentry Box and check the northeast part of the Window (the area covered by the window) to find an Ad (it is well hidden and it might take a few tries).
Head back to Border Post 001. You can choose to Fight, Go Back, or Hide. Fight is the safest option since you can destroy the robots. Hide is tricky to pull off, and Go Back gets you caught right away. You will fight 2 Tribots, 1 flying Catbot, and 1 military robot.
After the battle, Dr. Gherkin will repair the Pipe-Pill. Brok will get a message saying not to trust Dr. Gherkin. Once the repairs are done, you will move to Hacker Back Street.
Hacker Back Street
When you arrive, you will notice a Squealer on the phone. Approach him if you defeated the Squealer boss in Chapter 2 and fought the Squealers every time to make him run away. You will then get into a fight with Drones. Alternatively, you can attack him from behind to knock him into the hole.
Head west after the battle. RJ will be standing outside, whether you helped him or not. Brok will get another message telling him not to trust Dr. Gherkin again. You can talk to RJ to meet The Gloom. Ask The Gloom to check your messages, then head back outside.
After the scene, head back to the Factory and speak with Dr. Gherkin. Robots will appear on the left, but Dr. Gherkin will propose going right to take a long detour to the Border Post. Pick whichever path you like and leave the Border Post.
At Hacker Back Street, speak to RJ to save his life. Dr. Gherkin wants to head to Sector 56X, which is your next destination.
Alternatively, you can choose to save RJ first. Head to Drumer Street and use Brok’s citizen code (368745) to open the Pharmacy. Get the Daily Pill from the Machine, and then give the Toxout Pill to RJ.
Sector 56X
Dr. Gherkin will get to work repairing the Pipe-Pill in the area. After he is done, move to the right to meet Dee, who you fought in the first night fight. You will be ambushed by robots, but Dee will join you in the fight this time. Don’t let her do all the work; she has a health bar that can go down to 0.
After the battle, you have an Interrogation with Dee. Use the following responses:
- A journalist has called Dr. Gherkin with a secret identity + Warning messages about Dr. Gherkin from an unknown journalist
- Message sender did research on Sin + Picture of a happy woman and girl with Sin
- Dee is worried about her husband Sin + Dee is journalist and warned me about Dr. Gherkin
- Gherkin said he’s “part of”… something + Message sender did research on Government
- Government has total control over all forms of media
You will unlock the Chapter 5 achievement when the interrogation finishes.
Final Chapter
Consciousness Center
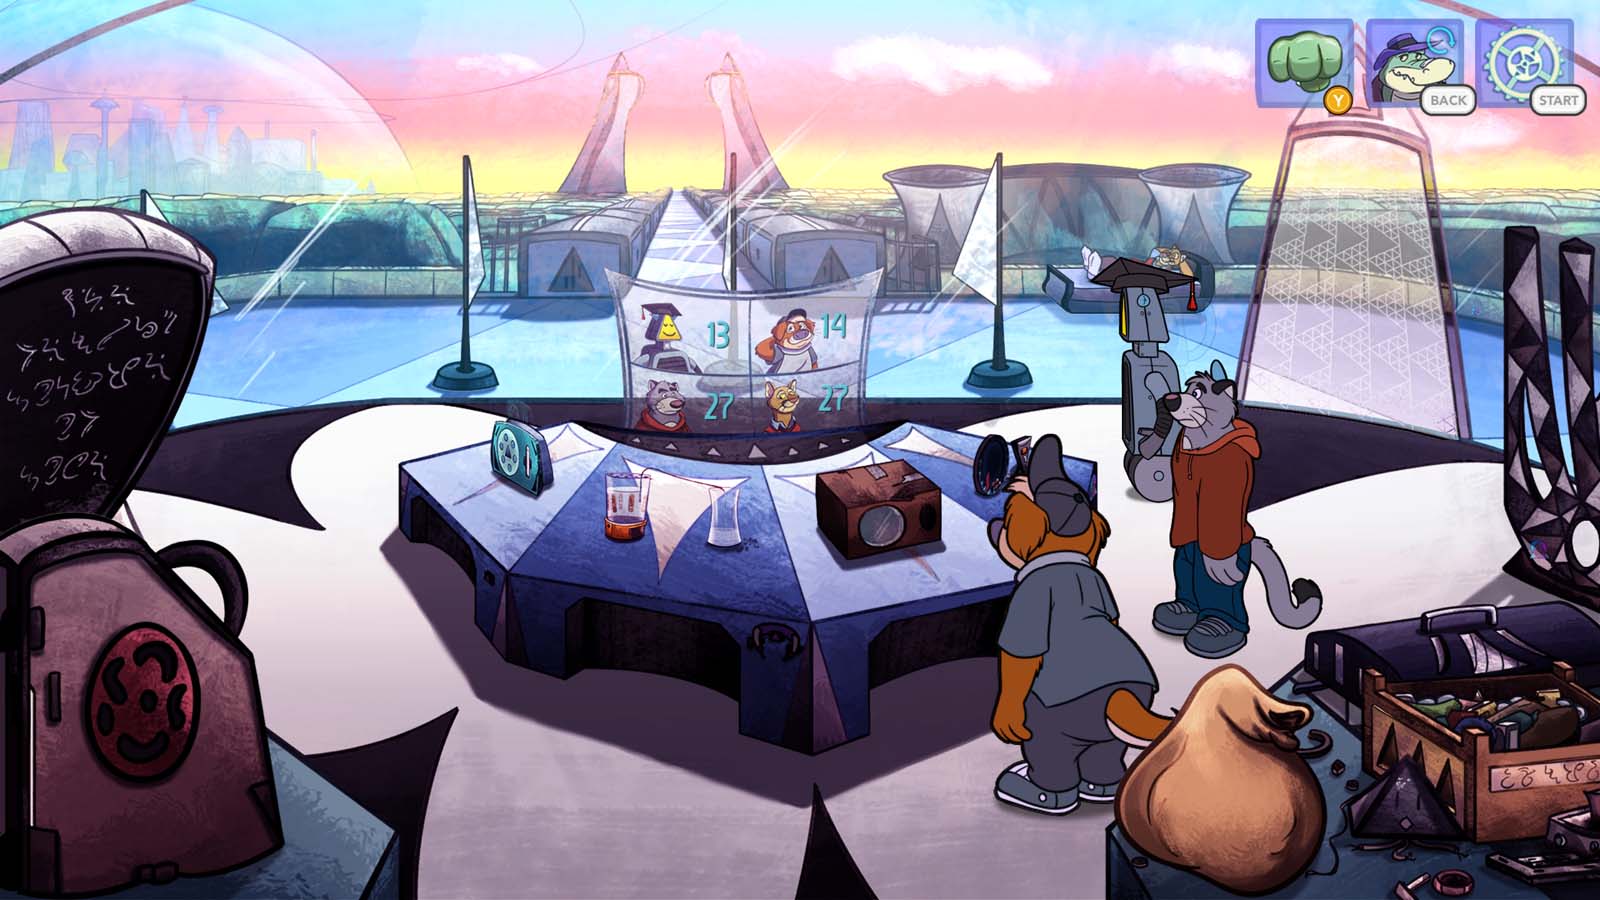
You will discuss the results of Graff’s academic performance throughout the game here. If Graff got a better score (you didn’t sabotage Klay/Stubot’s experiment, did well during the Bunker test), you will get the Best Student achievement here. Graff will always receive a 40-point penalty, which will factor into his pass/fail score.
The next scenes that play out will depend on whether Graff failed or passed. If Graff passed, you will get the Drumer ending.
If Graff failed, you will plan with Ott to try and change the results before tonight. Check your inventory (all other options don’t work) and you will get your destination as Hacker Back Street.
Hacker Back Street
Enter the door leading to The Gloom, and show him the Bank statement. This will get his assistance, and the two friends will decide to investigate the Toxout Pill shortage.
If RJ is safe, head to the right after talking with him. If RJ is not safe, you must head right to move to the entrance of Hacker Back Street, and run into Squealers. You get caught unless you manage to fight them off with Graff (a tough fight, but it can be won). Graff is not supposed to win this fight; keep that in mind before you pick your options.
If you win the fight, Ott will be taken hostage. You can run, keep fighting, or surrender. Only Keep Fighting leads to a special ending.
Keep Fighting
If you choose to keep fighting, watch the scenes. You will head to Shay’s Garage. Examine the entrance and put in the words “Time, Erases, Memory”.
Inside the Garage, head left and interact with the Blanket. Use the Pendant from your inventory and put it into the Slot on the left. Set the Timeline on the right, and then use the Door. You will get the Till the End of Time ending.
If you choose all other routes, you will take control of Brok at the Bunker.
Bunker
You must choose whether Dee or Brok fights off the robots while the other tries to open the door.
If you choose Brok to hold off the enemies, you need to stay alive for 90 seconds before Dee activates the door.
If you choose Dee to hold off the enemies, you must activate the green and blue buttons to turn all red lights into green lights. You must do this before Dee runs out of health. There are several correct answers, but here are button combinations guaranteed to work (all button combinations go from left to right).
For the first set, press the first, fourth, and fifth green buttons at the top.
For the second set, press the second, fourth, and fifth green buttons at the top, then the second, third, and fourth blue buttons at the bottom.
Regardless of what you choose, you will enter the Bunker, and will need to fight off a Tribot. After the battle, investigate every part of the Bunker like you did with Graff previously. If you inspect the Door near the Tribots too many times, it will open and you will have to fight them all (though this is necessary if you want the Ad inside). You can punch the Furniture to get some of the items inside.
Speak to Dee after investigating everything, then head to Dr. Gherkin for an Interrogation. Choose the following responses:
- Gherkin noticed a change in the Tribots behavior this morning + The Tribots are exclusively attacking Brok
- Gherkin’s mission is to fix the Pipe-Pills + The fixed Pipe-Pills don’t work
- Is Dr. Gherkin part of the Government?! + Only Dr. Gherkin knows the signature required for the Pipe-Pills to work
- The Government is also called the Triangle
- The Government controls the Tribot updates + Dr. Gherkin is a member of the Government
- Dee’s life was ruined due to her journalism investigations + Government has total control over all forms of media
- A member of the Triangle ruined Dee’s life to silence her + A member of the Triangle sent the Tribots after Brok
- The Triangle judges prisoners + More and more prisoners are disappearing
- Sin is currently in jail + All prisoners are killed by the Triangle despite Dr. Gherkin’s votes
If you haven’t activated the Tribots yet, Dee will offer to deactivate them. You can still fight them if you wish. Whatever you choose, head inside after the robots are gone, then move the Furniture by interacting with it. You will uncover a Control Panel, as well as the Bunker’s final Ad between some of the middle buttons. Speak to Dr. Gherkin to release him, then speak with him again at the Control Panel. Speak to Dr. Gherkin again to learn that you need a power generator.
Enter Action Mode and destroy the Button near the Footscreen, grabbing the Little box/Battery inside. Use the Battery on Dr. Gherkin and you can leave the Bunker.
You then need to choose a plan to get inside the Police Department. Choose to infiltrate or fight (calling Wes isn’t an option).
If you infiltrate, use the Remote control to disable everything. Head right into the Interrogation Room and repeat the process. Go right again and you will reach the prison.
You will switch the Graff in the Sewers.
Sewers (Below)
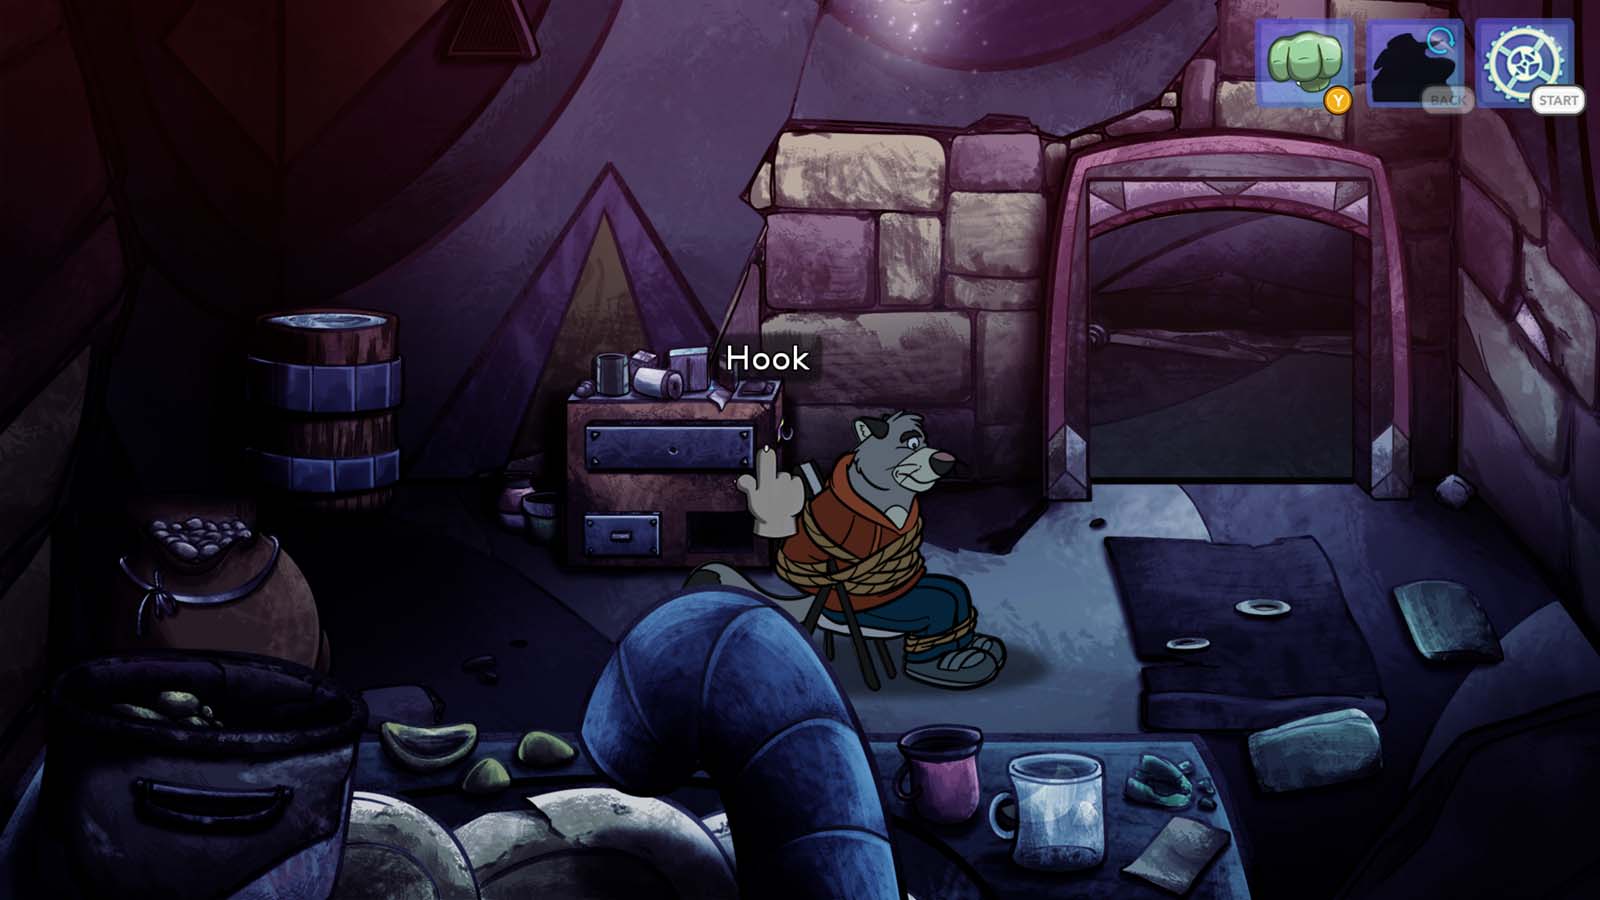
Move Graff’s chair to reach the Hook in the middle of the room. Slowly wear down the rope with the Hook, then choose whether you want to pretend you are still tied up or break free.
Check above the Cupboard to find an Ad between two containers, one of which is red. Head right and grab a Pipe Chunk from the open pipe. Watch the Squealer moving in front of the door, peek your head out and see where they are moving. When the coast is clear, head to the right room to find Ott. Use the Pipe Chunk to free Ott.
Check the Stuff north of Ott to get your inventory back. There is also an Ad east of the Stuff, but don’t go too far as there is a steep drop east of Ott’s cell. You should still have the Printed triangular prism that you can throw at the Window to knock out the first guard. When the second guard comes to check, throw your Screwdriver.
You can then rush towards the ladder to get out, but don’t forget to pick up the final Ad at the bottom of the ladder before you go. If you have been following along, that’s all the Ads in the game! You should get the Ads Fan achievement after picking it up.
Alternatively, you can do nothing and the Squad Leader will visit you. He will force you to make a choice between saving Ott and a group of civilians at a hospital. If you continue to do nothing, Ott will leave and Graff will stay behind. If you want the Canonical ending, this is what you want to happen.
World Map
You will take control of Brok on the World Map, who should head Home.
If you rescued the Tramp with the medicine, you will get the Tramp Saver achievement, as well as a Lucky Charm that will shield you from one fatal hit in each fight. It also carries over across playthroughs.
Back home, call everyone but nothing will work. You then resolve to look for someone who could find Graff. Now is the time you can go wherever you like to prepare for the end of the game. You can train at Shay’s Garage, buy supplies at Drumer Street, etc.
If you go to Drumer Street, the Pharmacy is locked behind a citizen code. Brok’s citizen code is 368745.
Go to Hacker Back Street when you are ready to continue.
Hacker Back Street
Talk to The Gloom to learn that Graff was there. If RJ is alive, speaking to him will accomplish the same thing. Head east to speak with Dee, where you must choose between saving the Slums and Graff. If RJ is alive and friendly with you, you automatically choose Dee while he picks Graff.
Saving Graff
If you choose to save Graff, watch the scenes and you will have to fight robots for 200 seconds. Graff will join you, and you are able to use food items on him in battle. It’s okay if Graff gets knocked out; Brok is the one who needs to stay alive for 200 seconds.
[[Brok Robot Fights]]
When you survive, you unlock the Fight Together ending.
Save the Slums
After the scenes play, you will interrogate Wes. Choose the following responses:
- Dee is married to Sin Silver + Wes has a folder named D. Silver
- A police investigator had an Aircar accident 5 years ago + Wes was the investigator on Lia’s case 5 years ago
- Wes never pronounces Brok’s name correctly + Wes suffers from occasional blanks and uses inappropriate words
- Chief of police suddenly stopped drawing identikits + Incomprehensible drawings in Wes’ office
- Wes survived a serious Aircar accident 5 years ago + Wes has mental problems
- Ais have no artistic abilities + Wes cannot draw anymore?
- Wes has sometimes AI-like behaviors + Wes developed mental problems after his Aircar accident
- Only old model bots can cause a circuit overload + In Wes’ office, a socket is burnt down
- I’ve already met another bot even more advanced than the Director + An old model bot connected recently in Wes’s office
You can ask Wes to show his rear or leave it alone. Asking him to show his rear gets you the Rupture ending. Leaving it alone gets you the Broken Detective ending.
Canonical Ending
If RJ handled Graff, you get to go straight to Dee and do the exact same situation with the Save the Slums ending. The only difference is that Wes fights you with a group of robots, and you must take him down with Dee. Wes only fights differently because he can shoot a freezing laser that prevents you from defending until you button mash your way out. Otherwise, he can easily be defeated like the other robots. You can also use the Remote control to defeat him instantly if he is standing in a puddle.
You will then have to fight a Giant Shell on your own. It has powerful attacks and must be crippled from the Legs, to the Arms, and then finally the Shell itself. Dodge frequently and make sure you are always looking out for incoming attacks. You can also wait for the Giant Shell to step in a puddle, then use the Remote control until it falls.
After the battle, choose whatever options you like. If Graff has a high affection for you, you will end up with the Slumer ending. You will also get another ending if Brok has constantly been aggressive (almost always chose to fight). If everything was normal (Graff has medium-low affection, Brok hasn’t always been violent), watch the scenes and you will have an Interrogation. Choose the following options:
- Shay is never worried I could kick the bucket + In the dark alley, I felt like coming back from the dead…?
- Shay seems stressed out and will be unavailable all day + Shay refused to tell me what’s under the blanket in the garage
- Did Shay save me in the dark alley? + Open this when truly desperate envelope
- Picture of Brok in a scene four years before it could happen + I’m held responsible for the Squealer’s banishment
- Impossible but…Shay can predict the future?… + Impossible but…Did this scene four years ago really happened?
- Shay loves to bother me with spacetime theories + Elements Shay asked me to retrieve include a high precision timer
- Shay’s time obsession must have something to do with her invention + Are we reliving the same events with changes?
- Egg-shaped machine under the blanket in the garage + The scientific symbol for loops is an egg
- Shay’s invention can loop? + Shay’s invention can alter events?!…
At Shay’s Garage, use the words Time, Erases, Memory. Interact with the Blanket on your left. Place your Pendant from your inventory into the slot, then interact with the Timeline on the right. When you regain control, head to the right.
Alternatively, you can destroy the machine to get the Cynical ending. Leave before going into the machine for the Out of Loop ending. You can also head east into the Virtual Arena room and look at the golden drawer. Enter 35298 and press the central button to get the Diary ending.
Now that you’ve reached the end of BROK the InvestiGator, let us know what you think about the game and if this guide proved useful.